Developing an app
In this guide, you will learn how to develop an app using the VTEX IO platform. You will be presented with some core concepts of the platform and guided through the necessary steps to have a running application in VTEX IO.
VTEX IO is a cloud-native development platform that allows you to develop web storefronts, custom admin apps, and backend integrations for VTEX.
Before you begin
Make sure to install the VTEX IO CLI (Command Line Interface) in your machine.
Any development in VTEX IO begins and ends with our CLI (Command Line Interface). VTEX IO's CLI allows you to perform any action necessary to your app development process, such as linking local files to the VTEX platform, managing workspaces, and releasing new app versions.
Instructions
Step 1 - Creating an app
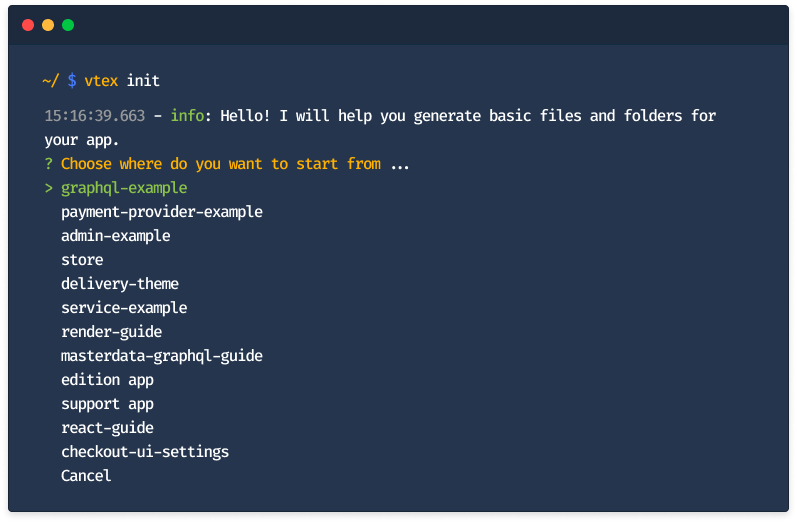
When developing an app in VTEX IO, you can start one from scratch or use one of our boilerplates. Our boilerplates contain implementation examples and all the initial settings needed for you to start developing an app. Take a look at the available boilerplates:
| Boilerplate name | Description |
|---|---|
graphql-example | Implements a VTEX IO service with GraphQL resolvers. |
payment-provider-example | Implements a Payment-Provider protocol |
admin-example | Implements an admin app that adds a menu button to the admin sidebar and navigation via parameter example. |
store | Implements the basic structure of a VTEX Store Framework storefront. |
service-example | Implements a VTEX IO service with HTTP route handlers. |
render-guide | Guide repository for an app with all common patterns in app development, such as pagination and editing entities. |
edition app | Creates an an Edition app. |
react-guide | Creates a frontend app with React. See… react app. |
checkout-ui-settings | Guide repository for the Checkout UI Settings app, responsible for A/B testing in your store's scripts, in addition to the possibility of quick rollbacks for old scripts, i.e., scripts of older Checkout UI Settings app's versions. |
service-worker-example | Guide repository for apps that enable service-worker builder to expose Service Worker. |
admin-ui-example | Guide repository for Admin apps for the admin v4 with the admin-ui design system. |
Cloning the boilerplate repository to your local files
-
Open the terminal and clone the boilerplate you desire by running the following command:
_10vtex init -
Select the boilerplate that you want.
-
A new folder will be created in your machine, and to access it run
cd {folder-name}in your terminal.Change the name in the curly brackets to the boilerplate that you choose, for example
cd graphql-example
Editing the manifest.json file
Once you have cloned the boilerplate repository into your local files, let's learn how to make it your own by editing the manifest.json file.
The
manifest.jsonfile saves essential information about a VTEX IO app, such as its name, version, vendor, description, dependencies, etc. It is the core communication of your app with the VTEX IO platform. For more information, see the Manifest article.
-
Open the boilerplate project you started in the previous step in any code editor of your choice.
-
Open the
manifest.jsonfile and look at the primary information that it provides, such as in the Manifest article. -
Change the following fields according to your scenario:
- Replace the value of the
namefield with the name of your app. - Replace the value of the
vendorfield with the VTEX account you are using for development. This should be the name of the VTEX account resposible for the app development, maintenance, and distribution. - Replace the value of the
versionfield with the app version, according to the Semantic Versioning 2.0.0. - Replace the value of the
titlefield with the app distribution name. This name will be displayed on the Apps section in the admin and on the VTEX App Store. - Replace the value of the
descriptionfield with a brief description of the app's functionality.
- Replace the value of the
-
Go to the
buildersprop and add the ones that make sense for your app project.A Builder defines the nature of an app. If you are developing a frontend app, you'll probably want to use the
reactbuilder. Instead, if you're developing a backend integration, you'll probably want to use thenodeordotnetbuilder. In summary, a builder is responsible for processing, validating, and forwarding a given block of code to a runtime or a framework capable of executing it. Notice that an app can have as many builders as you want. That allows bundling front and backend development and delivering your solution with just one package. Please refer to the Builders article for more information. -
Install the dependencies and peer dependencies necessary for your app to properly work by relying on VTEX IO apps and other apps, respectively.
-
Save your changes.
So far, you have created an app and made it your own. Now, it is time to start making changes to your code and use a development server to see your changes live.
Step 2 - Starting the app development
In this step, you will create a development workspace to perform the necessary changes in your app without worrying about the app's live version and see your changes in real-time by sending the app’s changes to our cloud platform.
Logging in to your VTEX account
This step will guarantee that your VTEX account is in sync with the VTEX IO development platform and allow you to manage the development and publishing of the app.
-
Once installed the VTEX IO CLI, log in to your VTEX account with the following command:
_10vtex login {accountName}Replace
{accountName}with the name of your VTEX account. -
A browser window will open and ask for your credentials.
-
Once logged in, run the
vtex whoamicommand to show which account and workspace the VTEX IO CLI is using.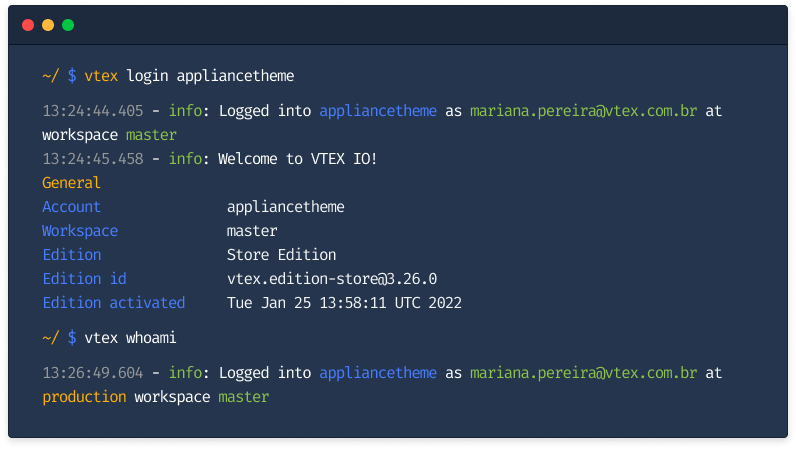
Creating a development workspace
When using VTEX IO, any development must happen in a workspace.
Workspaces are environments isolated from one another. They can be understood as different versions of the same VTEX account. In practice, changes performed in a particular workspace do not affect your app’s live version or other developers' work. Refer to the Workspace article for more information.
To start developing, you have to create a Development workspace in your VTEX account. When you log in, you automatically use the Master workspace, which means you are in the version available to the end-user.
-
Run the
vtex usecommand in your terminal as shown below:_10vtex use {exampleName}This changes your VTEX account to a Developer workspace called
exampleName( ️ replace it with the name of your choice), creating it from scratch if it does not already exist.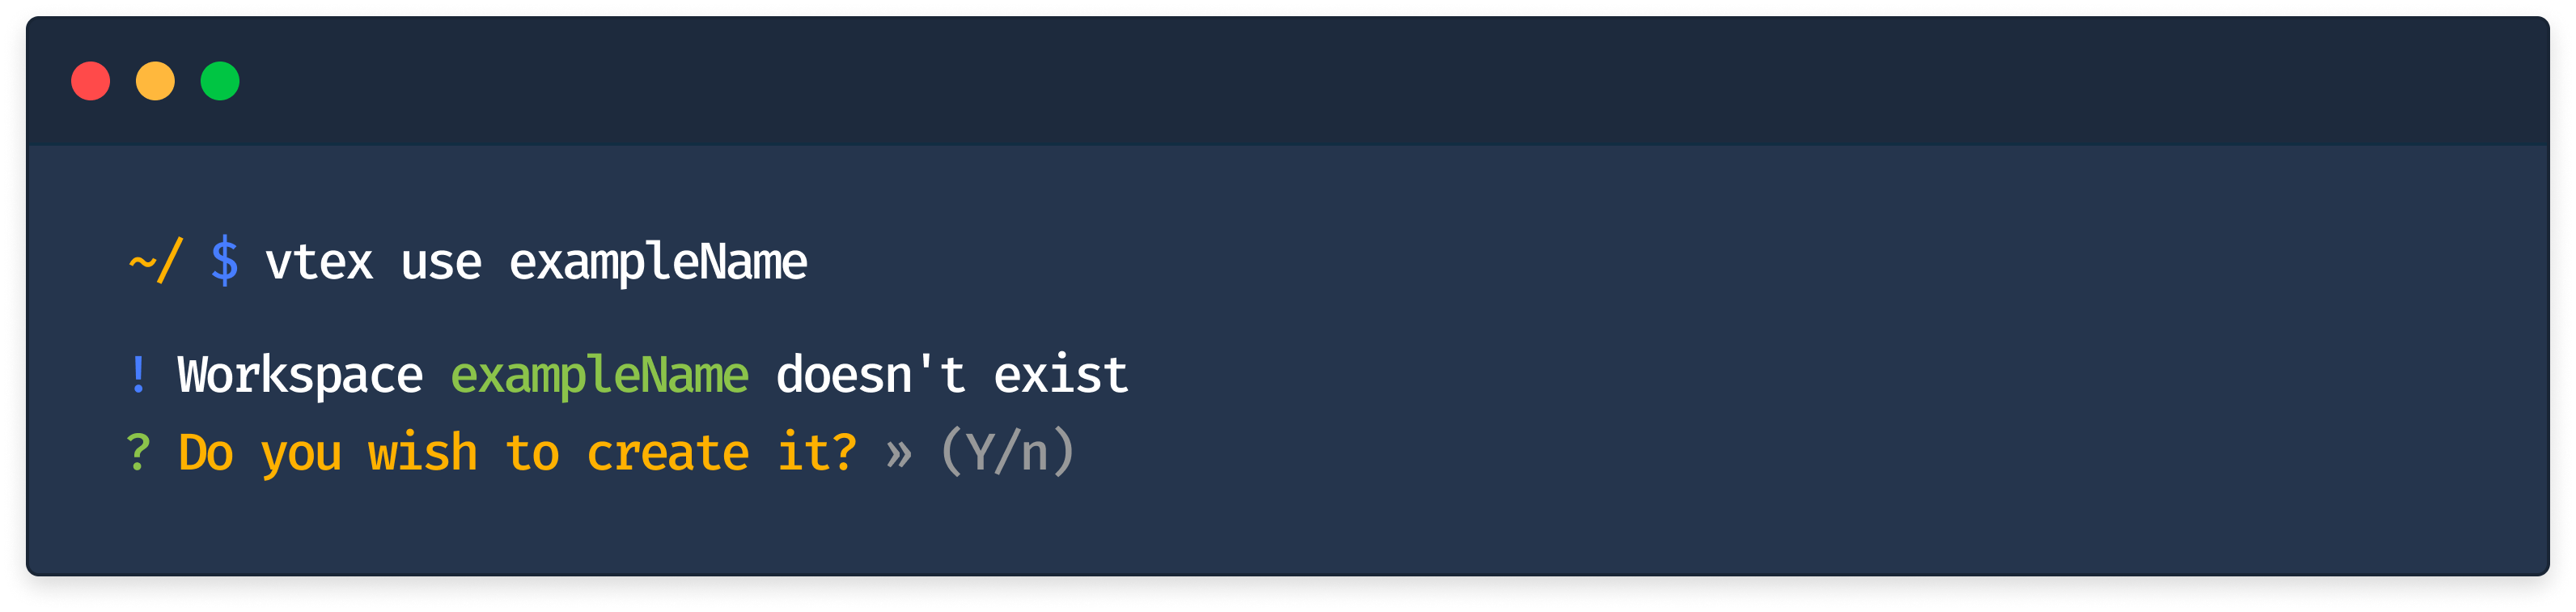
-
Type
Y, and a Development workspace will be created under your chosen name.
So far, you have created an app and have a Development workspace to perform any changes in your code. In the following section, you will learn how to sync the changes performed in your app to our cloud development environment by linking the app.
Starting a development server
Now that you have your app up and running on your machine, it is time to send all the changes you have performed locally so far to the cloud and reflect them in the workspace in which you are working. In other words, you will be able to see your changes in real-time by accessing the account you are logged in using the workspace you are using to develop.
-
Run
vtex whoamiin your terminal and make sure you are logged into the desired account using the development workspace you have created. -
In the terminal, access the app's directory in your local files.
-
Once in the accurate directory, type the following command in the terminal:
_10vtex link
After that, every change can be seen in your browser in real-time, and you can access it by running vtex browse in your terminal.
Next steps
Now that you have created your app and it is already live in your development workspace, here are some options of what you can do next:
- Manage application logs: keep track of errors, warnings, and informative events with VTEX IO logging service.
- Run A/B tests: Optimize your store's conversion rates by running A/B tests.
- Release a new app version: Release a new app version If you’re sure about all the code changes that you’ve done to your app in a development workspace.
- Create a Production workspace: Create a Production workspace to test in a user traffic environment the changes you performed in a development workspace Once you are sure of your changes performed in the Development workspace with traffic.
- Promote a workspace to Master: Promoting a workspace to Master marks the final step to make an app publicly available to end-users.
Developing for the VTEX App Store
If you are developing an app that will be distributed to the VTEX App Store make sure to check the following guidelines:
- Engineering Guidelines - The Engineering guidelines are your go-to guides to learn the coding standards to develop an app using the VTEX IO infrastructure, such as scalability, performance, security and data privacy.
- User experience guidelines - Learn how you can design an app to meet the VTEX App Store requirements.
- Business Guidelines - The Business Guidelines are divided in two:
- App monetization: Learn the types of business models for your app.
- Marketing assets: Learn how to prepare the assets to market the app in the VTEX App Store.