Running A/B tests
In this guide, you will learn how to manage an A/B test, covering steps from running the test to providing the results.
A/B testing involves comparing traffic between two store workspaces and helps you determine which performs better regarding user engagement and conversions. To run an A/B test, you can use the VTEX IO CLI or the A/B Tester app.
A/B tests have a maximum duration of 30 days from their start date. After this period, tests may end automatically without notice.
Before you begin
Make sure you have VTEX IO CLI installed on your machine.
Running A/B tests via Admin
The A/B Tester app allows you to run A/B tests via the Admin. To use the app, follow these steps:
-
Open the terminal and log in to the desired account.
_10vtex login {accountName}Replace the values between curly brackets based on your account name.
-
Install the A/B Tester app in the
masterworkspace by running:_10vtex use master_10vtex install vtex.ab-tester -
Type
yto confirm that you want to install the app in themasterworkspace. -
Install the A/B Tester app in the
masterworkspace by running the following:_10vtex install vtexarg.abtester -
Type
yto confirm the installation. -
Now, in the VTEX Admin, go to Extensions Hub > Installed Apps > AB Tester.
-
See the A/B Tester Admin app documentation to create A/B tests, compare and conclude tests.
Running A/B tests via VTEX IO CLI
Step 1 - Enabling A/B testing
-
Open the terminal and log in to the desired account. Remember to replace the values between curly brackets based on your account name.
_10vtex login {accountName}Replace the values between curly brackets based on your account name.
-
Create and switch to a Production workspace by running the following command:
_10vtex use {workspaceName} --production -
Perform the changes you want to test in the production workspace you are using, such as installing or editing an app.
If your store uses the Checkout UI Custom app, you must first publish its configurations on your new production workspace. Otherwise, you might experience undesired consequences, such as losing the Checkout custom JavaScript code and styles.
-
Switch to the
masterworkspace._10vtex use master -
Install the VTEX A/B tester app in the
masterworkspace to enable A/B testing on your store website by running:_10vtex install vtex.ab-testerYou can run
vtex lsto ensure you have successfully installedvtex.ab-testerin themasterworkspace. -
Run the following command in the
masterworkspace._10vtex workspace abtest start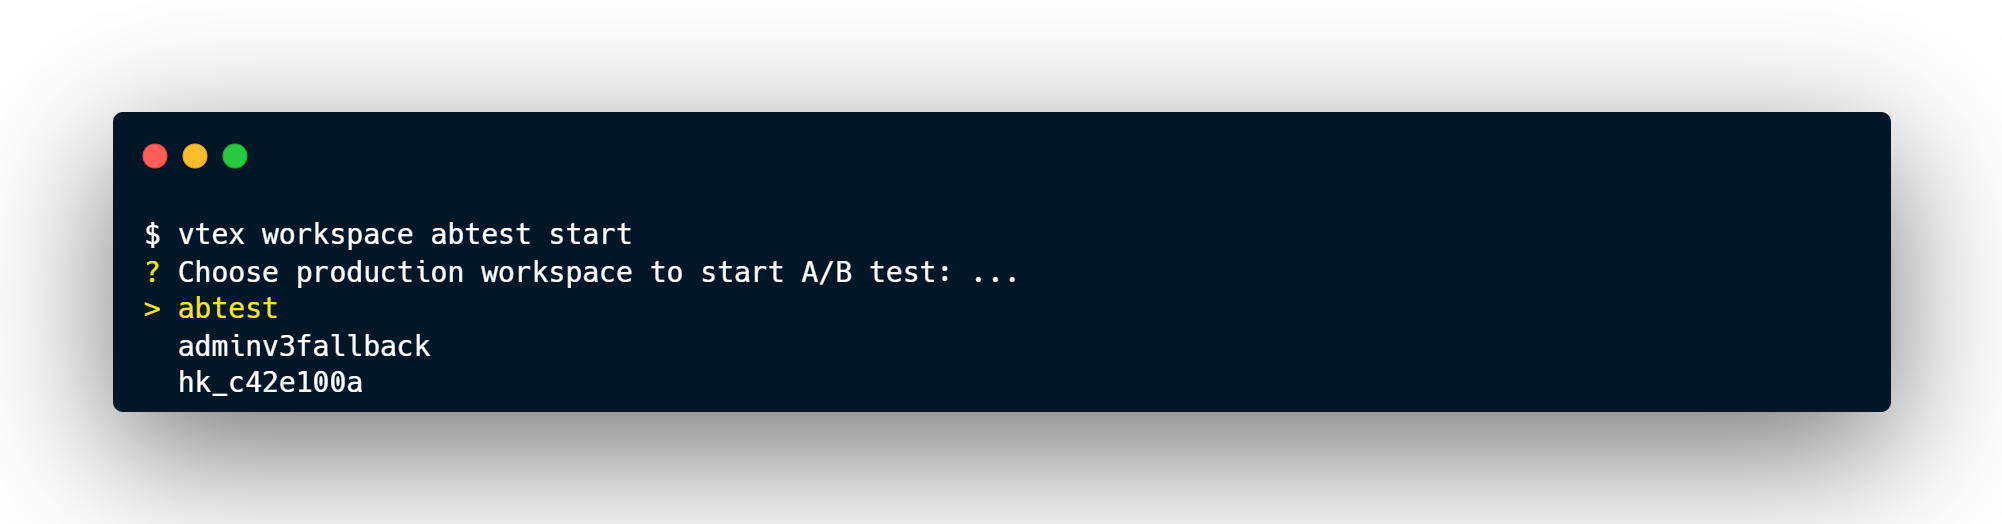
-
Select the production workspace you want to use for comparison with the
masterand agree to proceed.
Step 2 - Configuring the traffic and time
By agreeing to proceed with the test, you need to answer the following two questions:
What's the proportion of traffic initially directed to the master workspace?
You must answer this question with any whole number between 0 and 10000. For example, if you answer 9000, you will set 90% of the traffic to the master workspace.
To promote the changes from your production workspace in the safest way possible, we strongly recommend leaving 90% of traffic dedicated to the
masterand the other 10% to the production workspace being tested.
What's the amount of time respecting the restriction?
This is the time (in hours) when the traffic proportion stated in the previous question remains constant. After this period, the A/B testing system automatically balances the traffic proportions, sending more traffic to the best-performing workspace. There are two possible answers to this question:
| Option | Description |
|---|---|
Answer 0 to automatically proceed with the A/B test. | In this case, VTEX IO will automatically split your website traffic between workspaces, routing 50% of your store traffic to the master and the other 50% to the production workspace being tested.Following that, the platform will automatically balance traffic every three minutes based on the conversion rates. This means that traffic will be gradually routed from the workspace with the lowest conversion rate to the workspace with the highest conversion rate. The test doesn't conclude independently. Evaluate the test results daily. |
| Answer with the number of hours you want to keep constant the proportion of traffic previously specified. | During peak operational periods, it's critical for the test to extract as much data as possible. At the same time, the test shouldn't overextend and end up harming users navigating the workspace with the poorest performance. |
You can run many A/B tests simultaneously by comparing two or more workspaces to the master individually. However, if you set up the traffic manually, the A/B test will distribute the traffic evenly among all production workspaces being A/B tested. For example, suppose you started an A/B test between workspace A and master, routing 90% of traffic to the former and 10% to the latter. If you run a new A/B test between workspace B and the master, each production workspace, A and B, will only receive 5% of the store traffic.
When a user session begins, their assigned workspace is determined by a cookie that lasts for 24 hours. During this period, the user will remain in the same workspace, regardless of traffic redistribution. After 24 hours, when a new session starts, the user may be randomly assigned to either workspace, which could be the same as before or a different one.
Step 3 - Interpreting the test results
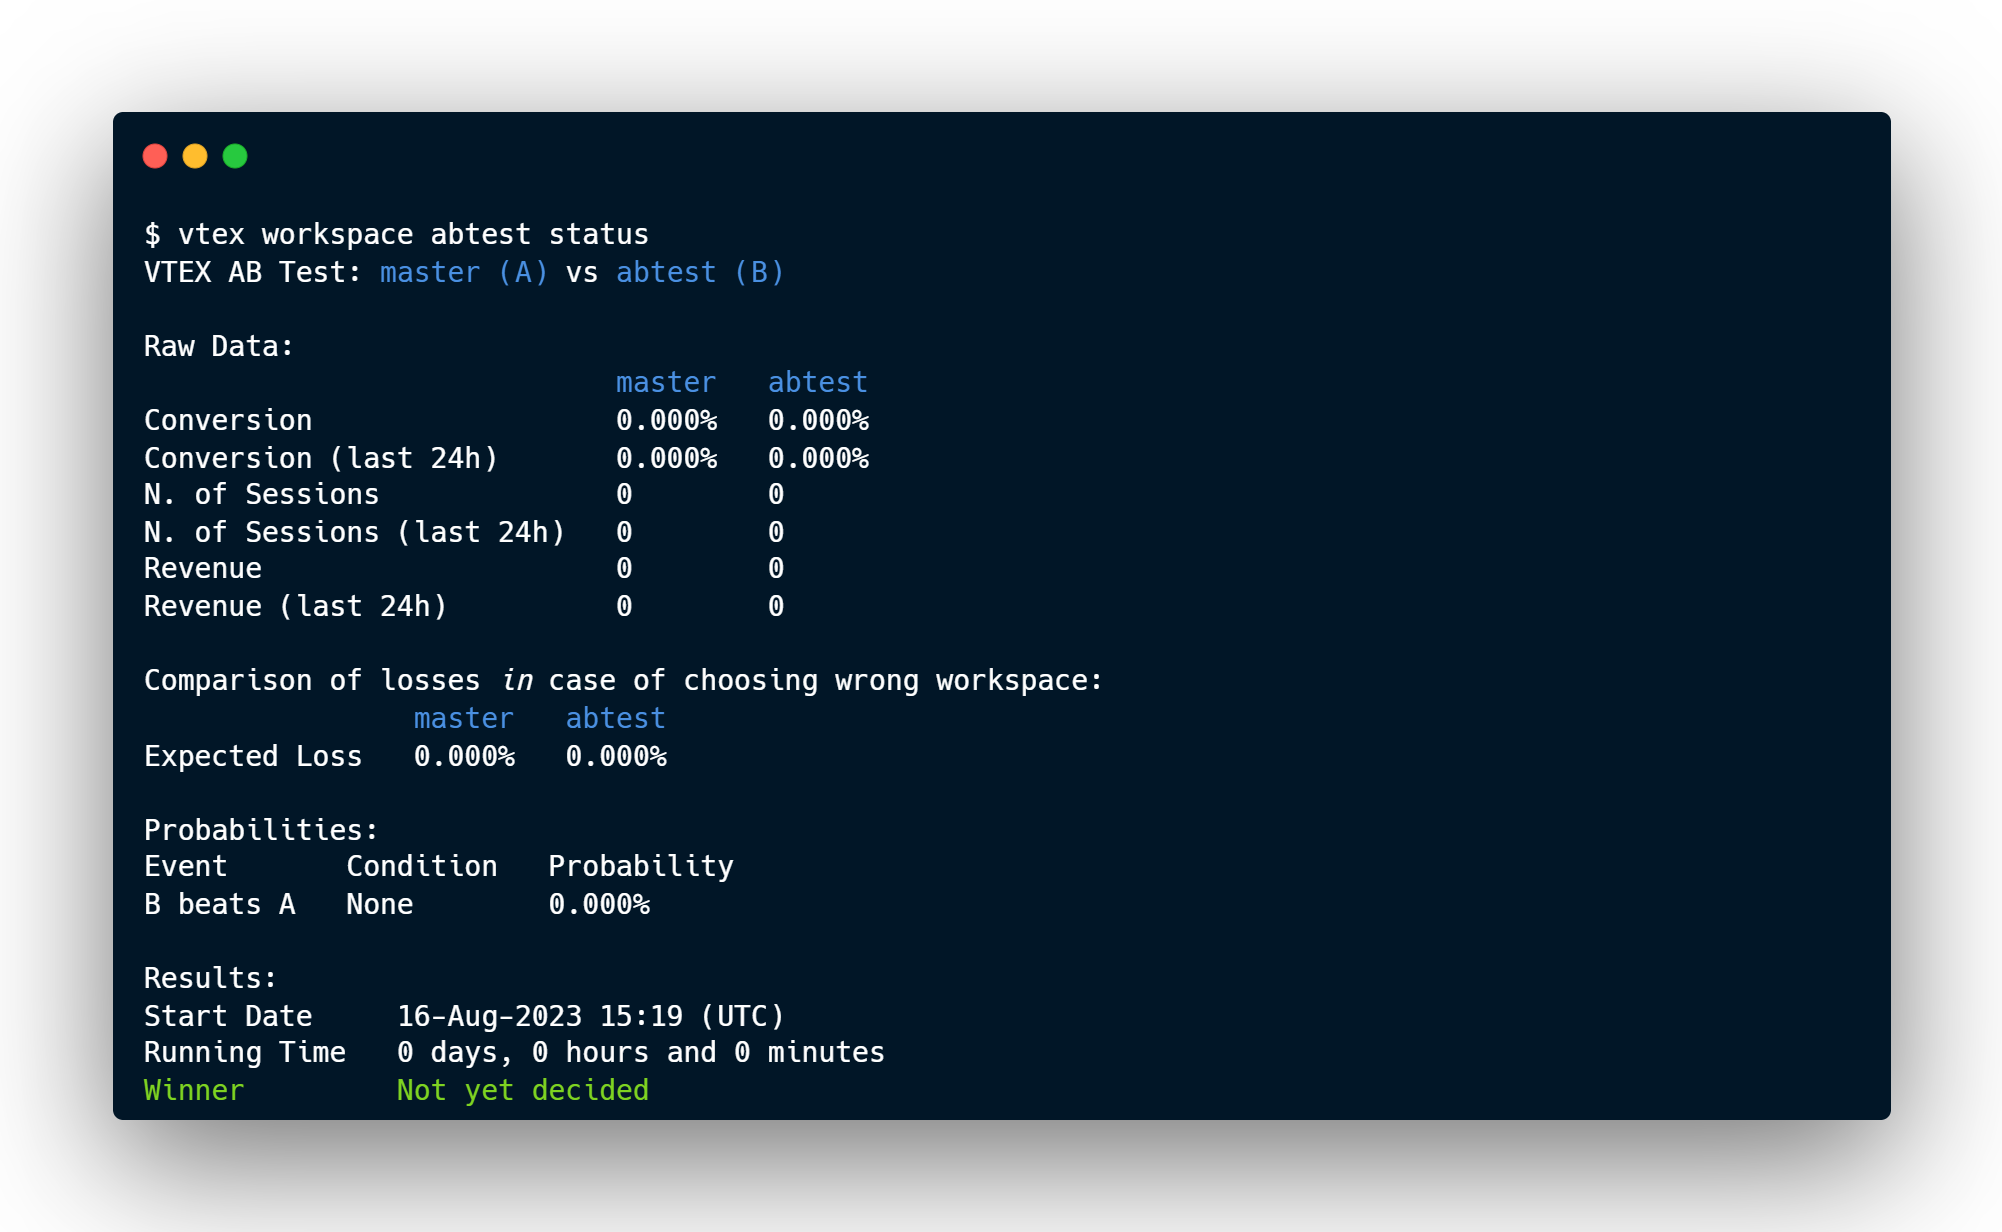
Any time during the A/B test, you can monitor the live results by executing the following command:
_10vtex workspace abtest status
You can update the workspaces used in the A/B test if necessary. However, fewer changes to these workspaces will lead to more accurate results.
Before concluding your A/B test, it's essential to understand the comparative and final results of the two workspaces. The following presents the metrics available for both results:
Comparative results
| Metric | Description |
|---|---|
| Conversion | Conversion rate percentage displayed by each workspace during the test. |
| Expected Loss | Anticipated percentage of conversion loss for the store if the lower conversion rate workspace is selected as the winner (based on Conversion results). |
| N. of Sessions | Total number of sessions for each workspace since the beginning of the test. |
| N. of Sessions (last 24hrs) | Number of sessions for each workspace during the test in the past 24 hours. |
| Revenue | Total revenue placed by users navigating the store version associated with each workspace since the beginning of the test (expressed in the store's native currency). |
| Revenue (last 24 hs) | Total revenue placed by users navigating the store version associated with each workspace in the past 24 hours during the test (expressed in the store's native currency). |
Final results
| Metric | Description |
|---|---|
| Start Date | Date and time for the test to start. |
| Running Time | Test duration. |
| Probability B beats A | Probability, in percentage points, that the production workspace is better for your store than the current master workspace. This calculation is based on session and completed sales counts. If this metric is greater than 10%, the production workspace can become the winner. |
| Winner | Workspace you selected as the winner. |
The main results of the A/B test are aimed at scenarios where the platform automatically directs store traffic. Although A/B testing can and should be used even in cases where traffic is directed manually, the numbers behind each result reflect an automatic segmentation depending on each workspace experience.
Validating the winner workspace
The best way to validate your A/B test workspace winner is to set a maximum conversion loss value based on the size of your store operation.
For example, when starting your test, you can set a maximum conversion loss of 0,0001%. Then, when either workspace achieves an Expect Loss result greater than 0,0001%, you should end the test and declare a winner.
Step 4 - Finishing the A/B test
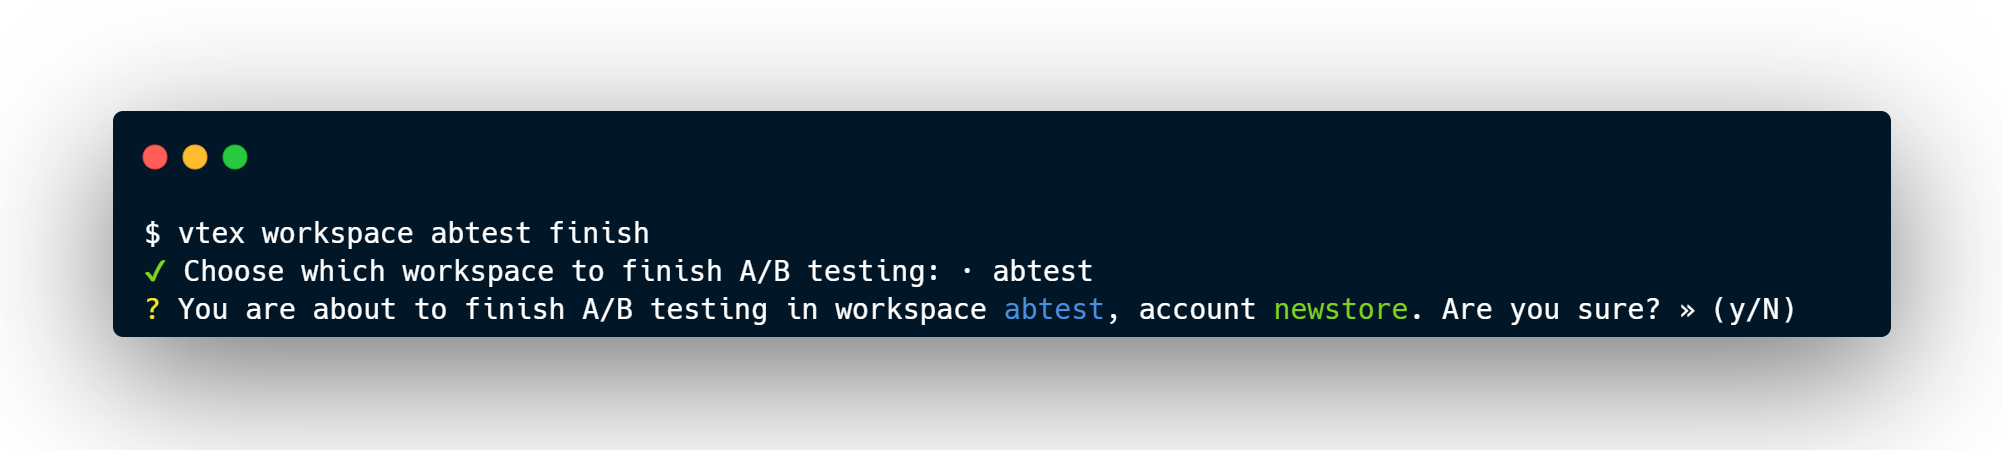
If your test has already reached the time frame you have manually set, or if you've already detected a winner during Step 3, run the following command in master to conclude the test:
_10vtex workspace abtest finish
If you've manually set a predefined time frame to run your A/B test, monitor it throughout the entire period. Although the platform automatically redistributes traffic according to how each workspace behaves after the set time frame, overseeing the test is fundamental to its success.
This command displays a list of all workspaces tested by the vtex.ab-tester app in the master environment. Choose the workspace that you intend to finish. For example:
Remember to save any relevant data using the
vtex workspace abtest finishcommand before it ends automatically in 30 days – A/B test data can't be retrieved otherwise. You can access data from ongoing tests with thevtex workspace abtest statuscommand.
After concluding the A/B test, follow the next step to promote the workspace to master.
Step 5 - Promoting the production workspace to master
In Step 4, you only ended the test on the selected workspace. Now, you need to promote it to master by following the steps below.
-
Change to the production workspace to be promoted.
You must be logged in to your VTEX account.
_10vtex use {workspaceName}Replace the values between curly brackets based on your workspace name.
-
Promote the workspace being used.
_10vtex workspace promote
Now, all changes made in production are available in the master workspace.