FastStore WebOps - Dashboard
Once you create your FastStore project, or are already working on customizing it, you can use the WebOps dashboard to view website deployments and performance.
The WebOps dashboard provides an overview of website builds and deploy previews and offers suggestions to improve storefront performance based on Lighthouse scores.
To access the WebOps dashboard, go to Storefront > FastStore WebOps in the VTEX Admin. The dashboard has four tabs: Overview, Deploys, Integrations, and Settings.
Overview
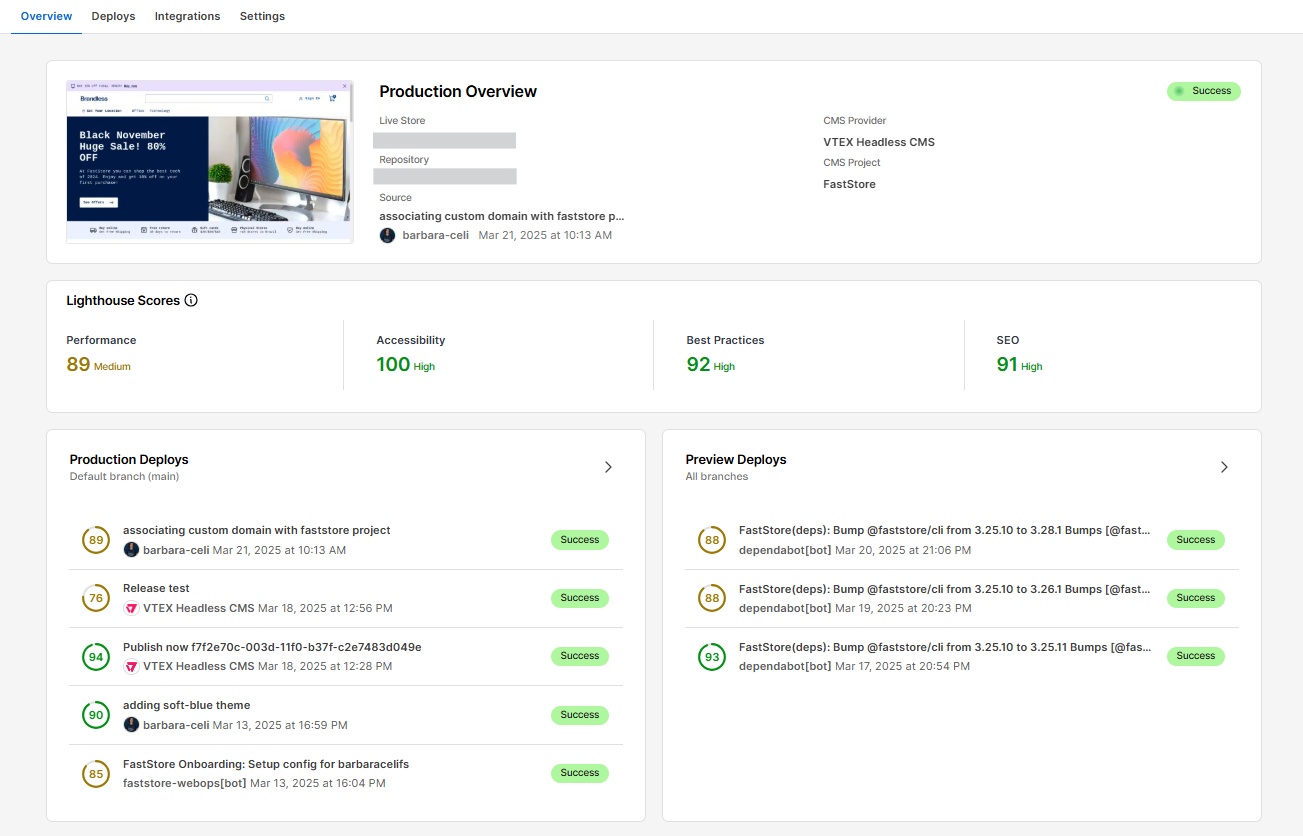
The Overview tab provides a quick snapshot of key website details, including the live store URL, CMS information, and latest deploy.
Production overview
The Production overview section provides the following information about the latest live store deploy:
| Field | Description |
|---|---|
| Live store | URL of your production environment, accessible to shoppers. |
| Repository | GitHub repository associated with the project. |
| Source | Commit for the current deployment, including date, time, and author. |
| CMS provider | Link to CMS. |
| CMS project | Link to the FastStore project in CMS. |
Live deployment statuses
This section also displays the status of the live deployment:
- Success: The commit was deployed to the production environment and is live.
- Queued: The commit is next in line to be deployed.
- In progress: The commit is currently being deployed.
- Failed: The deployment failed. You can find more details by clicking the link below the
Deploybutton.
Lighthouse results
When your store goes live (in production), ensuring optimal performance and a good user experience is crucial. The Lighthouse scores section offers insights into four key areas measured by Lighthouse, helping you understand their impact on store performance.
- Performance: Indicates how fast your pages load.
- Accessibility: Reflects how usable your pages are for people with disabilities.
- Best practices: Indicates how well your pages adhere to coding best practices.
- SEO: Reflects how well your pages are optimized for search engines.
These scores are based on the pages defined for testing in the Integrations tab.
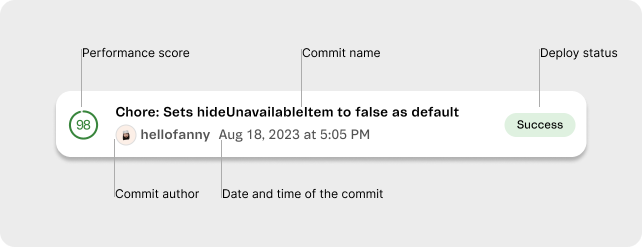
Production deploys
This section lists the recent deploys to your production store. Each item on the list is composed of the following:
For a complete list of all store deployments and their details, see the Deploys tab.
Preview deploys
This section lists all the deploy previews created for GitHub branches in your project repository. These previews are automatically available for each pull request opened in its corresponding branch. You can configure which branches generate preview deploys in the Integrations tab.
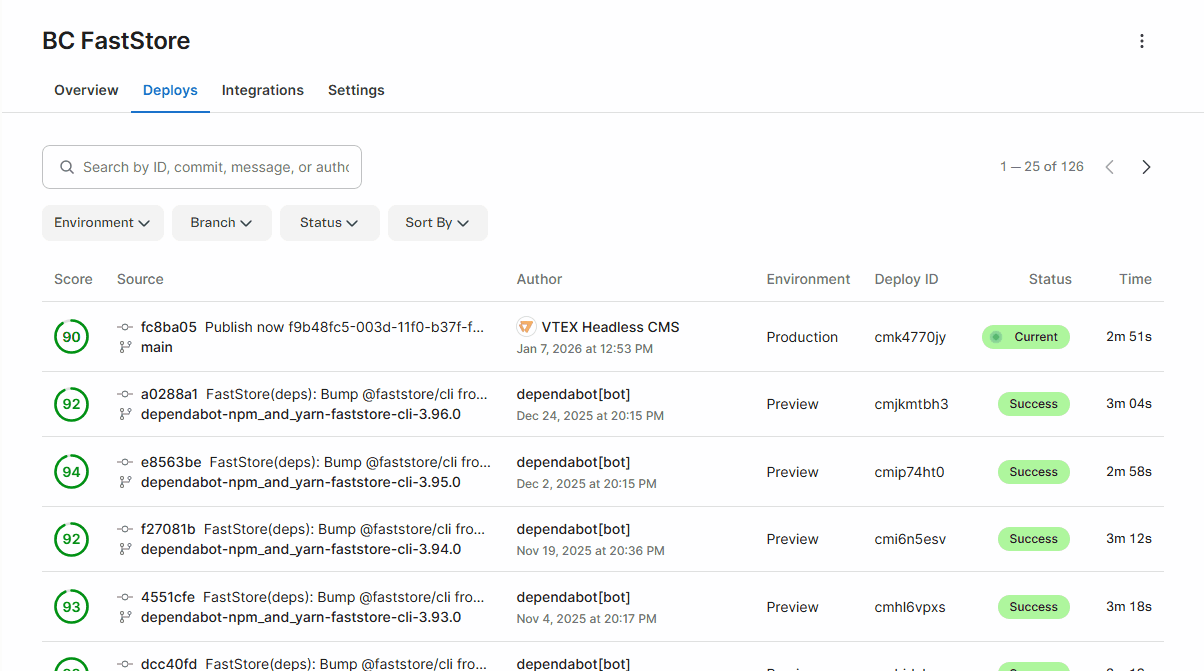
Deploys
The Deploys tab provides insights into store deployments, including their status (success, failed, etc.). The table below summarizes the key features of the Deploys page.

| Feature | Description |
|---|---|
| 1 - Search bar | Allows you to search by deploy ID, commit, message, or author. |
| 2 - Pagination | Allows you to navigate through pages of deployment data. |
| 3 - Environment | Filters deployments by environment:
|
| 4 - Branch | Filters deployments by GitHub branches. |
| 5 - Status | Filters deploy status:
|
| 6 - Sort by | Filters deployments by Latest first or Oldest First. |
| 7 - Deployments table | Lists all store deployments with the following information:
|
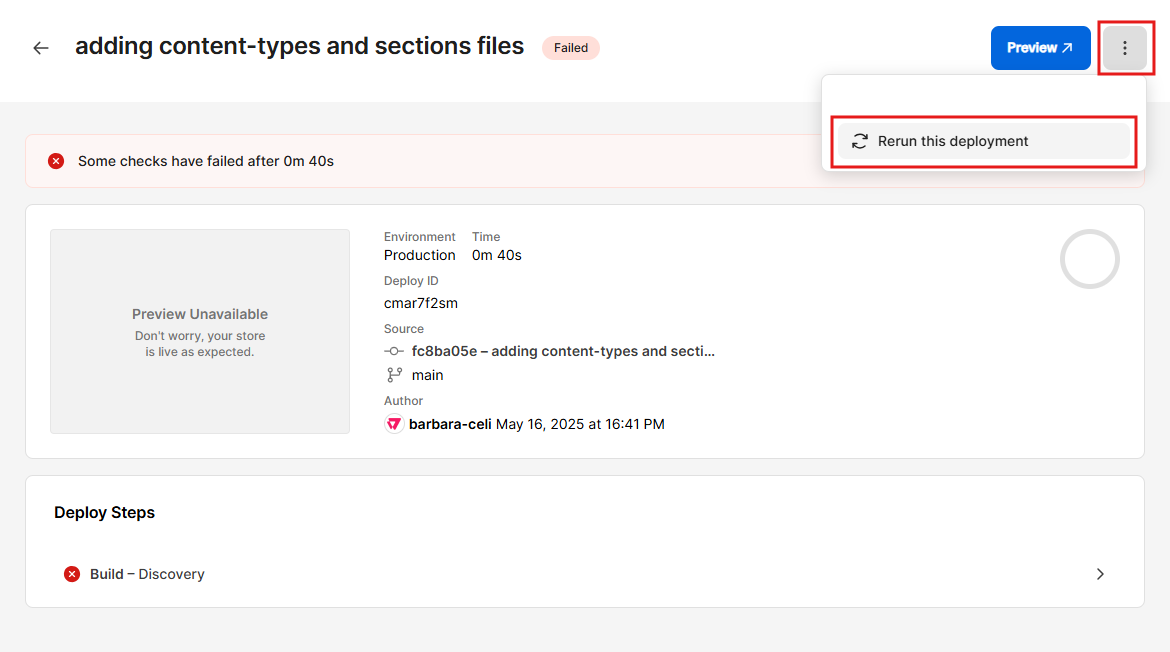
Deployment details
For more information, click any entry in the deploy table.
In the Deploy Steps section, select a step (example: Build - Discovery) to view logs. The logs show on the right and help diagnose failed deployments.
Rerunning a build
If a deploy fails due to issues unrelated to your code, such as environment variables or temporary network problems, you can rerun the build job directly in WebOps without pushing a new commit to the repository. To do so, follow the instructions below:
- Fix the related issue, if needed.
- In the Deploys tab, click the entry you want to redeploy.
- In the top-right corner of the page, click
⋮, then click Rerun this deployment.
If the logs indicate problems in your code (for example, syntax errors and failing tests), update the code in your local environment and push a new commit. WebOps will automatically trigger a new deploy for that commit.
Integrations
The Integrations tab allows you to configure branch settings and store pages for Lighthouse tests. The tab contains the following sections:
- Git Provider: Configures the GitHub organization and repository connected to your project.
- Production branch: Configures which Git branch generates production builds for your account.
- Preview branches: Controls which branches generate preview deploys.
- Lighthouse scores: Configures store pages for Lighthouse testing.
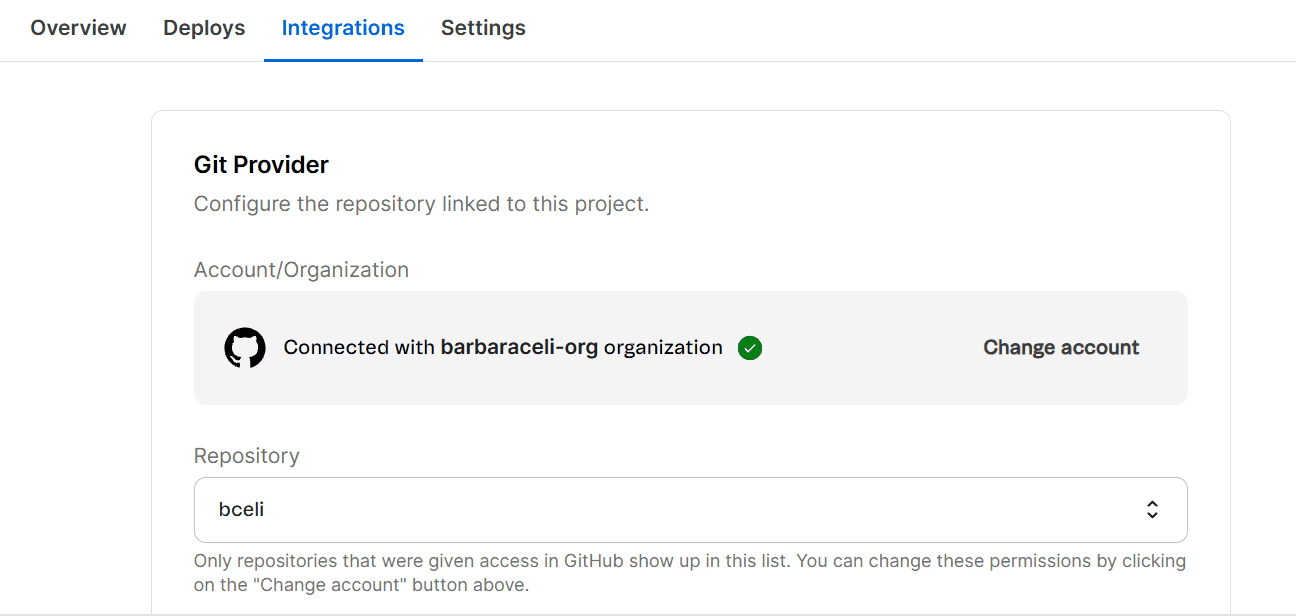
Git Provider
The Git Provider section lets you configure the GitHub organization and repository associated with your FastStore project. From this section, you can move your project to a different organization or to a different repository within the same organization. For detailed instructions, see Moving your FastStore project to a new GitHub repository.
Production branch
The Production branch section lets you configure which Git branch triggers production builds for your account.
Preview branches
The Preview branches section allows you to control which branches generate preview deploys by including or excluding patterns.
Rules
In the Rules subsection, you can manage your rules by editing or removing them.
For detailed instructions on branch configuration, see the guide Configuring production and preview branches in WebOps.
Lighthouse scores
The Lighthouse scores section allows you to configure store pages for Lighthouse testing. You can specify the URLs for a product listing page (PLP) and a product details page (PDP) to run automatic Lighthouse score testing during deployments, ensuring a consistent testing experience.
To set the pages you want to test with Lighthouse, follow these steps:
- In the Path for a PLP field, enter the category slug defined in the Catalog.
- In the Path for a PDP field, enter the slug for the specific PDP you want to test.
- Click
Save.
Once you've set the pages for testing and after a new deploy, go to the Overview tab and access the Lighthouse scores section to check the scores for those pages.
Settings
The Settings tab is where you manage the following configurations:
- Node.js version: Chooses which Node.js release WebOps uses for storefront builds.
- Production domain: Sets the primary URL customers use to access the live store.
- Password protection: Restricts access to preview environments and production domains with password authentication.
- Variables and secrets: Stores and allows secure management of sensitive information, such as API keys and passwords, required during FastStore deployment.
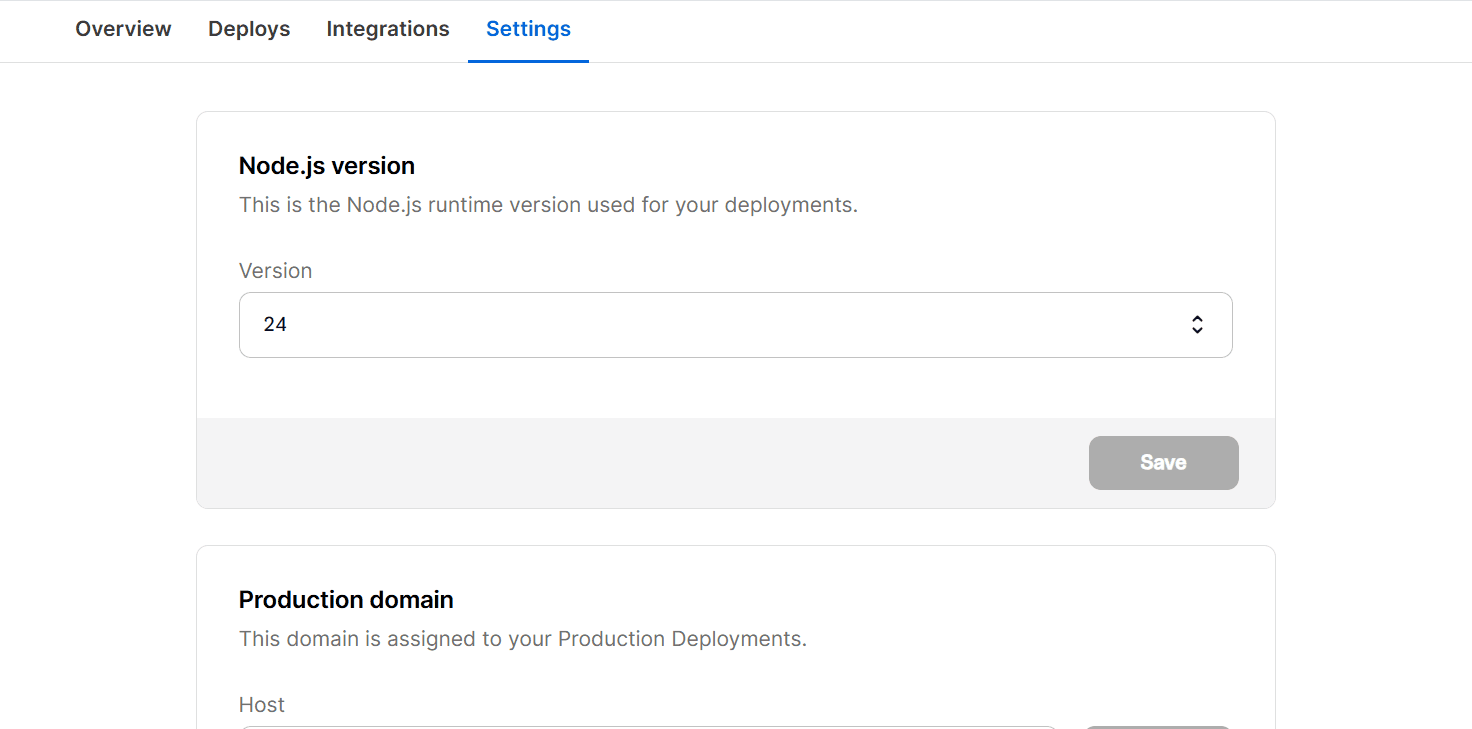
Node.js version
The Node.js version configuration specifies the Node.js runtime version WebOps uses when building your storefront. It doesn't change the Node.js version on your local machine.
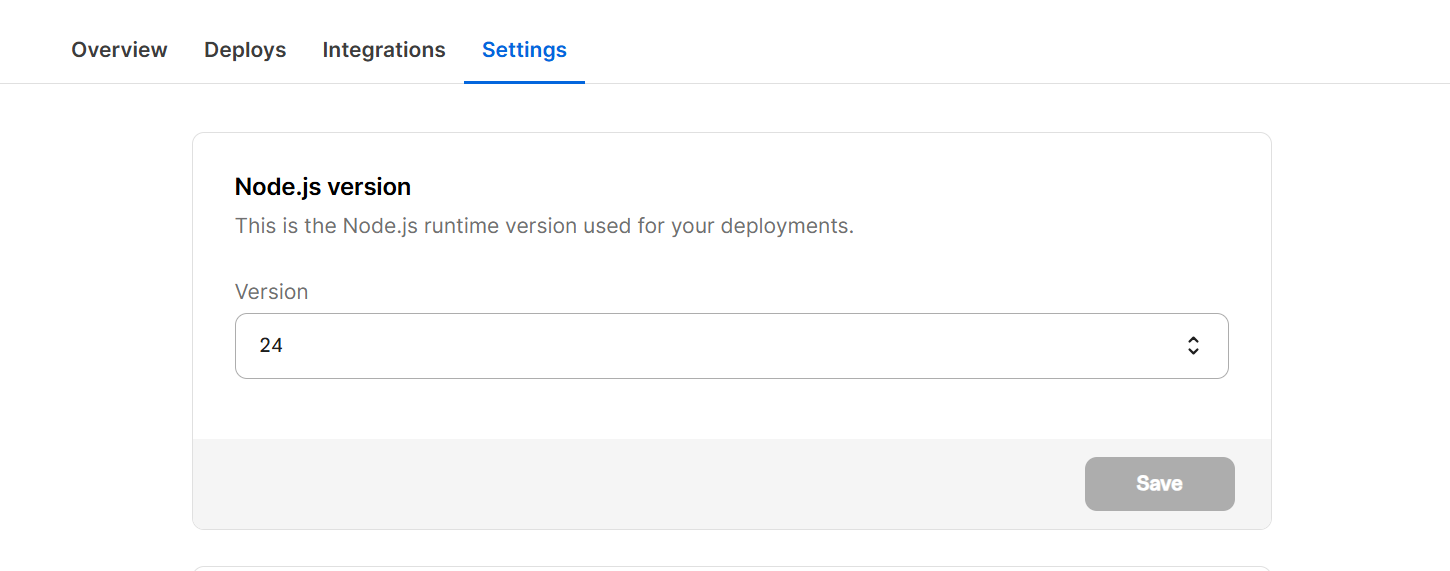
If no version has been saved for the project yet, WebOps sets it to Node.js v24, the default version. After you choose a version and save, WebOps uses that value for builds until you change it and save again. If the field shows
v22, v20, or another supported release, that is the version stored for the project. You should update the field and save when you want builds to run on a different Node.js release.FastStore v4 requires Node.js v24 in WebOps. If you're upgrading from an earlier FastStore major, follow Upgrading FastStore to v4, including the WebOps steps after you update your repository and configuration.
Production domain
As part of the go-live process, you must define the production domain of the store, the main URL customers will use to access your store.
Before adding the domain, make sure the external DNS settings are correctly configured in your VTEX account settings.
In the Production domain section, select the store domain from the dropdown list in the Host field and click
Add to set up the primary domain of your store.Current domains
The Current domains section displays the default and primary domains configured for your store. This section serves as a reference to verify that your domains are correctly set up in WebOps. By checking this list, you can confirm whether your domains have been successfully added and are ready for use in the FastStore environment.
If your domain isn't listed, there might be an issue with the configuration or DNS settings that you need to address before proceeding with the go-live. If you follow the external DNS settings guide correctly, and the problem persists, open a ticket with VTEX Support.
Password protection
Password protection is in closed beta, which means that only selected customers can access it. If you're interested in implementing it in the future, contact our Support team.
The Password protection section allows you to restrict access to your preview environments and production domain by requiring password authentication. This is useful for protecting internal testing environments, staging builds, or production domains from unauthorized access during development or initial launch phases.

In the Require password for section, you can configure the following:
| Domain type | Description | Availability |
|---|---|---|
| Default domains (*.vtex.app) | Applies password protection to testing URLs that use VTEX's default vtex.app domain. Select this option to restrict access to internal preview environments, branch previews, and other non-public links generated during development. | ✅ Available by default. |
Custom domains (for example, www.mystore.com) | Applies password protection to your public-facing store domain configured in FastStore (for example, www.mystore.com). Select this option to temporarily restrict access to your production site or a custom staging domain during soft launches, QA, or controlled rollouts. | ⚠️ Not enabled by default. You must open a ticket with VTEX Support. |
Password protection settings apply to all testing domains (your store's
vtex.app URLs) and/or your custom domain selected in the Require password for section. Changes take effect on those URLs in about 10 minutes.Make sure you share the password with authorized users through a secure channel.
When password protection is enabled, users will be prompted to enter a password when accessing the protected URL. They must enter the configured password to proceed.
Variables and secrets
Variables and secrets are encrypted credentials, like API keys and passwords, that require secure management during FastStore deployment. Standardizing variables and secrets management via WebOps enhances security and consistency across deployment providers.
In the Variables and secrets section, complete the following fields and click
Add:- Type: Choose
textfor non-sensitive values that can be viewed later (for example, public URLs), orsecretfor sensitive values that must be hidden after saving (for example, API tokens and passwords). - Key: Define the name of the variable or secret, used as its unique identifier in the environment (for example,
VTEX_API_TOKENorNEXT_PUBLIC_SITE_URL). - Value: Define the content associated with the key, such as the actual token, password, or configuration string used by your application.
Learn more in Managing variables and secrets.
Current keys
The Current keys section lists all variables and secrets configured for your store, along with their corresponding keys (identifiers). Variable values can be revealed or hidden using the visibility toggle, while secret values remain hidden for security.
In this section, you can update or delete an existing secret by clicking
⋮ and selecting the corresponding option, Edit or Delete.Deleting the project
To delete your FastStore project, click More actions (
⋮). Then, click Delete project.A modal will open to confirm your action.
Proceed with caution. Deleting the project is irreversible. All deployments and associated domains will be permanently removed.