Configuring external DNS
Learn how to point your custom domain to FastStore and get your store ready for production.
In this guide, you will configure your custom domain so it correctly points to your FastStore website hosted on FastStore WebOps (
https://{accountName}.vtex.app/).
Once the configuration is complete, customers will access your store using your final domain (e.g., www.mystore.com) instead of the default WebOps URL.This process includes:
- Creating DNS records that point your domain to VTEX’s CDN infrastructure
- Registering your domains in VTEX Account Settings
- Associating your domain with your FastStore WebOps project
- Migrating your store to the final HTTPS domain
As soon as you complete this guide, your FastStore website will be accessible via a custom domain, and VTEX Checkout will also be operational. You will then be ready to continue configuring other VTEX solutions, such as Order Placed, Login, and My Account.
Plan ahead: Because several steps in this guide depend on DNS changes becoming fully available worldwide, we strongly recommend planning your go-live schedule accordingly. Avoid making last-minute updates that may delay your deployment or cause temporary domain resolution issues.
Before you begin
- Develop your FastStore project by following the Getting Started track.
- Deploy your FastStore project.
- Purchase the domain you want to use.
- Configure a root-domain redirect to the
wwwsubdomain.
Instructions
If you still need to configure other VTEX solutions, use a fictitious domain name while following the steps. Once you have set up all the desired integrations, repeat the instructions using your final domain to make your website publicly available to end users.
Step 1 - Creating DNS records
VTEX uses a CDN to serve FastStore websites. To make your domain reachable, you must create DNS CNAME records pointing your domain to VTEX’s CDN endpoints. Without this step, VTEX cannot validate or route traffic for your domain.
- Access your domain provider's website.
- Create a CNAME DNS record for your
wwwdomain (e.g.,www.mystore.com) pointing towww.{rootDomain}.cdn.vtex.com(example:www.mystore.com.cdn.vtex.com). Check your domain provider's documentation for more information. The configured addresses may not be immediately available to everyone due to DNS propagation, which can take 24-48 hours to complete. For example:
| Hostname | Type | Points to |
|---|---|---|
| www.mystore.com | CNAME | www.mystore.com.cdn.vtex.com |
If your strategy requires additional subdomains (e.g.,b2b.mystore.com), add them as separate CNAMEs and ensure they are listed under Hosts.
Step 2 - Putting your account into production
Before VTEX can serve your website on a custom domain, your account must be configured as a production-ready environment. See Putting your account into production for more information.
Step 3 - Configuring domains in VTEX Account Settings
VTEX must know which domains belong to your store so it can recognize incoming requests and serve the appropriate environment. Adding your domains here ensures My Account, Checkout, Login, and other VTEX services can operate correctly.
For more information about store domain configuration, see the Configuring the store domain guide.
- In the VTEX Admin, click your profile avatar, identified by the first letter of your email address.
- Access Account Settings > Account.
- Go to the Stores tab and in the Hosts table, click the menu (⋮) and choose Edit.
- In the Hosts field, enter your main store domain (e.g.,
www.mystore.com) into the list. - Click
Add. - Add the root domain as well (e.g.,
mystore.com). - Click the Save button.
Checkout and secure flows will not work if any used domain or subdomain is missing. If your store uses multiple subdomains or custom prefixes, see For stores with custom domain prefixes section.
For stores with custom domain prefixes
To ensure your store operates efficiently, it's important to correctly configure custom domain prefixes for checkout and secure product viewing. Custom domain prefixes must be configured in the following scenarios:
- Stores with multiple subdomains: Add all the subdomains to the host list.
- Stores with prefixed domains: Add
subDomainPrefixfor prefixed domains.
Adding subdomains to the host list
To ensure a seamless checkout experience, all subdomains used by your store must be added to the host list. If the store operates without the
www. domain, you must include both the www. and non-www. domains in the host list.Stores with custom prefixes, like
shop.mystore.com, need both the prefix and main domain (shop.mystore.com and mystore.com) added. This guarantees that the checkout process works seamlessly when customers access the store with or without www. or any other custom prefix.Adding subDomainPrefix for prefixed domains
To ensure customers can view products in the secured environment on your store's final domain, add the
subDomainPrefix property to the discovery.config.js file.
The subDomainPrefix property maintains compatibility between cookies set in the storefront and the secure environment.To add the
subDomainPrefix property, follow these steps:-
Open your FastStore project in a code editor of your preference.
-
Open the
discovery.config.jsfile. -
Navigate to the
apiobject and add the following:_10// Platform specific configs for API_10api: {_10..._10subDomainPrefix: ['xxx']_10},Replace'xxx'in thesubDomainPrefixproperty with the actual subdomain prefix (example:['b2b']). If you have multiple prefixes, add them as an array of strings (example:['b2b', 'dev']). -
Save your changes.
You will commit and deploy these changes later in Step 4.
Step 4 - Associating your custom domain with your FastStore project
Up to this stage, your FastStore build continues to reference the default WebOps URL. Complete the steps below to update your storefront configuration and environment variables to point to your final production domain.
-
Open your FastStore project in any code editor of your preference.
-
Open the
discovery.config.jsfile. -
In the
discovery.config.jsfile, update theProduction URLsfield with the new URLs, and replace therootDomainvalue with your store root domain name. See the example below:_10..._10_10// Production URLs_10storeUrl: "https://www.mystore.com",_10checkoutUrl: "https://www.mystore.com/checkout",_10loginUrl: "https://www.mystore.com/api/io/login",_10accountUrl: "https://www.mystore.com/api/io/account",_10_10...Remove any references tosecureSubdomainandsecurehost. -
Save your changes.
-
Open the
vtex.envfile. -
Add the
SITE_HOSTkey with the main store domain as the value specified in Step 3, for example,SITE_HOST=www.yourstore.com -
Save your changes.
-
Open a Pull Request, commit your changes, and deploy them to
main.
Step 5 - Configuring the CDN workflow (Only for new go-lives)
If your FastStore website is going live for the first time, VTEX must activate the CDN workflow for your account. Open a ticket with VTEX Support and specify that you need to configure the CDN workflow for your store's secure and main domains.
Include the following information in your ticket:
- Your VTEX account name.
- The store's main domain (e.g.,
www.mystore.com).
The VTEX team will evaluate your request and take the necessary actions to configure your account's CDN workflow.
Step 6 - Adding your store domain to FastStore WebOps
To finish the domain configuration, add your store domain to FastStore WebOps.
FastStore WebOps domain configuration always takes priority over any settings indiscovery.config.js.
-
Access your FastStore WebOps dashboard.
-
Navigate to the Settings tab.
-
In the Host field, choose your store's domain (example:
www.mystore.com) from the dropdown list. -
Click
Add.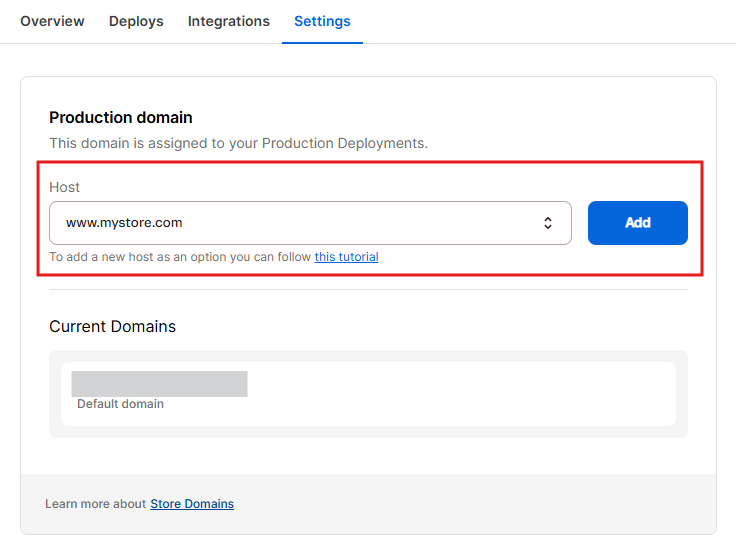
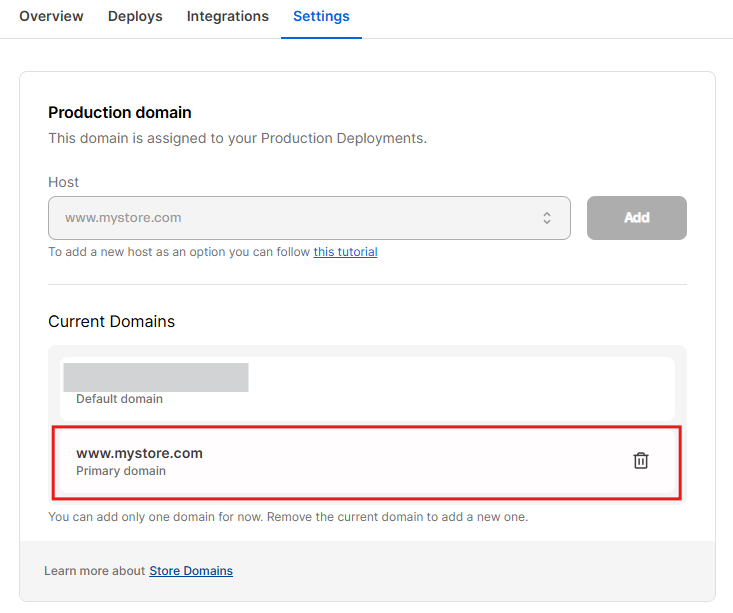
Step 7 - Monitoring the new deployment
After you add your domain to FastStore WebOps, an automatic deployment is triggered to update the CDN and routing configuration. This deployment must finish successfully before your store becomes accessible under your custom domain.
-
Access your FastStore WebOps dashboard.
-
Navigate to the Settings tab.
-
Confirm your domain appears in the Current Domains list.
Step 8 - Migrating the domain
This final step asks VTEX to fully migrate your WebOps project so the custom domain becomes the primary URL instead of the default
{accountName}.vtex.app. This is required for HTTPS, secure flows, and production routing.- Open a ticket with VTEX Support requesting a domain migration for your FastStore WebOps implementation. Include the following information:
- VTEX account name
- Store's main domain (example:
www.mystore.com) - Store's root domain (example:
mystore.com) - Confirmation that you’ve completed all previous steps in this guide.
- Wait for the VTEX team to process your request and complete the domain migration.
- Once the migration is complete, test your store to ensure everything is working properly.