Creating an integration app from a Template
Create an app to integrate with external marketplaces.
The integration Template App is a pre-built app developed by VTEX for our partners to reduce development and implementation time when integrating with external marketplaces. By using the template to build your integration app, connectors will also have the app displayed in the VTEX App Store.
What the App Template includes for the VTEX Admin
An integration app created from our App Template already includes:
- Standard set up page containing:
- Activate/deactivate the integration button
- Field identifying the affiliate ID
- Field to inform the email that will receive notifications about changes in the affiliate
- Callback URL used by the VTEX notification system
- Field for the sales channel ID
- Fields included in the sales channel form
- Save Settings button
- Custom settings page containing:
- Button to activate/deactivate franchise accounts
- Complete search endpoint to retrieve seller configurations using AppKey and AppToken generated in the seller’s account, defined by the appVendor.
- Link to VTEX Mapper Registration, allowing sellers to map their catalog according to the marketplace’s definitions.
Before you begin
The Template App runs in VTEX IO. Before you begin creating your app from our template, make sure to:
- Set up your development environment.
- Install VTEX IO CLI.
- Have your VTEX Partner account in hand for step 2.
If you do not have access to a VTEX Account, join our Partner Program, to become a certified partner.
Step 1 - Creating your repository from the template
- Access the Template App’s repository.
- Don't forget to request the use of the builders necessary for the development of the app. Read the article Filling the Application form for development and request the builders: admin, docs, graphql, messages, node and react.
- Click on
Use this template. - Add a name to your repository.
- Select the
Privateoption. - Do not check the Include all branches option.
- Click on
Create repository from template.
Step 2 - App configurations
Once your repository is created from the template, you must configure your app by substituting placeholders and setting up the necessary Template App Configurations.
Substituting placeholders
Follow the list below to substitute placeholders properly. Once placeholders are replaced, the App’s foundation will include the fields needed to set up the seller and the integration on VTEX's side.
Placeholders within the
manifest.jsonfile must follow the rules described in Manifest Fields Summary.
| Placeholder | Description | Files where it can be found |
|---|---|---|
| appName | Name of the app. This value must follow the kebab case (only minor case letters and the - character). | manifest.json, navigation.json, routes.json, node/service.json, node/constants/variables.ts, react/package.json |
| appVendor | Name of the app’s owner, responsible for its distribution and maintenance. It must be the Partner’s VTEX accountName. | manifest.json, navigation.json, node/routes.json, node/service.json, node/constants/variables.json |
| appTitle | Title of the app that will appear in the VTEX Admin’s screen and left navigation, once the seller accesses it. | messages/context.json, messages/en.json, messages/pt.json, messages/es.json, node/constants/variables.ts |
| connectorEndpoint | Base URL of the backend connector to which notifications coming from VTEX will be sent. Examples: https://externalconnector.com or relative URL; https://externalconnector.com/api/vtex. | node/constants/variables.ts, react/areas/ConfigArea/DefaultConfigs/endpoint.tsx |
| connectorEndpointHost | Endpoint host informed in the connectorEndpoint placeholder. Example: externalconnector.com. | manifest.json |
| affiliateId | Affiliate identifier code, which consists of three consonants, whether they are repeated or not. | react/areas/ConfigArea/index.tsx |
| manifestTitle | App’s title in the VTEX App Store. | manifest.json |
| manifestDescription | App’s description in the VTEX App Store. | manifest.json |
| mapperId | Connector’s ID in VTEX Mapper. | admin/navigation.json |
| connectorId | Connector's ID registered in Channel Manager. | node/constants/variables.json |
The fields listed above come with the App Template as default. However, it is possible to remove fields that represent features not used by your integration, like the VTEX Mapper. They are listed ahead in the section CustomConfigs.
Receiving notifications
To receive notifications from VTEX, the seller needs to implement specific API routes in the endpoint informed in connectorEndpoint. These endpoints are described in the following sections:
Catalog notification
To receive product update notifications and product variations (including stock, price and trade policy), you must implement the POST {{connectorEndpoint}}/catalog/notification route.
This notification follows the format of our VTEX Broadcaster Adapter.
Store configuration notification
To receive notifications of updates to store or seller settings, you must implement the POST {{connectorEndpoint}}/store-config/notification route.
The store configuration notification format will vary according to the configuration you implement in your app. The default fields are:
| Field name | Description | Type |
|---|---|---|
accountName | Name of the seller’s account in VTEX. | string |
active | Flag that indicates if the seller wants to be active in the marketplace. If false, the connector should deactivate the seller’s products on the marketplace. | boolean |
affiliateId | Unique affiliate ID configured in the seller that identifies its connection with the marketplace. | string |
salesChannel | Sales channel/trade policy ID configured in the seller and being used for this marketplace. | string |
email | Email that’ll be notified about changes related to the affiliate. | string |
cookie | App’s auth cookie. This token can be used when making requests to VTEX APIs with the seller’s account. | string |
allowFranchiseAccounts | Flag indicates if the seller also wants to synchronize their franchise accounts catalog/orders with the marketplace, through the Multilevel Omnichannel Inventory feature. | boolean |
Template App Configurations
The Template App is divided into two areas:
- TitleArea: where the app's title goes, defined by the
{{appTitle}}field. - ConfigArea: where the app's set up fields go. The ConfigArea has two types of configurations: Default Configurations and Custom Configurations.
DefaultConfigs
DefaultConfigs is where the mandatory fields for all apps are included. This section does not need to be changed, regardless of the marketplace's needs, since they are internal configurations used by VTEX. This section already includes:
- Toggle indicating if the integration is activated or inactivated.
- Input field showing the marketplace's affiliateId.
- Input field showing the connector's endpoint, for notifying product and order updates occurred in VTEX.
- Input field for sellers to fill in the email registered as the affiliate.
- Button leading to the account's Affiliate page.
- Selection box showing a list of countries, currencies, time zones and other information registered in the sales channels that the seller has set up in their account. This way, sellers can create or edit their sales channel information directly through the Default Configs page.
- Field showing the sales channel's name used for the marketplace, with a button leading to the VTEX account's Sales channels page. This becomes available after the initial set up of the fields listed above.
CustomConfigs
The CustomConfigs section is where you find configurations that come as default but are optional, like VTEX Mapper and AllowFranchiseAccounts.
Removing VTEX Mapper
You can remove VTEX Mapper Registration from the app, if the integration does not require mapping categories, or the partner already has a solution for mapping catalog architecture. To remove VTEX Mapper, on the admin/navigation.json, remove file the object that defines the Mapper endpoint in the Admin:
_10{_10 "labelId": "admin/app.mapper.tile",_10 "path": "/admin/mkp-category-mapper/{{mapperId}}"_10}
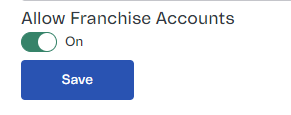
Removing AllowFranchiseAccounts
When the configuration AllowFranchiseAccounts is configured, the component becomes a toggle indicating whether franchise accounts are permitted.
You can remove the configuration by performing the following actions:
| Instruction | Files where it can be found |
|---|---|
Remove component AllowFranchiseAccounts | react/areas/ConfigArea/CustomConfigs/index.tsx |
Remove field allowFranchiseAccounts | react/graphql/getConfig.gql graphql/schema.graphql graphql/types.graphql node/typings/configuration.d.ts react/typings/config.d.ts |
Set the atribution allowFranchiseAccounts as false | react/areas/ConfigArea/index.tsx: |
Adding your own CustomConfigs
CustomConfigs is also where connectors can add their custom fields and most of the app’s development will be made, in case it is necessary to add extra fields like input field for the marketplace’s token, or a button to activate a connector’s new feature, for example. To add custom fields in the App:
-
In the folder
react/areas/configArea/customConfigs, create a file with the field’s name and .tsx extension. Ex. email.tsx, token.tsx. -
In the file, add the following code, replacing the
ExampleComponentfield with the name you wish to give it.
_10import React from "react"_10import { DefaultProps } from '../../../typings/props'_10_10const ExampleComponent: React.FC<DefaultProps> = ({ intl, config }) => {_10 return (_10 )_10}_10_10export default ExampleComponent
| Field | Description | Files where it can be found |
| DefaultProps | Defines attributes used by all components present in the integration. The attributes include intl (used for field internationalization) and config (represents the seller’s current configuration). | react/typings/props.tsx |
- To add more properties to the
DefaultPropsfor a specific field, extend theDefaultPropsinterface, adding the extra properties. This step is optional.
_12import React from "react"_12_12export interface CustomProps extends DefaultProps {_12 newProp: string_12}_12_12const FieldName: React.FC<CustomProps > = ({ intl, config, newProp}) => {_12 return (_12 )_12}_12_12export default FieldName
In the example above, a new interface called CustomProps was created, that can extend the DefaultProps, by adding a newProp string property. Thus, it is possible to use CustomProps in place of DefaultProps, and the component can now accept the extra newProp property.
- To use other properties that are not listed in
DefaultProps, define a new interface with the needed properties.
In the example below, a new interface called CustomProps is created, with only two properties: prop1 (string) and prop2 (number).
_13import React from "react"_13_13export interface CustomProps {_13 prop1: string._13 prop2: number_13}_13_13const FieldName: React.FC<CustomProps > = ({ prop1, prop2 }) => {_13 return (_13 )_13}_13_13export default FieldName
- Add components developed to the app’s template.
Here’s an example code for adding an input field:
_29import React from "react"_29import InputComponent from "../../../components/InputComponent"_29import { DefaultProps } from "../../../typings/props"_29_29export interface ExampleProps extends DefaultProps {_29 setConfig: React.Dispatch<React.SetStateAction<Configuration>>_29}_29_29const ExampleComponent: React.FC<ExampleProps> = ({ intl, config, setConfig }) => {_29 return (_29 <InputComponent_29 id={example}_29 label={example}_29 canEdit={true}_29 initValue={config.email}_29 type={'text'}_29 required={false}_29 tooltip={intl.formatMessage({ id: "admin/app.example" })}_29 onChange={value => {_29 if(value !== undefined){_29 setConfig(oldConfig => ({ ...oldConfig, email: value }))_29 }_29 }_29 }_29 />_29 )_29}_29_29export default ExampleComponent
The example above creates an input field called ExampleComponent. It uses an extra property, or the setConfig, used in this case within the onChange property of the Input component. This updates the email field in the config, whenever the seller types something within the field. This is how it is rendered in the UI:

- To finalize the new field’s inclusion, add the new field within the CustomConfigsArea. To do that:
- In the
react/areas/configArea/customConfigs/index.tsxfield, add an import to the new component developed. Following the example above: import ExampleComponent from './example' - Add the component within the
CustomConfigArea.
_11const CustomConfigsArea: React.FC<CustomConfigsProps> = ({ intl, config, setConfig }) => {_11 return (_11 <div>_11 <ExemploComponent_11 config={config}_11 intl={intl}_11 setConfig={setConfig}_11 />_11 </div>_11 )_11}
Note that the CustomConfigArea in the template does not include intl, config and setConfig. They must be added, like in the example above, depending on which properties are needed. To add more properties, repeat step 3.
- If other components are necessary, add them in the
returnobject.
The order of components within the return affects the order in which components are rendered in the app.
Step 3 - Translating a component
The app’s internationalization is made using the intl library in the messages builder, declared in the manifest.json. This builder’s addition comes in the Template App as default and does not need to be altered. It is only necessary to add translations for new inserted fields. Check out Translating the component to know more.
The intl library gets what locale is being used in the VTEX Admin’s context and searches in the messages file the corresponding translated text in the {messageId}. In case the VTEX Admin is using a language that is not translated in the app, the library will search the id of a language mapped in the app, and automatically translate it to the Admin’s locale.
To add translations to the app:
- Add the translations in the
messagesfolder. The Template app already includes the files:
- en.json: english
- es.json: spanish
- pt.json: portuguese
The following languages are also available in the VTEX Admin: italian (it), japanese (ja), korean (ko), dutch (nl) and romanian (ro).
- Add the translations in the
{messageId}to the corresponding locale’s file in the format"admin/{messageId}": "translation". - In the selected property that needs translation, substitute the text for the code
intl.formatMessage({ id: 'admin/{messageId}' }).
- admin/: used to identify a translation of a component installed in the VTEX Admin. It must be every Id’s prefix.
- messageId: can be substituted for any text. It only accepts letters and
-to define the text.
To illustrate with an example, let’s suppose we have the following component:
_17import React from "react"_17import InputComponent from "../../../components/InputComponent"_17import { DefaultProps } from '../../../typings/props'_17_17const ExemploComponent: React.FC<DefaultProps> = ({ intl }) => {_17 return (_17 <InputComponent_17 canEdit={true}_17 id={'test'}_17 initValue={""}_17 label={intl.formatMessage({ id: 'admin/app.test.title' })}_17 type={'text'}_17 />_17 )_17}_17_17export default ExemploComponent
In this case, we have an Input component, type “text”, and its label will be translated according to the VTEX Admin’s locale. If we do not add the id "admin/app.test.title" in the messages folder, this is what is rendered in the UI:

Since the id does not exist in any messages file, it renders the id itself as a response.
To add the id to the file, we add the code: “admin/app.test.title”: “Teste no en.json”. Once the id is rendered in all files, the component will then render:
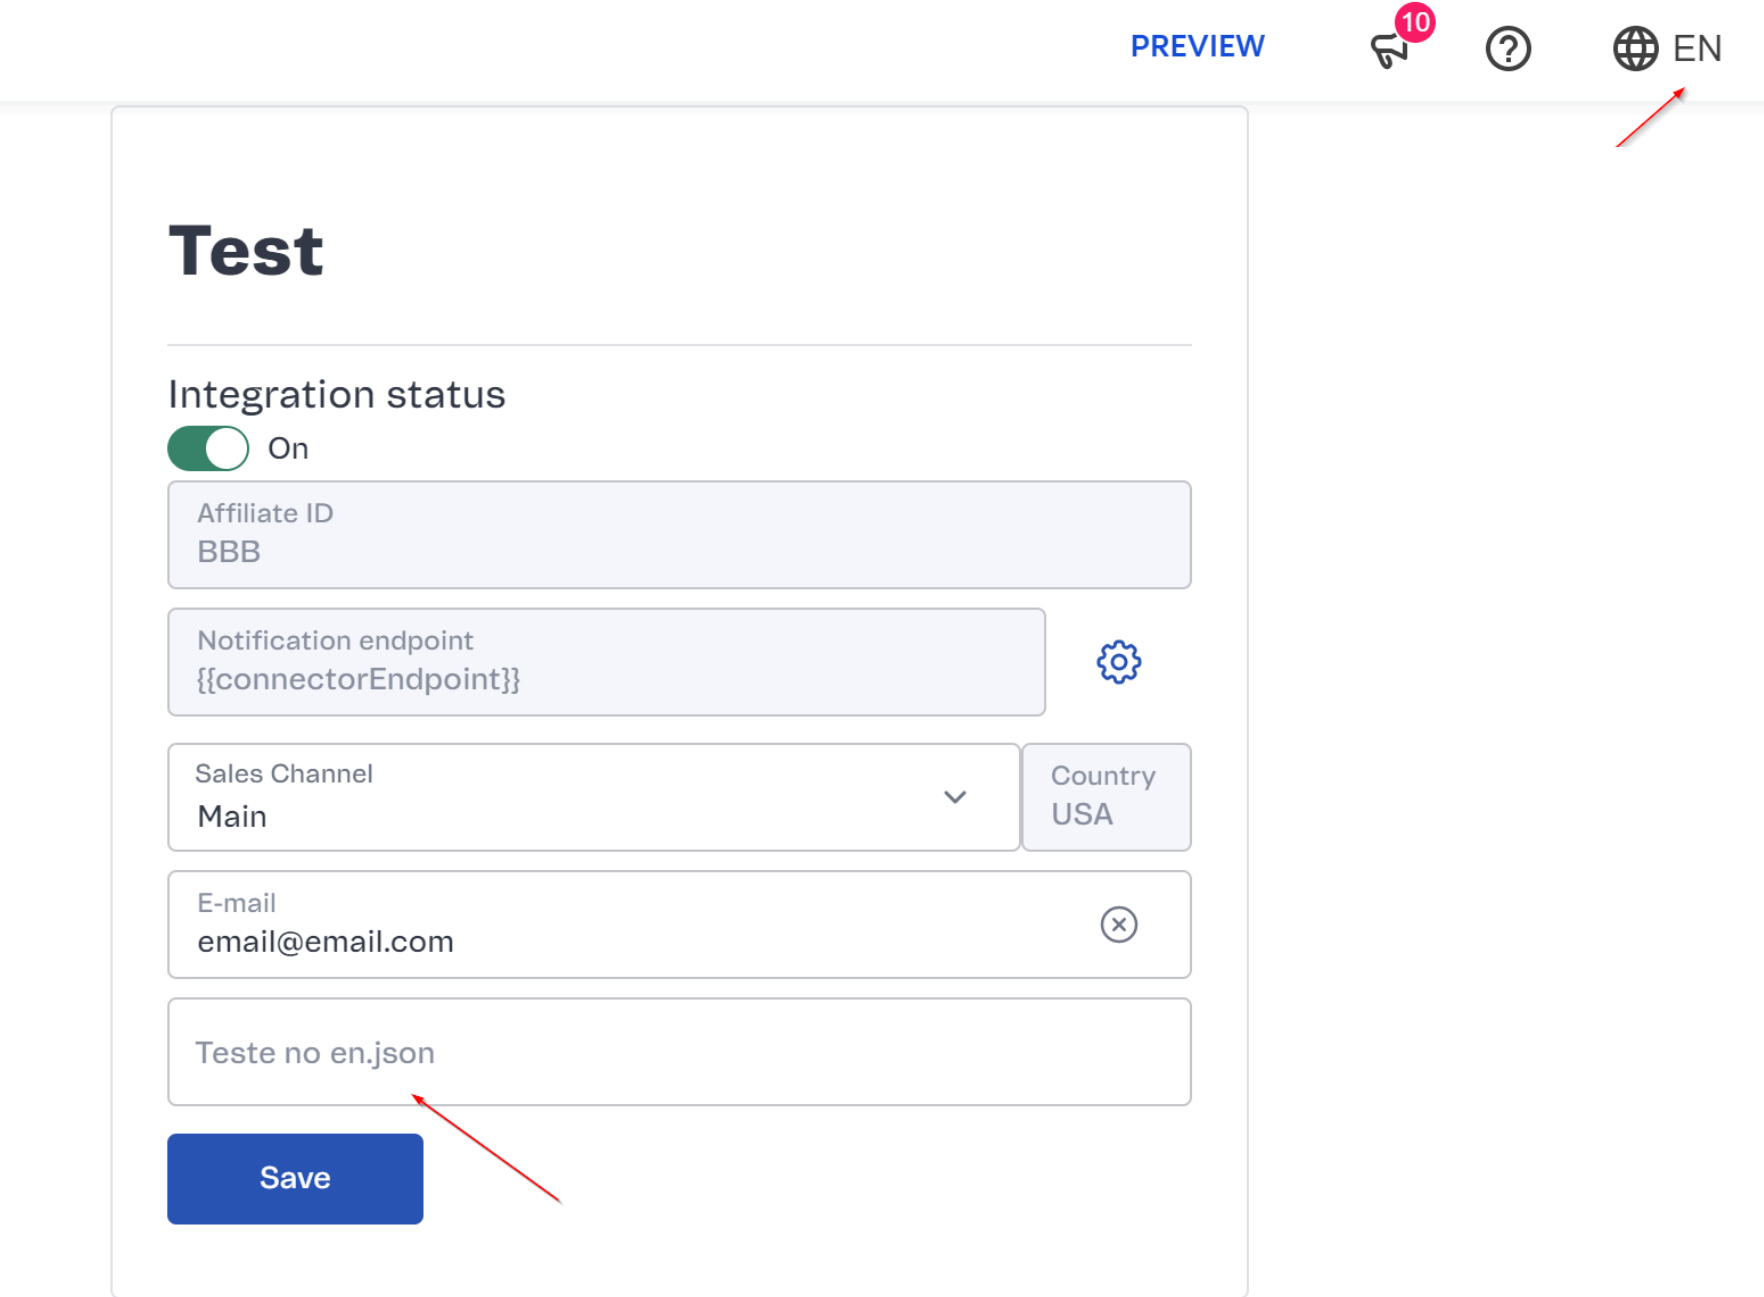
Step 4 - Testing the app locally
- With the app already configured, open a CLI in the project’s root.
- Login into a test account using the command:
vtex login {{account}}. Substitute {{account}} by the test account’s accountName. - Once logged into the account, use the command
vtex use {{workspace}}to access a development workspace to link the app. Substitute {{workspace}} by any name you choose. - Use the command
vtex setupto adjust IO types and variables based on the values set in the app’s configuration. - Use the command
vtex linkto link the app so it operates on VTEX IO’s infrastructure. - Access the following address:
https://{{workspace}}--{{account}}.myvtex.com/admin/{{appVendor}}/{{appName}}substituting the placeholders for the chosen values in the previous steps.
Collecting the app’s configurations
Once the app is configured, it is possible to recover the seller’s configuration through the app. To search a seller’s configuration:
- Call the following API:
https://{{workspace}}--{(account}}.myvtex.com/_v/{{appVendor}}/{{appName}}/config
| Field | Description |
| workspace | Environment where the app was linked. In production, the workspace is not included in the call, so the endpoint is as follows: https://{(account}}.myvtex.com/_v/{{appVendor}}/{{appName}}/config |
| account | Seller’s VTEX account you wish to recover configuration information from. |
| appVendor | Name of the app’s owner, responsible for its distribution and maintenance. It must be the Partner’s VTEX accountName. |
| appName | Name of the app. This value must follow the kebab case (only minor case letters and the - character). |
- Generate the account’s AppKey and AppToken to authenticate it.
Request’s curl in a workspace
_10curl --location -g --request GET 'https://{{workspace}}--{{account}}.myvtex.com/_v/{{appVendor}}/{{appName}}/config' \ --header 'appkey: {{appkey}}' \ --header 'apptoken: {{apptoken}}'
Request’s curl in production
_10curl --location -g --request GET 'https://{{account}}.myvtex.com/_v/{{appVendor}}/{{appName}}/config' \ --header 'appkey: {{appkey}}' \ --header 'apptoken: {{apptoken}}'
Step 5 - Publishing the app in the VTEX App Store
Once all steps are completed, you must publish the app in VTEX’s App Store, so it is available for clients to install it in their accounts. Follow the instructions on Submitting your app in the VTEX App Store for this step.