Admin builder
Learn how to use the VTEX IO Admin builder.
The admin builder is used to develop apps for the VTEX Admin in combination with React. To understand better how to develop apps using this builder, access our Admin Applications course.
Folder structure
An app that uses the admin builder has an admin folder on its root, where are located the following files and directories:
_10admin_10 ┣ 📄 navigation.json_10 ┗ 📄 routes.json
navigation.json: Defines the navigation in the Admin left panel for sections and pages. The file structure consists of an object or list of objects for each section, with a list of objects for the subsections ("subSectionItens"field).routes.json: Assigns the components to their corresponding routes ("path"field). The file structure consists of an object of objects, where each object defines a component with its route. The routes have to match the paths described in thenavigation.jsonfile. The names of the components ("component"field) have to match the React components in thereactfolder.
Usage
To develop an app using the admin builder, refer to the following steps:
- Start with a template: Download the
admin-ui-exampletemplate or create a new project using thevtex initCLI command and choose theadmin-exampleoption. - Configure the navigation: Edit the
navigation.jsonfile to define the structure of the sections and pages of the app in the Admin's left panel. - Configure the routes: Edit the
routes.jsonfile to define the components and associate them with the navigation. - Implement the app's logic: Add your frontend logic using React. Check the Admin Applications course for more details.
- Testing: Link the app to a development workspace for testing.
Use case examples
Here are some app examples that use the admin builder:
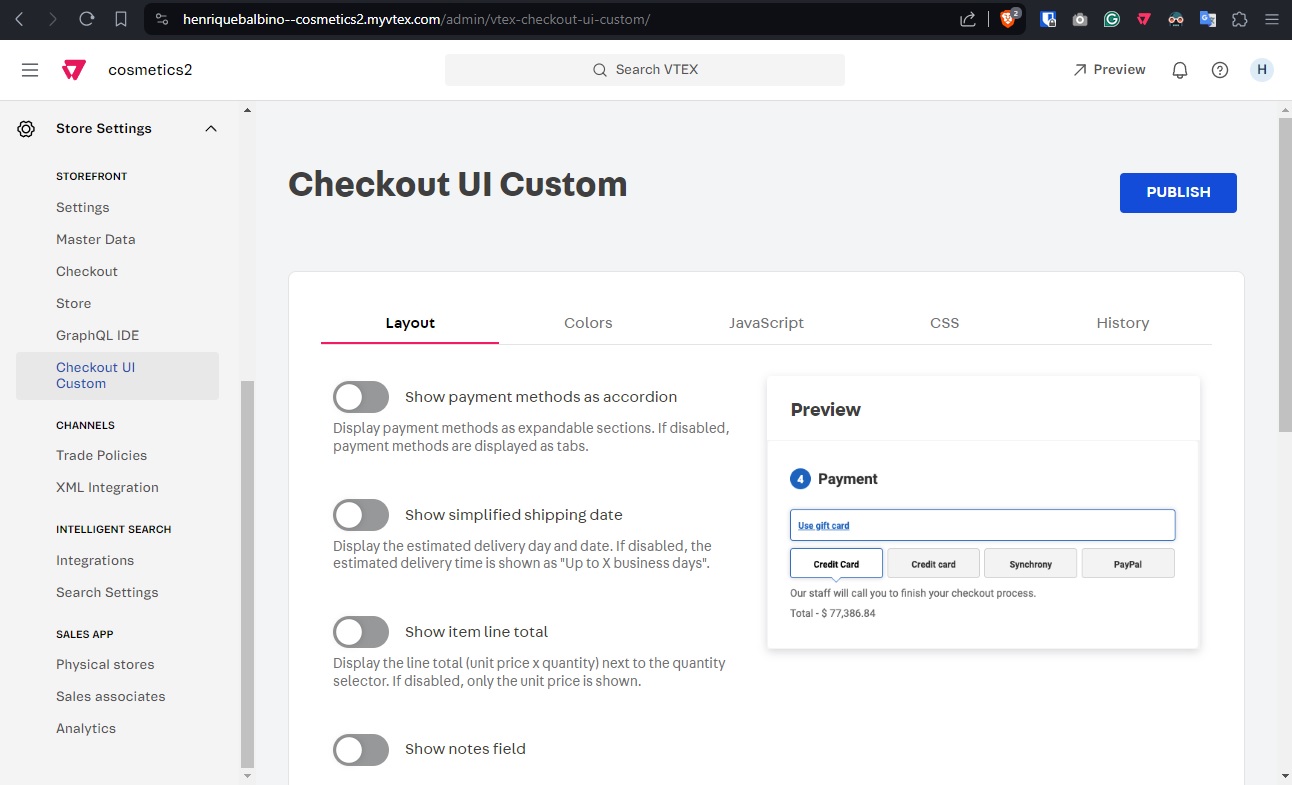
As an example, check the file contents for this builder in the Checkout UI Custom:
navigation.json file
In this example, there is a list of objects. It is also possible to have only a single object.
The properties in these objects are:
"adminVersion": Specifies the Admin version for the page. The presence of this property only in the second object indicates that the first one is for the Admin version3.xand the second one is for the redesigned Admin."section"and"subSection": indicate which section and subsection of the Admin the page will be, respectively. The first will be inside an existing section,"storeSetup". The second object will be inside an existing section,"storeSettings", and an existing subsection,"storeFront"."path": Contains the path in the URL to access the page, and correlates with the component defined in theroutes.jsonfile."subSectionItems": A list where each object represents a page in the subsection."titleId"and"labelId": Identifiers of the component. This will be used by themessagesbuilder to map the navigation and the name of the app in each language.
routes.json file
Here we have an object of objects, where each inner object maps a component to a path. The keys of the objects inside use the format "admin.app.{routeName}", where {routeName} is an identifier to the route.
The properties of the inner object are:
"component": Name of the React component corresponding to the page in the route."path": Contains the path in the URL to access the page, and correlates with the component defined in thenavigation.jsonfile. Note that the path here only differs from the one in thenavigation.jsonfile by having a/appsegment.
Result
As we can see in the image of the app running in the Admin, the path in the address bar (/admin/vtex-checkout-ui-custom/) is the same as the one in the path property from the navigation.json file. In the Admin left navigation bar, we can see that the Checkout UI Custom app is inside the Store Settings section and the STOREFRONT subsection, as described by the "section" and "subSection" properties.
