Payment Provider Protocol for Point of Sale (POS) - VTEX Sales App
Learn how to integrate a payment connector for in-store card payments through a Point of Sale (POS) terminal using the Payment Provider Protocol and VTEX Sales App.
VTEX offers multiple solutions for a Unified Commerce experience, handling orders from both ecommerce and physical stores. For the physical store experience, VTEX provides the VTEX Sales App, where sellers serve customers and complete the entire sales process. To complete a purchase, the customer can pay with a physical card in a payment terminal, also known as a Point of Sale (POS).
To integrate a POS payment solution, payment partners must meet the following requirements:
- Develop a payment connector using the Payment Provider Protocol (PPP). To handle POS payments, the connector requires the following:
- Include the supported payment methods (credit or debit card) in the Manifest.
- Use callbacks for asynchronous payments.
- Work with Payment Apps to identify the POS and wait for its response.
- The endpoint must respond to any call in less than 20 seconds.
- For testing, use a VTEX store configured with the supported payment methods. VTEX can provide an account for this purpose.
- For testing, use a device with the VTEX Sales App installed.
- Optionally, create a Payment App to identify the POS. Install this app in the store as well.
To develop a new payment connector, you must follow the prerequisites determined by VTEX. See the Implementation prerequisites section of the Payment Provider Protocol article.
This guide covers the full journey to integrate POS payments:
- Payment connector prerequisites: Required routes and manifest configuration.
- How POS payments work: End-to-end payment flow, from identifying the POS to confirming the result.
- Implementing the connector: Create Payment parameters, asynchronous flow, timeouts, Payment Apps, and POS interaction.
- Testing your connector: Setting up a store to test the integration.
- Homologation: Validating and publishing your connector.
Payment connector prerequisites
Complete the following steps to enable the connector to process payments in the physical world:
1. Route GET List Payment Provider Manifest (/manifest)
The response body of the endpoint must contain the payment methods Venda Direta Credito and Venda Direta Debito. If a split of receivables is offered, indicate it in the allowsSplit field for each payment method. The following example shows a correctly configured response body, including the POS-specific Venda Direta Debito and Venda Direta Credito methods:
_52{_52 "paymentMethods": [_52 {_52 "name": "American Express",_52 "allowsSplit": "onCapture"_52 },_52 {_52 "name": "Diners",_52 "allowsSplit": "onCapture"_52 },_52 {_52 "name": "Elo",_52 "allowsSplit": "onCapture"_52 },_52 {_52 "name": "Hipercard",_52 "allowsSplit": "onCapture"_52 },_52 {_52 "name": "Mastercard",_52 "allowsSplit": "onCapture"_52 },_52 {_52 "name": "Visa",_52 "allowsSplit": "onCapture"_52 },_52 {_52 "name": "Boleto Bancário",_52 "allowsSplit": "onAuthorize"_52 },_52 {_52 "name": "Visa Electron",_52 "allowsSplit": "disabled"_52 },_52 {_52 "name": "Maestro",_52 "allowsSplit": "disabled"_52 },_52 {_52 "name": "Pix",_52 "allowsSplit": "onAuthorize"_52 },_52 {_52 "name": "Venda Direta Debito",_52 "allowsSplit": "onCapture"_52 },_52 {_52 "name": "Venda Direta Credito",_52 "allowsSplit": "onCapture"_52 }_52 ]_52}
2. Route POST Create Payment (/payments)
This route must be idempotent: the provider must handle repeated calls with the same paymentId correctly. Instead of recreating the payment on each call, the provider must return the most up-to-date status.
How POS payments work
This section describes the end-to-end payment flow for a physical store using a POS. The following sequence diagram shows all the steps, where the green bars represent the steps that the payment provider is responsible for:
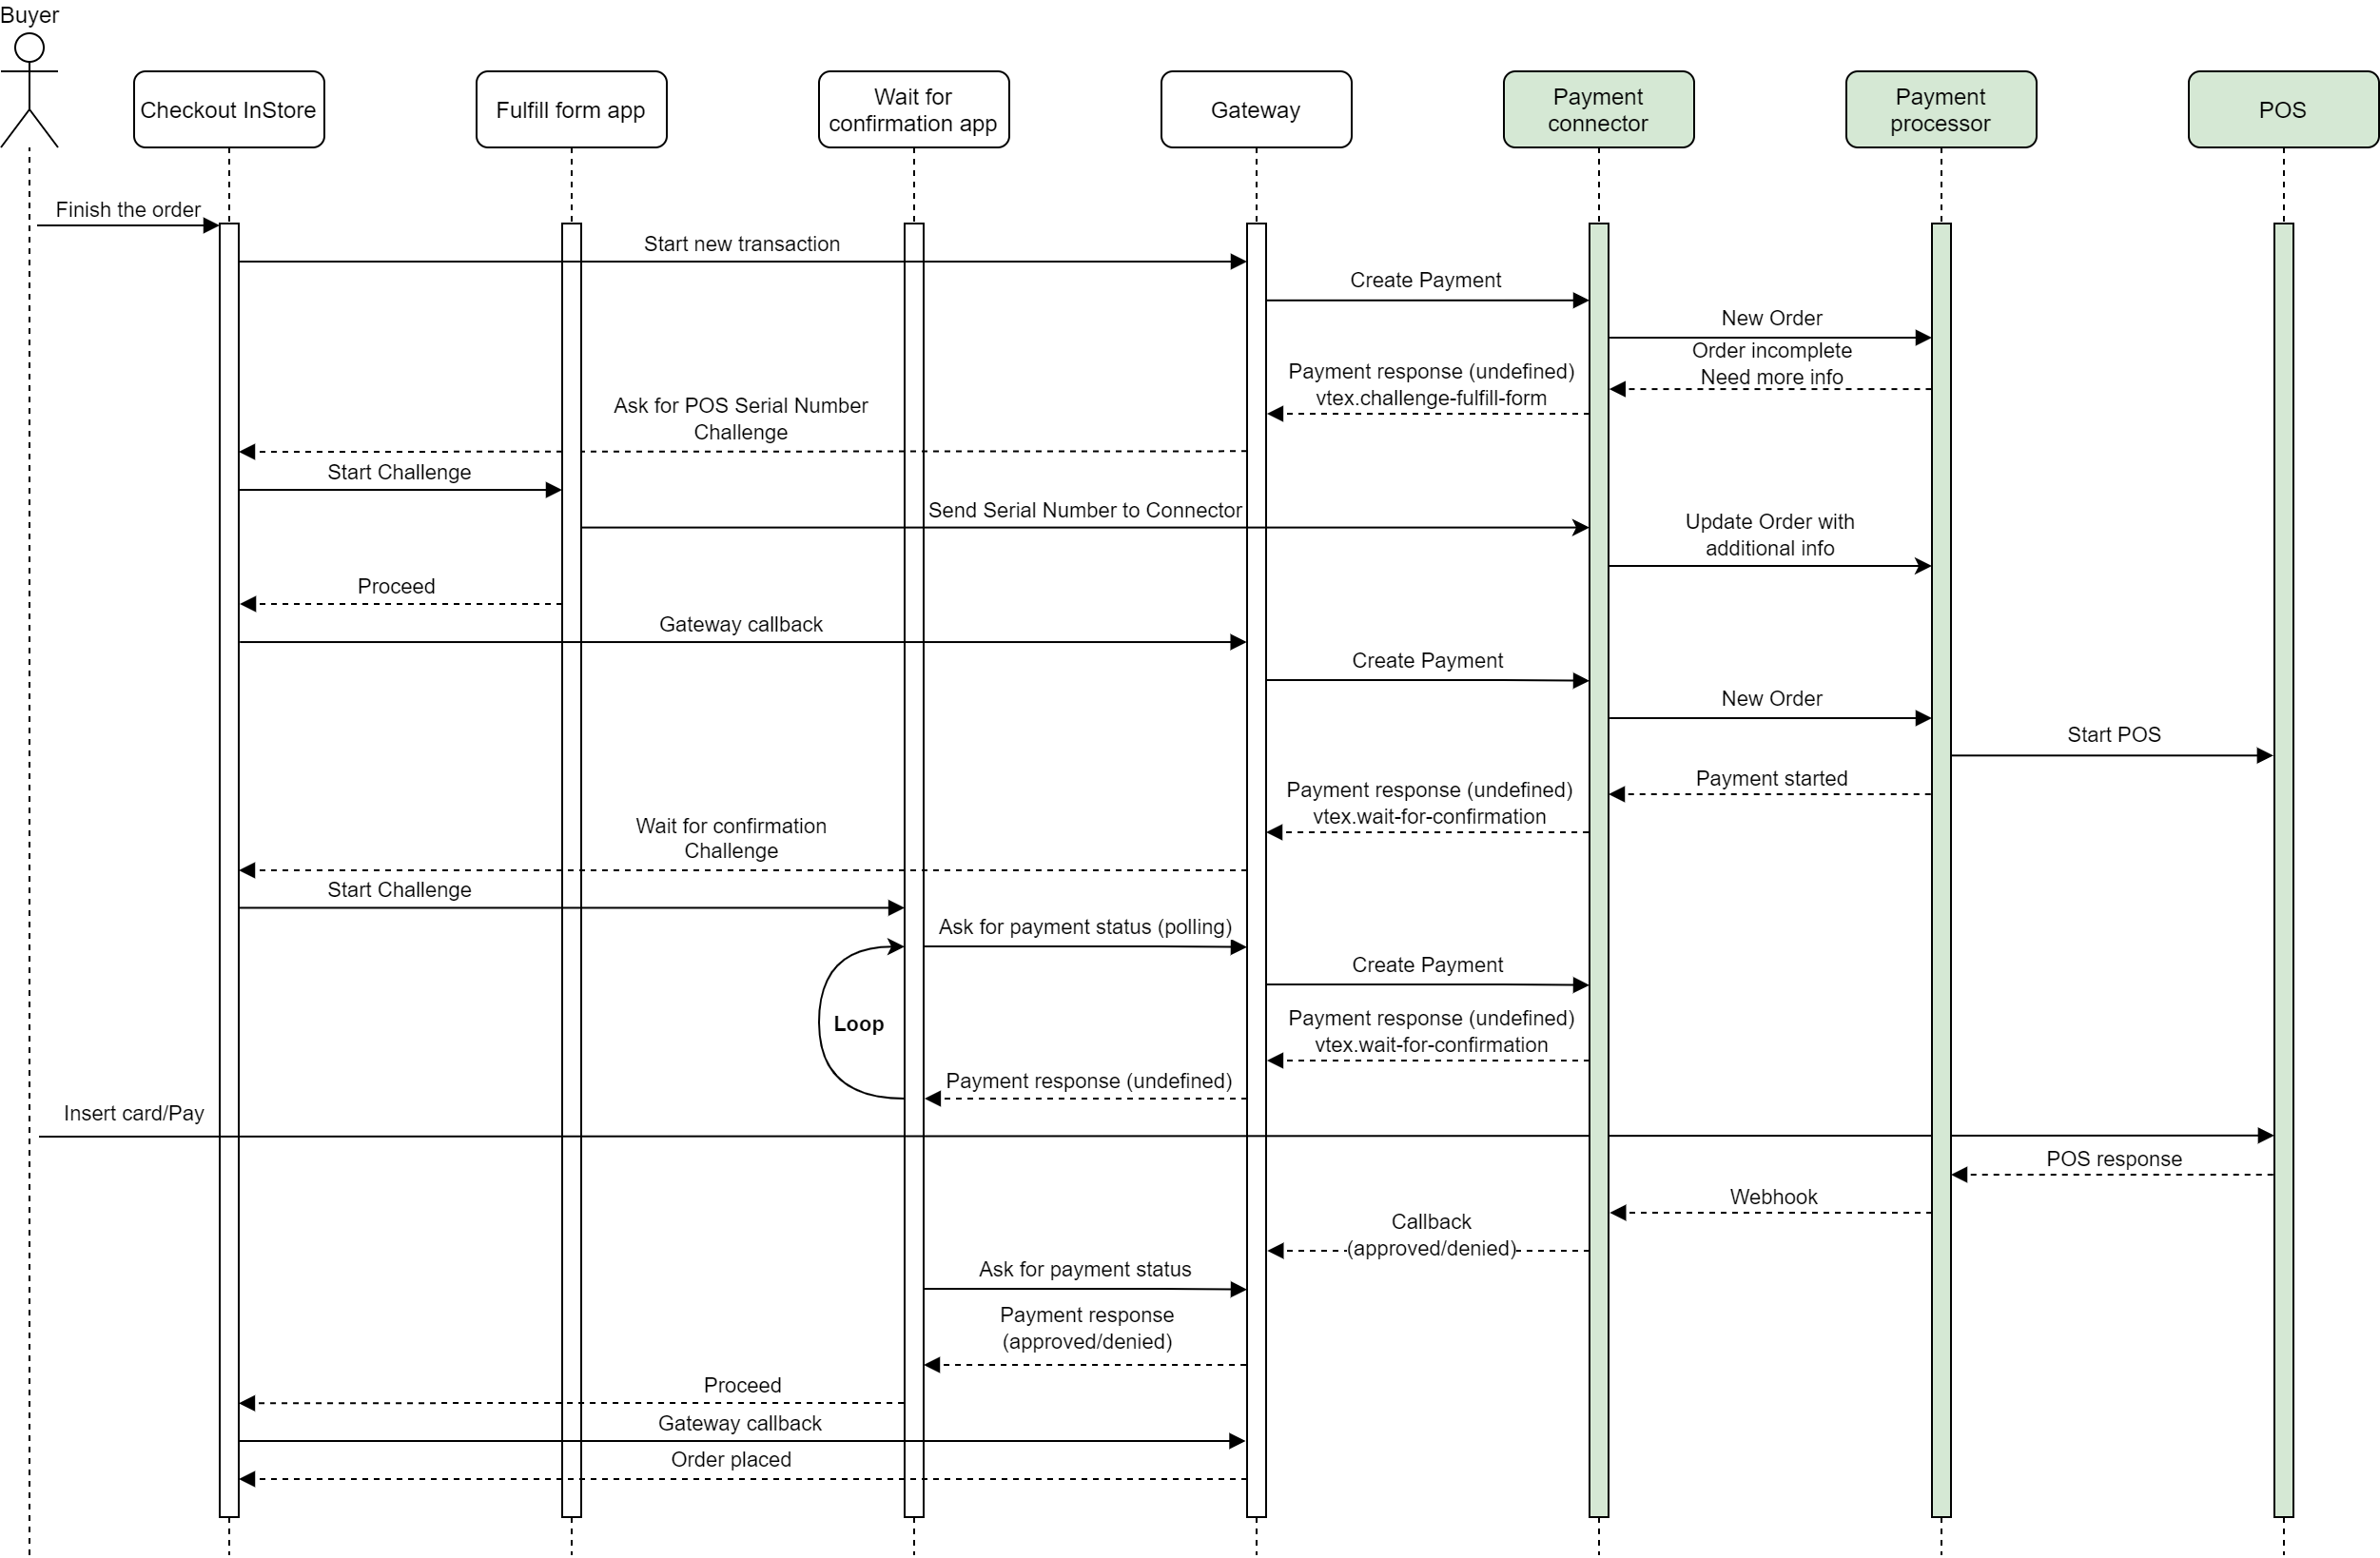
The flow has three phases:
- Identifying the POS (steps 1–7): The Gateway routes the payment to the connector, and a Payment App captures the POS serial number.
- Processing the payment (steps 8–13): The payment processor charges the card on the POS and reports the result through a callback.
- Confirming the result (steps 14–18): The VTEX Sales App confirms the final status and places the order.
The complete sequence is as follows:
- The flow starts with a buyer finishing a purchase in a VTEX physical store created on VTEX Sales App.
- The VTEX Sales App makes an Authorization request to the VTEX Payment Gateway.
- The Gateway makes a Create Payment request to the connector defined in the store settings for the specific payment method used in the purchase (for example,
Venda Direta Credito). - The Gateway receives the Create Payment response from the connector with the
undefinedstatus and theappnamefield of thepaymentAppDataparameter set with the name of an app (for example,vtex.challenge-terminal-connector-app). This means the payment isn't concluded and requires a challenge, which opens a Payment App that identifies the POS. - The VTEX Sales App receives the response from the Gateway and opens the app to start the challenge.
- The Sales person interacts with the app to identify the POS used in the payment. The app then sends the POS serial number to the connector and closes.
- The connector updates the order in the payment processor with the POS serial number.
- After the app closes, the VTEX Sales App triggers a callback to the Gateway, starting the sequence of requests to process the payment on the POS.
a. The Gateway makes a Create Payment request to the connector with the same payment ID used in step 3, waiting for an update on the payment status.
b. The connector calls the payment processor to start the payment on the POS.
c. The payment processor calls the POS to process the card payment, then confirms to the connector that the payment has started.
d. Because the payment takes time to conclude on the POS, the connector responds to the Gateway again with an
undefinedstatus and instructions to open another Payment App calledvtex.challenge-wait-for-confirmation. e. The Gateway instructs the VTEX Sales App to open the Wait for confirmation app. - The VTEX Sales App opens the Wait for confirmation app to indicate that it is waiting for the POS to finish the payment.
a. The Wait for confirmation app asks the Gateway for the updated payment status.
b. The Gateway makes a Create Payment request to the connector for the updated status.
c. Until the POS finishes the payment, the connector keeps responding that the status is
undefined. d. The Gateway responds to the Wait for confirmation app with theundefinedstatus. e. The Wait for confirmation app enters a loop, repeating from step 9.a and polling the Gateway for the updated status until the POS finishes the payment and the status changes, or until a timeout occurs. ThesecondsWaitingparameter in the payload defines the timeout. On timeout, the payment is canceled and the buyer must place the order again. For details, see the Wait for confirmation app subsection. - After step 8.c, the previous steps occur in the background. From this point, the buyer can insert the card and interact with the POS to complete the payment.
- The POS responds to the payment processor from the request in step 8.c.
- The payment processor processes the transaction and uses a webhook to call the connector.
- The payment provider makes a mandatory callback request to the Gateway (without which it's not possible to approve or deny the POS transaction), sending the following information to VTEX:
- Payload containing card information (
cardBrand,firstDigitsandlastDigitsfields) - Payment status (
approvedordenied)
- Payload containing card information (
- The Wait for confirmation app requests the Gateway once more for the updated payment status.
- The Wait for confirmation app receives the updated payment status.
- The Wait for confirmation app responds to the VTEX Sales App that it can proceed, so the app is closed.
- From a callback, the VTEX Sales App calls the Gateway to know the status of the payment.
- The Gateway responds to the VTEX Sales App with the final status. If the status is
deniedorcanceled, the VTEX Sales App shows an error and the buyer can retry the purchase from checkout. Otherwise, the purchase is completed and the order is placed in the system.
Implementing the connector
This section details the connector behavior required for POS payments: the Create Payment request parameters, the asynchronous authorization flow, timeout handling, the Payment Apps used for challenges, and the interaction with the POS.
Create Payment route parameters
The request body of the Create Payment endpoint has many parameters. The following parameters require special attention for physical stores:
card: The VTEX Gateway does not receive card data for payments in physical stores. Therefore, all fields in this object are sent asnull.
_11"card": {_11 "holder": null,_11 "number": null,_11 "csc": null,_11 "expiration": {_11 "month": null,_11 "year": null_11 },_11 "document": null,_11 "token": null_11 }
paymentMethod: For physical stores, this field contains"Venda Direta Debito"or"Venda Direta Credito"instead of values like"Visa"or"Mastercard". A connector that handles both ecommerce and physical payments can check this field to determine which flow applies.callbackUrl: Because physical payments follow an asynchronous flow, this field tells the provider which URL to use when notifying VTEX about status updates. The payment is first created with anundefinedstatus. When the status changes toapprovedordenied, the provider sends a request with the updated status to thecallbackUrl. For details, see the Payment Apps and paymentAppData section and the Payment App article.
Asynchronous flow and delayToCancel
When VTEX Payment Gateway calls the Create Payment endpoint, the connector starts an asynchronous authorization process, which returns immediately with an undefined status. This flow is similar to other asynchronous payment methods like Pix and Boleto (common methods used in Brazil). After the Gateway receives the initial status as undefined, at some point the payment will be concluded and the status will be updated to approved or denied.
The payment can't stay undefined indefinitely. The Gateway waits for the payment to conclude up to a time limit defined by the connector in the delayToCancel field of the Create Payment response body, expressed in seconds. If this limit is exceeded, the Gateway automatically calls the connector's Cancel Payment endpoint.
Handling timeouts and errors
POS payments involve two independent timeouts. Handle both to avoid stuck transactions:
| Timeout | Set by | Scope | Outcome when exceeded |
|---|---|---|---|
secondsWaiting | Connector (Wait for confirmation payload) | How long the Wait for confirmation app polls for a status update | The app stops polling, the payment is canceled, and the buyer must restart the order. |
delayToCancel | Connector (Create Payment response) | Maximum time the Gateway keeps the payment as undefined | The Gateway calls Cancel Payment on the connector. |
To make the flow resilient:
- Keep responses under 20 seconds. Every connector endpoint must respond within 20 seconds; otherwise, the Gateway treats the call as failed.
- Set
secondsWaitinganddelayToCancelconsistently.delayToCancelshould be greater than or equal tosecondsWaitingso the Gateway does not cancel a payment that the app is still waiting for. - Return the latest status on repeated Create Payment calls. Because the route is idempotent, respond with the current status rather than creating a new payment.
- Handle POS-side failures at the processor. Card declines, insufficient funds, and password retries are resolved between the payment processor and the POS. Report the final result to the Gateway through the callback flow with
approvedordenied. - Confirm cancellation on failure. When a payment is canceled or denied, the VTEX Sales App returns the buyer to checkout so they can retry.
Payment Apps and paymentAppData
At VTEX, payments in physical stores follow an asynchronous flow that requires additional interactions with the user, also called challenges, before approval. To request this interaction, the connector returns the paymentAppData field in the Create Payment response. This field contains the name of the VTEX IO app (appName) presented on the VTEX Sales App and the data the app needs to function (payload).
VTEX provides ready-to-use apps for additional interaction with payments on a POS.
Besides the provided apps, partners can also develop apps for their specific needs. You can check more details in the Payment App article.
Terminal connector App
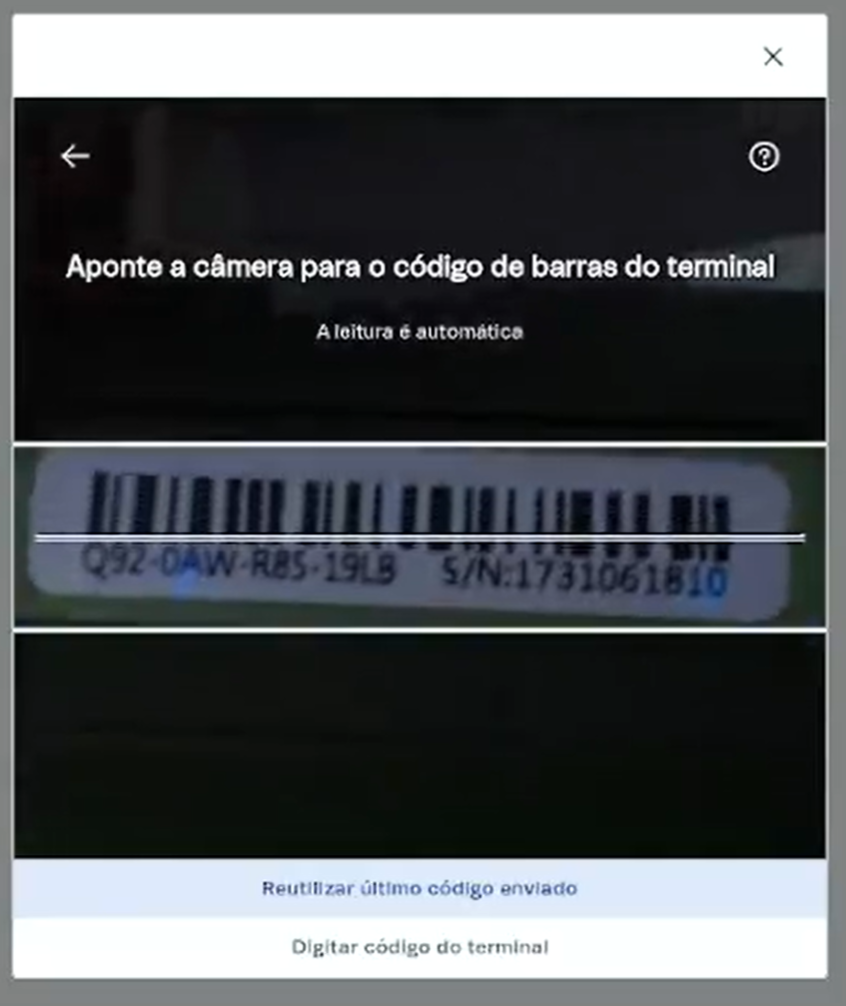
This app uses the device camera to read the barcode of the POS used for the purchase. After reading the barcode, the app automatically sends the information to the URL defined by the submitUrl parameter, using the format {"serialNumber": "12345"}.
Fields used in this app:
appName:vtex.terminal-connector-app
payload:submitUrl(string): URL where the app sends theserialNumber.
Payload example:
_10"paymentAppData": {_10 "appName": "vtex.terminal-connector-app",_10 "payload":_10 "{_10 \"submitUrl\": \"https://coolacquirer.com/instore_config/1231231\"_10 }"_10}
Wait for confirmation
The connector returns this app after the payment starts on the POS, so the VTEX Sales App can poll for the payment status. The secondsWaiting parameter in the connector's payload defines how long the app waits for a status change.
Fields used in this app:
appName:vtex.challenge-wait-for-confirmation
payload:secondsWaiting(int): Number of seconds the app stays open waiting for a payment status update.
Payload example:
_10"paymentAppData": {_10 "appName": "vtex.challenge-wait-for-confirmation",_10 "payload": "{ \"secondsWaiting\": 600 }"_10}
Interaction with the POS
After the user interacts with the app that identifies the POS, the payment processor communicates with the POS to read the buyer’s physical card. This communication happens without VTEX intervention. The payment processor also handles retries caused by password errors, insufficient credit, and other reasons.
When the payment processor determines that the payment is approved or denied, it must report the status to the VTEX Payment Gateway. This report uses the callback flow with the URL in the callbackUrl field from the Create Payment request. For details, see the Payment Authorization section of the Payment Provider Protocol article.
The callback flow starts when the payment connector calls the callbackUrl to the Gateway. The callback request is one of two types:
- Retry: The connector calls the
/retryroute, and the Gateway makes another Create Payment request to receive the updated status. - Notification: The connector calls the
/notificationendpoint to report the updated status to the Gateway.
For physical payments, the callback request payload must include three additional fields about the card, used for reconciliation and merchant financial reports:
cardBrand: Brand of the card.firstDigits: First six digits of the card number.lastDigits: Last four digits of the card number.
Testing your connector
Before a VTEX store can process payments in the physical world, the payments Gateway requires some setup. VTEX provides a preconfigured store for testing during development, so these steps are usually not needed. To configure a store manually, follow these steps:
- Install your connector in the store. To install a PPF connector built with VTEX IO, follow the steps in the Payment Provider Framework article. For installation help, open a ticket with the VTEX Support team.
- Configure a Gateway affiliation with the installed connector. For details, see Registering gateway affiliations.
- Configure a payment condition that works with a POS: Venda Direta Crédito for credit cards and Venda Direta Débito for debit cards. These are the payment condition names displayed in the Admin, which correspond to the
Venda Direta CreditoandVenda Direta DebitoAPI method values. Remember to select the configured affiliation. For more details, see Configuring payment conditions. - Make the payment method available on the VTEX Sales App by following the steps in the Define payment methods displayed on VTEX Sales App article. The payment condition IDs used in the
filterarray are44for debit and45for credit. You can also check them on the Payment Conditions page in the Admin. - Install the VTEX Sales App on a device.
- Simulate a purchase using your connector as a payment condition.
Homologation
When the connector is ready for all VTEX stores, start the homologation process. Test the connector endpoints with the Payment Provider Test Suite app. After all tests pass, open a ticket with the VTEX Support team to publish your connector. For details about the homologation process, see the Payment Provider Protocol and Payment Provider Homologation articles.