Payment App
Learn how to build a Payment App on VTEX IO to create custom payment experiences at checkout without redirecting customers.
Watch the Payment App demo on VTEX Office Hours: English | Portuguese.
A Payment App is a special type of app built in VTEX IO that allows developers to create custom payment experiences on the checkout page without redirecting customers to an external website.
Technically, a Payment App is a TypeScript class that extends React's Component. You configure a payment method to use a specific Payment App, and the Checkout UI instantiates the app when the customer selects that payment method.
Build a Payment App instead of a standard Payments Integration to:
- Implement a payment method using the Payment Provider Protocol without redirecting users to an external website.
- Add a security layer to your store’s online payments using the 3D Secure 2 (3DS2) standard.
- Measure conversions using analytics tools to customize flows.
The Payment App is displayed as a modal window when the customer clicks the Buy now button:
- Understanding the Payment App flow: How the Payment App interacts with the Checkout API and Gateway.
- Implementing a Payment App: Development instructions.
- Operational Mode: Handling the order payload, responding to the Checkout UI, and injecting external scripts.
IO apps do not work in headless environments. If you want to process payments in this type of scenario, you must use a checkout webview or implement a fully headless integration directly between your system and the acquirer/connector, sending the information via custom payments or notes payable.
Understanding the Payment App flow
The Payment App model supports a wide variety of payment methods through its interaction with the Checkout API. The following sequence diagram illustrates the complete flow:
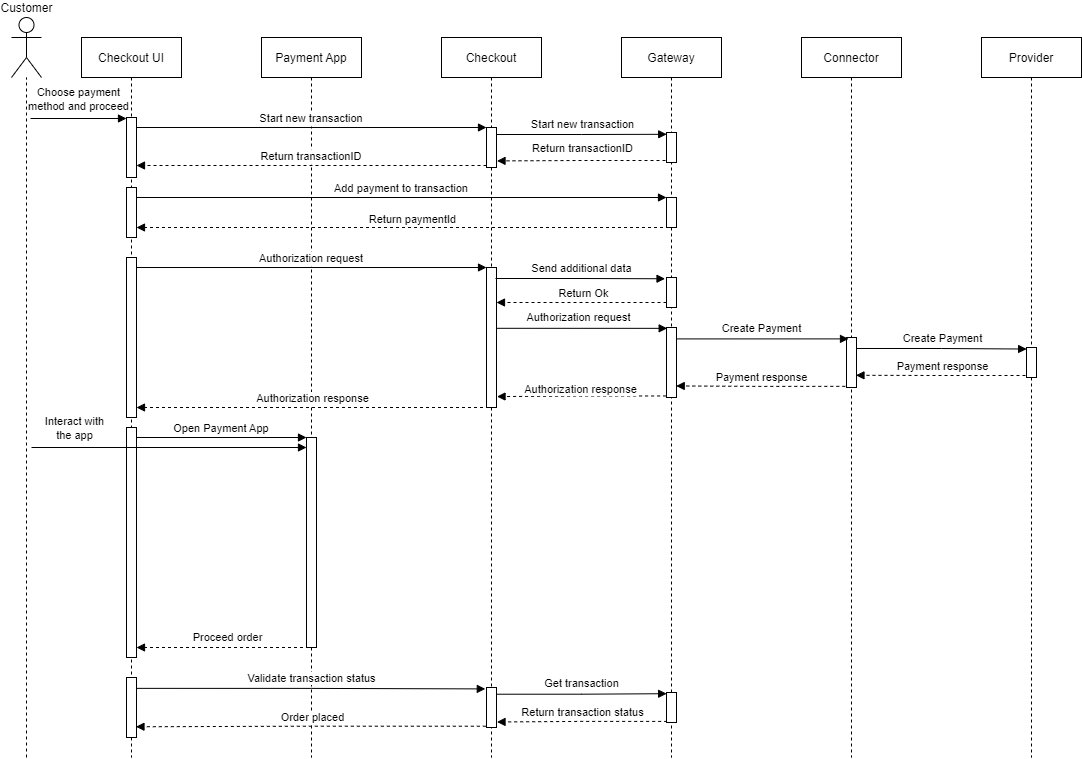
The steps below correspond to the diagram. Steps 1–4 are common to every payment flow. Steps 5–7 are specific to the Payment App flow.
- Checkout UI sends a Start Transaction request to the Checkout API.
- Checkout API sends a Start Transaction request to the Gateway API. The Gateway creates a new transaction, generates a unique
transactionId, and returns it to the Checkout UI. - Checkout UI sends a Send Payments request directly to the Gateway API. The Gateway creates a payment entity for each payment inside the transaction. A single transaction can contain multiple payments (all sent in this request). Each payment entity receives a unique
paymentId. This step transmits the actual payment information (for example, credit card data). - Checkout UI sends an Authorization request to the Checkout API.
- Checkout API sends two requests to the Gateway API:
- Send Additional Data: Sends order information (client profile, shipping address, cart items) to the Gateway. This data is stored securely in the Gateway database and used by anti-fraud providers or some payment providers during authorization.
- Authorization request: Triggers the Payment Authorization workflow inside the Gateway. The workflow proceeds as follows:
- The Gateway calls Create Payment on the connector configured in the store's payment conditions.
- The connector executes its payment-method logic. For example, a Pix (Brazilian payment method) connector requests the payment provider to generate a QR code.
- The connector responds with a
paymentAppDatafield containing:appName: The Payment App identifier in the format"{vendor}.{appName}".payload: The data required to complete the transaction (for example, the Pix QR code content). The Gateway forwards this response through the Checkout API back to the Checkout UI.
- The Checkout UI instantiates the Payment App identified by
paymentAppData.appNameand injectspaymentAppData.payloadinto the app'sappPayloadproperty. The app then executes its logic, for example, rendering a 3DS2 authentication challenge, displaying a Pix QR code, or simulating a redirect within the Payment App frame. At this point, the transaction enters the Authorizing state. Learn more in Transaction flow in Payments. - When the user completes the interaction, the Payment App closes and triggers transaction validation. The Checkout UI queries the transaction status from the Gateway API through the Checkout API:
- Authorized or Undefined: The Checkout UI displays the Order Placed screen.
- Any other status: The Checkout UI displays a warning and returns the user to the payment method selection.
Implementing a Payment App
This section covers setting up the development environment, cloning the boilerplate, testing, and deploying. All steps use the VTEX IO development platform.
If you're implementing a new payment method in your Payment App, contact the VTEX Support Team to add it to the VTEX backend.
Step 1: Setting up the development environment
- Install the VTEX IO CLI in your terminal.
- Create a development workspace.
Step 2: Developing your Payment App
Make the following changes to the boilerplate to create your own app. You also need to add the business logic of your payment system.
Before you start editing the Payment App, you must have Git installed on your computer.
- Using your terminal, clone the repository that contains a Payment App model to your local files by running:
_10git clone https://github.com/vtex-apps/example-payment-authorization-app.git
-
Open the cloned project in a code editor.
-
Open
manifest.jsonand update the fields for your scenario. Key requirements:name: Must match theappNameproperty ofpaymentAppDatain the connector's Create Payment response body.billingOptions: Settypetofree. See Billing Options.
For details on all required fields, see the Manifest documentation.
-
Open
pages/pages.jsonand replaceexample-payment-auth-appwith thenamevalue frommanifest.json. This file creates the routes that allow VTEX to find and display the app at checkout. The"component": "index"entry indicates thatreact/index.jscontains the component instantiated at checkout.
Replace only the last part of the path in
pages.jsonwith your app name (theexample-payment-auth-apppart). Don't change thecheckout/transactions/prefix, which the checkout uses to identify payment applications.If you're using the Test Connector for internal tests, keep the original app name from the repository in
pages.json. The Test Connector uses this name to open the Payment App in the checkout.
- Using your terminal, go to the app directory and run the following command:
_10vtex link
Once you link the app, local file changes are automatically synced to the VTEX cloud development environment and reflected in your workspace.
Step 3: Testing a Payment App flow
Follow the steps below to display the Payment App on the checkout screen and test the general flow.
Proceed with the following steps only when you want to test a Payment App flow; otherwise, skip to Step 4: Deploying the Payment App.
- Make sure your connector is installed and configured with the Payment App and payment method you want to test. The connector must return the
paymentAppDatafield in the Create Payment response body with the following properties:"appName": "{vendor}.{appName}""payload": "{payload information}"If the connector isn't installed yet, contact the VTEX Support Team for help with installation. See Implementing a Payment Provider for endpoint implementation details.
- Select the payment condition associated with your connector in the checkout and complete the purchase to test the flow.
Step 4: Deploying your Payment App
Once you've made the changes, see Making your new app version publicly available for instructions on running your app on the Master workspace.
Operational mode
After deploying the Payment App, use the following features to customize its behavior:
Handling the order payload
The Payment App receives appPayload as a prop, a serialized JSON string containing the order payload. This prop isn't declared in the Payment App class; the Checkout UI injects it after instantiation. Access it with the following code:
_10const { appPayload } = this.props // This appPayload is a serialized JSON (as string).
The JSON object contains the data the Payment App needs to approve or deny the transaction. The connector developer defines which fields are displayed in appPayload.
Example payload:
_10{_10 "timeToCancel": 300,_10 "transactionApproveLink": "https://..."_10}
In this example:
"timeToCancel": Time in seconds before the Payment App automatically cancels the transaction."transactionApproveLink": URL to request transaction approval when the Payment App conditions are met.
Understanding the response to the Checkout UI
When the Payment App finishes its operation, it must notify the Checkout UI so the UI can close the app and verify the transaction status. If the status is approved or undefined, the Checkout UI redirects the customer to the Order Placed page. Otherwise, it displays a warning and returns the customer to the payment method selection.
The Payment App notifies the Checkout UI by dispatching the transactionValidation.vtex event using the browser’s native event handling engine. The Checkout UI listens for this event, closes the Payment App, and queries the transaction status from the Gateway. Use the following method to trigger the event:
_10respondTransaction = () => {_10 $(window).trigger('transactionValidation.vtex')_10}
The
$(window).trigger()syntax above uses jQuery, which is available in the VTEX Checkout environment. Alternatively, you can use the native browser API:window.dispatchEvent(new Event('transactionValidation.vtex')).
If the
transactionValidation.vtexevent isn't triggered, the order confirmation email won't be sent to the user. Create a retry flow to handle cases where this event isn't triggered or the order confirmation email isn't sent.
Injecting external scripts
External script injection adds custom content and behavior to your Payment App. Inject the script into the checkout <head> element using DOM manipulation:
_10const head = document.getElementsByTagName('head')[0]_10_10const js = document.createElement('script')_10js.id = '{{script-id}}' // Replace with your script's unique identifier_10js.src = '{{script-src}}' // Replace with the external script URL_10js.async = true_10js.defer = true_10js.onload = {{callback-onload}} // Replace with a callback function to run after the script loads_10_10head.appendChild(js)
See the script injection example that adds Google reCAPTCHA to a Payment App.
If the external script handles DOM manipulation, use React's Ref to create a
divcontainer and pass it to the library. See the example.
Payment App scenarios
The following scenarios illustrate common Payment App use cases.
Scenario 1: An integration via Payment Provider Protocol that requires a new payment method
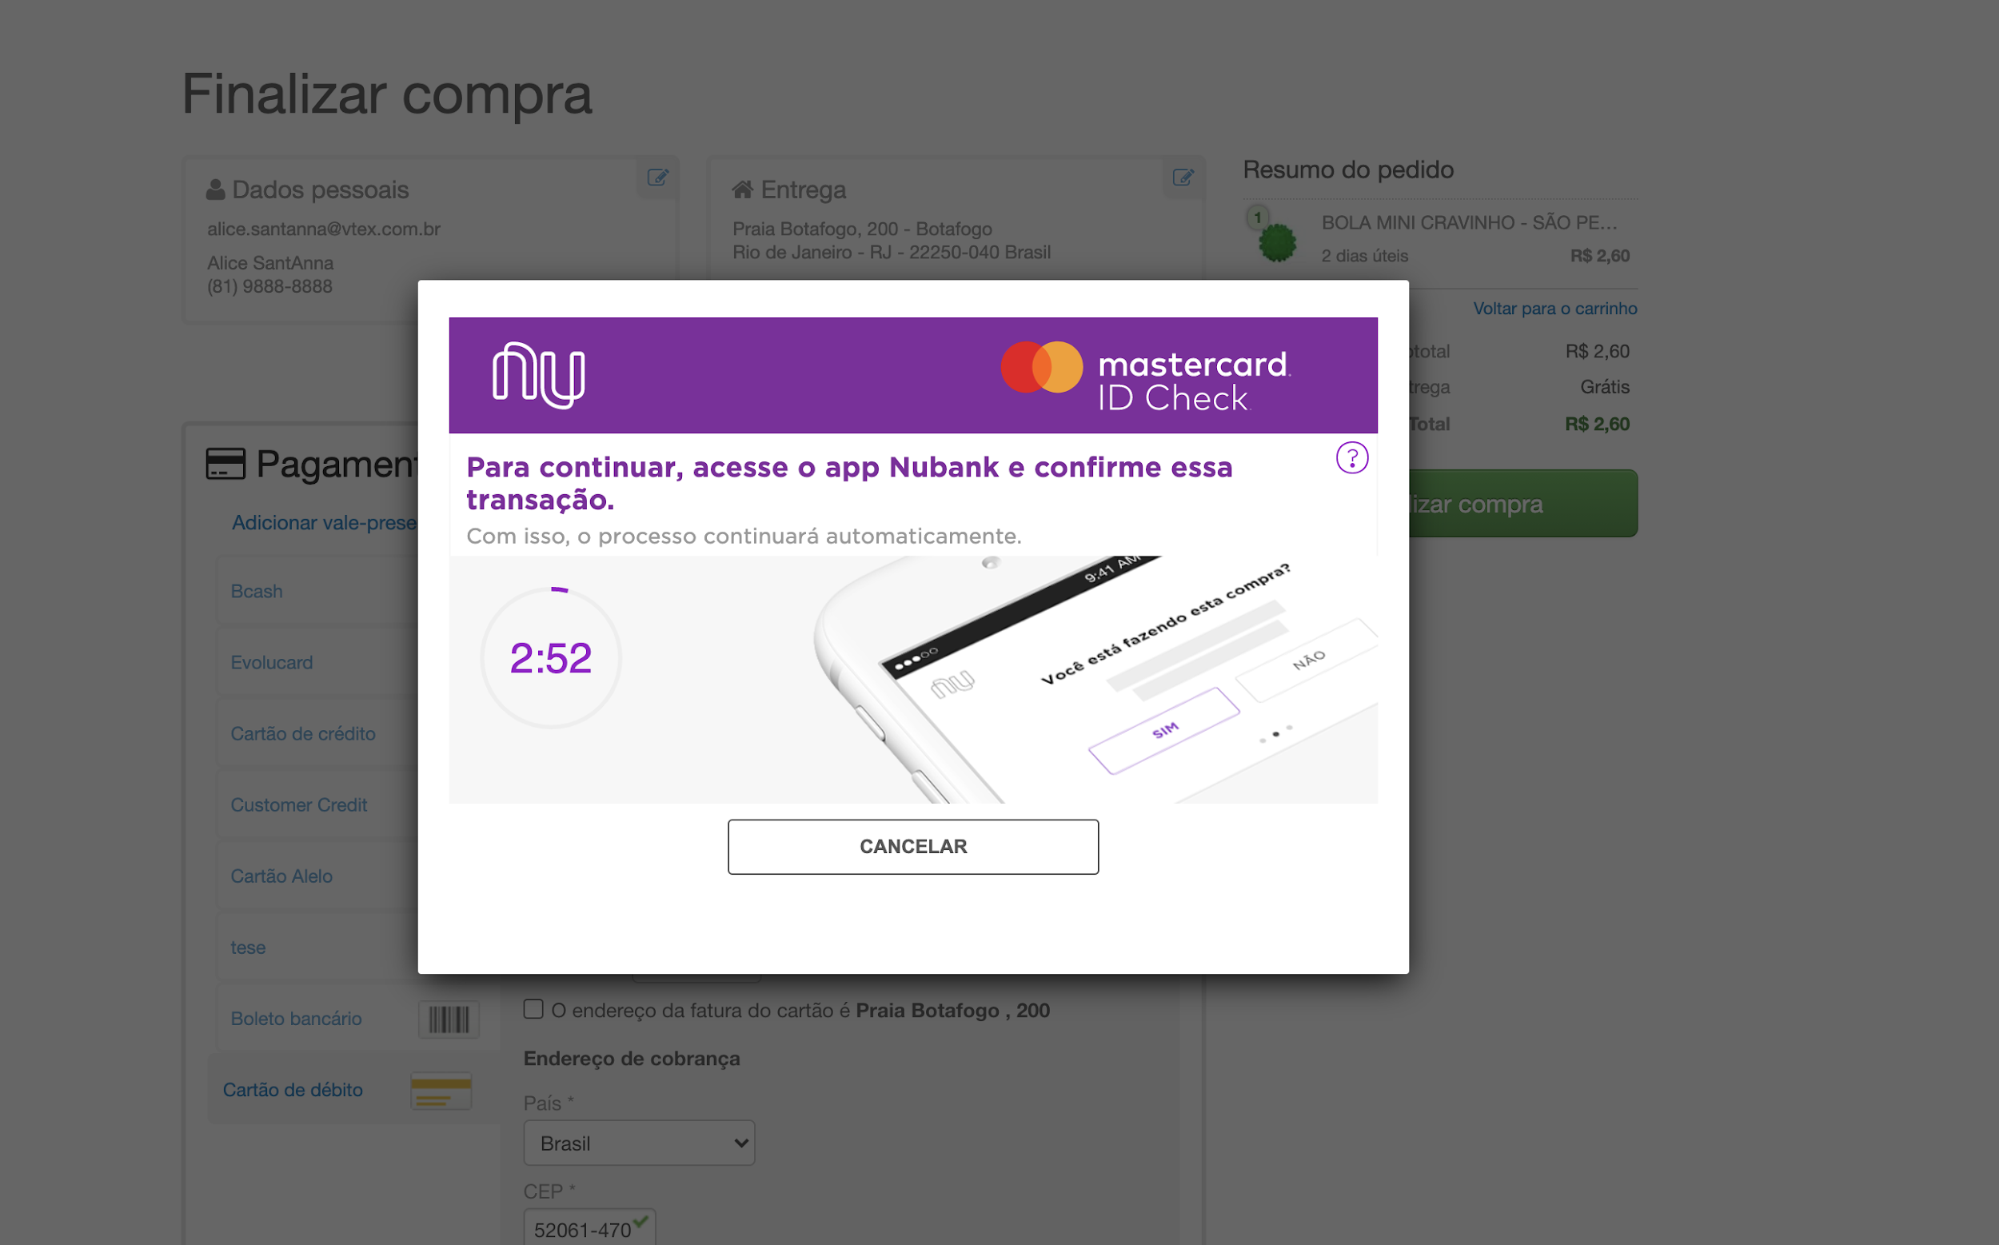
A Payment App is the recommended approach for new payment methods because customers complete the transaction without leaving the checkout page. It also enables adding a security layer to online payments using the 3D Secure 2 standard.
Scenario 2: Payment App and 3D Secure 2
3D Secure 2 (3DS2) is a protocol that enables checkout processes to comply with Strong Customer Authentication (SCA) requirements through risk-based authentication for online card transactions. It was created to comply with European payment regulations under the Revised Payment Services Directive 2 (PSD2).
3DS2 is an evolution of 3D Secure 1 (3DS1), introducing the frictionless authentication flow and improving the purchase experience. See the 3D Secure 2 FAQ for a comparison.
On VTEX, 3D Secure 2 can only be implemented via the Payment App, as the platform doesn't support alternative methods, such as redirect URLs, for this protocol.
3DS2 flow
To apply 3DS2 at checkout, the acquirer must create a Payment App that handles authentication challenges for each issuing bank that requires Strong Authentication.
When the customer enters card information and clicks the Checkout button, the acquirer calls the issuing bank through the 3DS2 flow.
The card issuer performs Risk-based Authentication, analyzing the fraud risk of the purchase. The risk score is based on elements such as transaction value, purchase history, and device information.
- High fraud risk: The issuer triggers the 3DS2 challenge, requiring the customer to complete Strong Authentication (for example, approving the payment in the bank app).
- Low fraud risk: The issuer doesn't trigger the challenge (frictionless flow).
If the acquirer requires Strong Authentication for a payment, it must return status as undefined and include the Payment App information in the paymentAppData field of the Create Payment response body.
A status of undefined indicates to the VTEX Gateway that the payment isn't yet authorized or denied. Strong Authentication is one possible reason for this. The paymentAppData field in the response determines which Payment App the Checkout UI instantiates.
The Gateway stores the app data on the payment and notifies the Checkout that the payment isn't yet authorized or denied. The Checkout UI then instantiates the Payment App specified in the paymentAppData field.
The Payment App displays the Strong Authentication challenge on the checkout screen, requiring the customer to approve the transaction through the issuing bank (for example, via the bank app).
After the customer completes the challenge, the Payment App closes and the Checkout UI checks the transaction status:
approvedorundefined— The Checkout UI displays the Order Placed screen.deniedorcanceled— The Checkout UI displays a warning and returns the customer to payment method selection.
The following image shows how the 3DS2 is displayed to customers: