Payment Provider Framework
Learn how the Payment Provider Framework (PPF) lets you develop payment connectors on VTEX IO using a boilerplate app that handles API routes, request/response types, Secure Proxy, and hosting.
Payment Provider Framework (PPF) is an alternative way to develop payment connectors for your integration through VTEX IO. Since the development is based on a boilerplate of an IO app, a lot of the work is already done to implement the needed feature, including the API routes, the types used in the request and response bodies, and the Secure Proxy. With PPF, developers also do not need to worry about hosting the connector since it is hosted on the IO infrastructure.
To develop a new payment connector, it is mandatory to follow the prerequisites determined by VTEX. You can learn about them in the Implementation prerequisites section of our Payment Provider Protocol article. For more information on how payment providers can be integrated into VTEX, visit Integrating a new payment provider on VTEX.
Getting started
Cloning base repository
If you are starting a brand new project, we recommend you to clone the example repository, as it already has all the basic configuration setup.
Updating your project
Once you have the repository code in your workspace, you have to make sure you have all the necessary dependencies and that they are updated. To do so, follow these steps:
- Run the following command on your node folder:
_10 yarn add @vtex/payment-provider
- Go to your
package.jsonand make sure it has been added as a dependency with the correct version:
_10 "@vtex/payment-provider": "1.x"
- Check in the
package.jsonthe version of@vtex/api, which should be listed in the devDependencies as follows:
_10 "@vtex/api": "6.x"
- When linking your app, this version might get updated to a later than 6.x version, which is fine. In case it is not listed as a
devDependency, run the following command on your node folder:
_10 yarn add -D @vtex/api
If you get any type errors or conflicts in your project related to
@vtex/api, follow these steps: 1. Delete thenode_modulesfolder and theyarn.lockfile from both your project root and your project's node folder. 2. Run the commandyarn install -fin both folders.
- In your
manifest.json, you should check the builders section, in which you must include thepaymentProviderin its current version. This will add policies to callback the Payment Gateway APIs and also expose Payment Provider protocol routes.
_10"builders": {_10 "node": "6.x",_10 "paymentProvider": "1.x"_10}
Next steps
In order to create your service, you must implement your payment provider connector and the service itself, as described in the sections below.
Payment Provider
This is an abstract class with the signatures of the route functions required in your connector, according to the protocol.
You must create a new class extending the Payment Provider, which must implement a function for each route. The functions will receive the request body (when there is one) as a parameter and the response must be returned as an object, such as the example shown below:
_10import {_10 PaymentProvider,_10 // ..._10} from '@vtex/payment-provider'_10_10class YourPaymentConnector extends PaymentProvider {_10_10 // ... implementation of the other routes functions_10}
Typescript should automatically check for typing errors, but if you need, you can check the requests and responses signatures from the Payment Flow endpoints in our API Reference.
Payment Provider builder
To specify which payment methods the connector will accept to process, follow the steps below:
- Create a folder named
paymentProviderusing the following folder structure.
_10node_10paymentProvider_10manifest.json
- Create a file named
configuration.jsoninside thepaymentProviderfolder.
_10node_10paymentProvider_10 |--configuration.json_10manifest.json
- Declare the payment methods accepted by your payment provider. This allows them to be automatically implemented by the builder, without the need to declare them in the
/manifestroute.
Before adding values to
paymentMethodsin your connector manifest, check the names already documented in the List Payment Provider Manifest endpoint. If a payment method already exists, use the same name (same spelling and capitalization). Create a new name only when the payment method is truly new.
_33{_33 "name": "MyConnector",_33 "paymentMethods": [_33 {_33 "name": "Visa",_33 "allowsSplit": "onCapture"_33 },_33 {_33 "name": "American Express",_33 "allowsSplit": "onCapture"_33 },_33 {_33 "name": "Diners",_33 "allowsSplit": "onCapture"_33 },_33 {_33 "name": "Elo",_33 "allowsSplit": "onCapture"_33 },_33 {_33 "name": "Hipercard",_33 "allowsSplit": "onCapture"_33 },_33 {_33 "name": "Mastercard",_33 "allowsSplit": "onCapture"_33 },_33 {_33 "name": "BankInvoice",_33 "allowsSplit": "onAuthorize"_33 }_33 ]_33}
The
namefield indicating the name of the connector must be replaced with the name of your provider. This field cannot be filled with a value"MyConnector".
To check which payment methods are currently available in the VTEX Admin, go to Store Settings > Payment > Settings, or type Settings in the search bar at the top of the page and click the green
+button. If you want to support a new payment method that is not available, you need to open a ticket to the VTEX team informing them of this new payment method.
You can also declare the customFields array to allow your payment provider to send specific information. The type field can be configured as follows: text for non-confidential data; password for sensitive and security information (except appKey and AppToken which should not be sent in this field); and select to group a set of custom information.
_34{_34 "name": "MyConnector",_34 "paymentMethods": [_34 ..._34 ],_34 "customFields": [_34 {_34 "name": "Company account",_34 "type": "text"_34 },_34 {_34 "name": "POS URL",_34 "type": "text"_34 },_34 {_34 "name": "Client key",_34 "type": "password"_34 },_34 {_34 "name": "Auto Capture Settings",_34 "type": "select",_34 "options": [_34 {_34 "text": "Automatic Capture Immediately After Payment Authorization",_34 "value": "Immediately"_34 },_34 {_34 "text": "Auto Settle Delay: 7 Days",_34 "value": "Deactivated"_34 }_34 ]_34 }_34 ]_34}
Overriding the Manifest route
If you wish to override the default /manifest route due to some specific feature of your provider, please open a ticket to the VTEX support team describing your use case and add special parameters as specified below.
_17{_17 "memory": 256,_17 "ttl": 10,_17 "timeout": 10,_17 "minReplicas": 2,_17 "maxReplicas": 3,_17 "routes": {_17 "manifest": {_17 "path": "/_v/api/my-connector/manifest",_17 "handler": "vtex.payment-gateway@1.x/providerManifest",_17 "headers": {_17 "x-provider-app": "$appVendor.$appName@$appVersion",_17 },_17 "public": true_17 }_17 }_17}
The
x-provider-appparameter must be updated whenever there is an important change (e.g. vtex.payment-provider-example@1.2.3). You can also omit thehandlerandheadersparameters, however, when performing this procedure you will need to implement them yourself.
Available Configurable Options
In addition to the manifest fields (paymentMethods and customFields), the following configuration options are available:
| Parameter name | Required | Default | Description |
|---|---|---|---|
name | Yes | Payment provider connector name. | |
serviceUrl | Yes | Auto-generated for IO connectors. | A valid URL (can include relative paths). |
implementsOAuth | No | false | Defines whether the provider implements the configuration flow with OAuth authentication support. |
implementsSplit | No | false | Defines whether the provider implements the payment split flow. |
usesProviderHeadersName | No | true | Defines whether the provider will receive appKey and appToken headers as "x-provider-api-appKey" and "x-provider-api-appToken" respectively. |
useAntifraud | No | false | Defines whether anti-fraud providers can be used in the payment provider's transactions. |
usesBankInvoiceEnglishName | No | false | Defines if the Bank Invoice payment method will use the English name (true), or the Brazilian name (Boleto Bancário)(false). |
usesSecureProxy | No | true | If true, the provider can process payment without being PCI-Certified. The connector will receive a secureProxyUrl on createPayment flow, and the card encrypted data. If false, the provider must be a PCI-Certified entity, and you should send the AOC containing the provided serviceUrl. |
requiresDocument | No | false | If true, the customer must include the cardholder document on Checkout. A new field will appear on the Checkout form. If false, the customer does not need to include a cardholder document. |
acceptSplitPartialRefund | No | false | If true, a partial refund will be sent when a payment split occurs. If false, the connector couldn't process a partial refund when a payment split occurs. |
usesAutoSettleOptions | No | false | If true, the client will be able to choose the behavior of the auto settlement in the VTEX admin configurations of the provider. The available options are as follows: "Use behavior recommended by the payment processor", "Automatic capture immediately after payment authorization", "Automatic capture immediately after anti-fraud analysis", "Scheduled: schedules the automatic capture" and "Deactivated: not automatically captured". If false, the connector will not have this dropdown configuration field for auto settlement. More information can be found in the Custom Auto Capture Feature article. |
Request a retry from Payment Gateway
A retry is required to develop your connector according to the protocol, and for this action, the function below must be invoked:
_10this.retry(request)
More information about the retry flow can be found in the Payment Authorization section of the Payment Provider Protocol article.
Payment Provider Service
This is a class that extends the Service from @vtex/api. You must invoke it by passing the developed connector as a property of the first parameter and it will automatically set up the required routes for you.
The following code shows how to do this and find it in the node/index.ts file.
_10import {_10 PaymentProviderService,_10} from '@vtex/payment-provider'_10_10new PaymentProviderService({_10 connector: YourPaymentConnector,_10})
By default, the Payment Provider Service declares the following routes:
/manifest/payments/settlements/refunds/cancellations/inbound
If your service requires any extra routes, you must declare them separately and use them as parameters:
_10new PaymentProviderService({_10 routes: newRoutes,_10 connector: YourPaymentConnector,_10})
If your connector requires any extra clients, you must also pass them in the parameters along with the connector:
_10new PaymentProviderService({_10 clients: NewClients,_10 connector: YourPaymentConnector,_10})
Using Secure Proxy
For processing credit, debit or co-branded card transactions, integrations must be compliant with PCI-DSS security standards. For integrations hosted in VTEX IO supporting one of those payment methods, it is mandatory to use Secure Proxy to make calls to a PCI-certified endpoint. You can check more details in the Secure Proxy article.
The endpoint must be allowed by VTEX Secure Proxy. This must be requested via ticket sending the AOC with the wanted endpoint. Currently the Secure Proxy only accepts two Content-Types: You can use
\"application/json\"or\"application/x-www-form-urlencoded\". Any other Content-Type will not be supported.
To make calls over our Secure Proxy, you must:
- Extend the
SecureExternalClientabstract class. The constructor of the class is made in a way that VTEX allows'http://my-pci-certified-domain.com'as one of the trusted destinations by receiving its AOC. - Set the Secure Proxy URL on the request that you want to be proxied.
SecureProxyURLis received oncreatePaymentflow.
_30import { SecureExternalClient, CardAuthorization } from '@vtex/payment-provider'_30import type {_30 InstanceOptions,_30 IOContext,_30 RequestConfig,_30} from '@vtex/api'_30_30export class MyPCICertifiedClient extends SecureExternalClient {_30 constructor(protected context: IOContext, options?: InstanceOptions) {_30 super('http://my-pci-certified-domain.com', context, options)_30 }_30_30 public myPCIEndpoint = (cardRequest: CardAuthorization) => {_30 return this.http.post(_30 'my-pci-endpoint',_30 {_30 holder: cardRequest.holderToken,_30 number: cardRequest.numberToken,_30 expiration: cardRequest.expiration,_30 csc: cardRequest.cscToken_30 },_30 {_30 headers: {_30 Authorization: 'my-pci-endpoint-authorization',_30 },_30 secureProxy: cardRequest.secureProxyUrl,_30 } as RequestConfig_30 )_30 }_30}
Placing an order with your new connector
Now that you have a new connector ready to be used, you can test it entirely in the production flow using your store's Checkout.
A prerequisite for this procedure is to have products for sale at your store for testing. To place an order with your new connector:
-
Launch a beta version of your connector. E.g.:
vtex.payment-provider-test@0.1.0-beta. If you need, check the Making your app publicly available article to learn how to create a beta version of your app. -
Install the beta version on
masterworkspace. Wait for around 1 hour. -
Go to
https://{account}.myvtex.com/admin/affiliations/connector/Vtex.PaymentGateway.Connectors.PaymentProvider.PaymentProviderConnector_{connector-name}/. Replace{account}for the name of the account you want to test on and{connector-name}for the name of your connector. The format of the name is:${vendor}-${appName}-${appMajor}(e.g.:vtex-payment-provider-example-v1).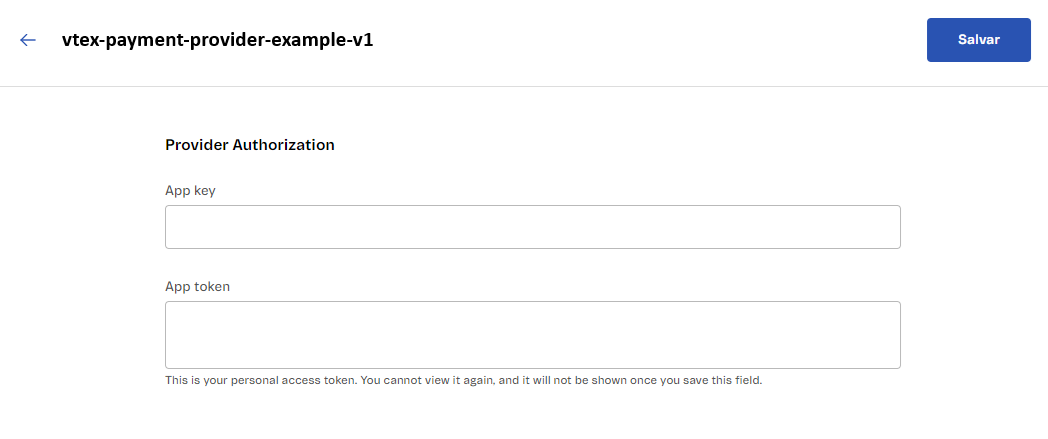
-
In Payment Control, activate the test environment by clicking Enable test mode. A new field called Workspace will appear.
-
Set the Workspace as you wish. You can leave it as
masterif it is the workspace you want to test on.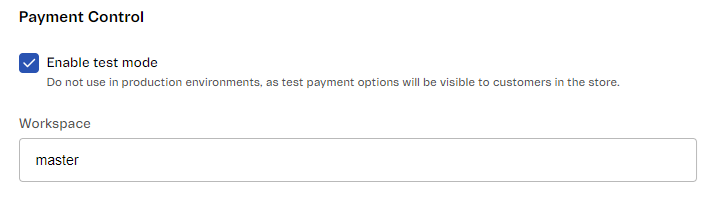
-
Configure a payment condition with your newly created connector and wait 10 minutes to appear on Checkout.
-
Make a purchase with the payment condition you configured with your connector.
-
After completing all transaction testing in the beta version of the connector, release and deploy a stable version of your connector (e.g.: vtex.payment-provider-test@0.1.0). This stable version must be sent to the homologation process.
Making your connector available to process sales
To process sales with your connector on all VTEX accounts, make sure to send the
billingOptionsfield indicated asfreein the manifest. If you want to restrict the use of the connector to only a few specific accounts, thebillingOptionsfield must also be sent asfree, but the payments team must be notified via a support ticket to enable the connector only for the desired accounts. More information about this field can be found in the Billing Options article.
The publication process is made via the app store. More info on how to do that can be found in the Submitting your app to the VTEX App Store article.
After that, you need to open a ticket to the VTEX support team informing them that the integration was completed. However, before opening the ticket, make sure you have the following information:
- Connector App Name: Name of the PPF connector app. Use the following format:
"vendor.appname". For example:partnername.connector-partnername. These can be found in themanifest.jsonfile. - Partner contact: partner email address in case we need to communicate changes and new features of our protocol.
- Production Service Provider Endpoint: the base path that will be used for API calls to the provider, e.g.
https://vtex.pagseguro.com. It has to respond to the route{{serviceUrl}}/manifest. This endpoint must be publicly available. - Allowed Accounts: describe which VTEX accounts from this provider will be available (all accounts or specific accounts).
- New Payment methods: inform if this connector supports a payment method that is not yet available in the VTEX Admin.
- New Payment method purchase flow: if a "New Payment method" is supported, inform whether it works with Redirect or Payment App. For more information, access the Purchase Flows article.
The SLA required for the payment team to carry out homologation is 30 days.
After the homologation step is complete, your app needs to be installed in the account that wants to use it. Then, a new affiliation will be available to configure it.
Updating and testing new configurations for an already published connector
To change and test new settings in an already published connector, you must:
- Apply the new settings to the last created beta version of your connector.
- Follow the same procedures described in the Placing an order with your new connector section to verify that the beta version of your connector is working correctly after applying the new settings.
- Create and submit a new stable version of your connector (containing the same modifications as the beta version) to the homologation process. E.g.: vtex.payment-provider-test@0.1.1.
- Publish it as indicated in the Making your connector available to process sales section.