Enabling performance settings
For ecommerce businesses, appealing offers, high-quality products, or brand recognition might not be enough to convert leads if the user experience falls short. Store website performance is essential to the user experience, directly impacting sales conversion rate, user session time, and other metrics. Every millisecond counts and affects the consumer decision-making process and website ranking in search engine results.
This guide outlines actions you can implement to optimize store performance. These optimization options can improve SEO score and page loading time. You can measure these improvements using tools like Google Lighthouse and Google Analytics. Learn more in the Monitoring tools section in the Performance guide.
This guide is divided into the following sections:
- Instructions: Instructions for enabling and deploying performance optimizations in your store, including workspace setup, Admin configuration, and promoting changes to production.
- Optimization options: Methods to enhance store performance, categorized by:
- Store settings: Actions that can be performed directly in the VTEX Admin.
- Manual optimizations: Additional manual actions for advanced performance that require direct code changes.
Instructions
Step 1 - (Optional) Testing manual optimizations
If you have implemented manual optimizations, make sure to use a development workspace to test them before making your new app version publicly available. Learn more about this process in the guide Deploying a new app version.
Step 2 - Applying changes in a production workspace
-
Using the terminal and the VTEX IO CLI, log in to the desired account by running
vtex login {account}. -
Run the command
vtex use {productionWorkspace} --productionto create and use a new production workspace.Replace the values between the curly braces based on your scenario.
-
Using your browser, access the Admin for that workspace.
-
In the account's Admin, go to Store Settings > Storefront > Store > Advanced.
-
Follow the instructions in the Store settings section to activate the desired features, then save the changes.
-
Access your store in the workspace you're using and check whether the performance improvements were applied.
Changes may take some time to be reflected.
Step 3 - Testing and analyzing performance
- Review and test all main pages, ensuring the changes didn't cause any side effects, such as style inconsistencies or undesired behaviors.
- Access Google PageSpeed Insights.
- Using the following URL pattern:
https://{account}.myvtex.com/?workspace={productionWorkspace}, check store performance in the production workspace where you're currently working.
Using the standard URL pattern
https://{workspace}--{account}.myvtex.com/won't show the store performance score in the specified workspace. To analyze performance in a workspace, you must use the?workspace={productionWorkspace}query string as shown in Step 3.3.
Step 4 - Making your changes publicly available
If you're satisfied with the results, run vtex promote to promote your workspace and benefit from a faster store. Before promoting your workspace to master, measure the performance improvements by comparing the performance scores in the production and master workspaces.
Optimization options
Store settings
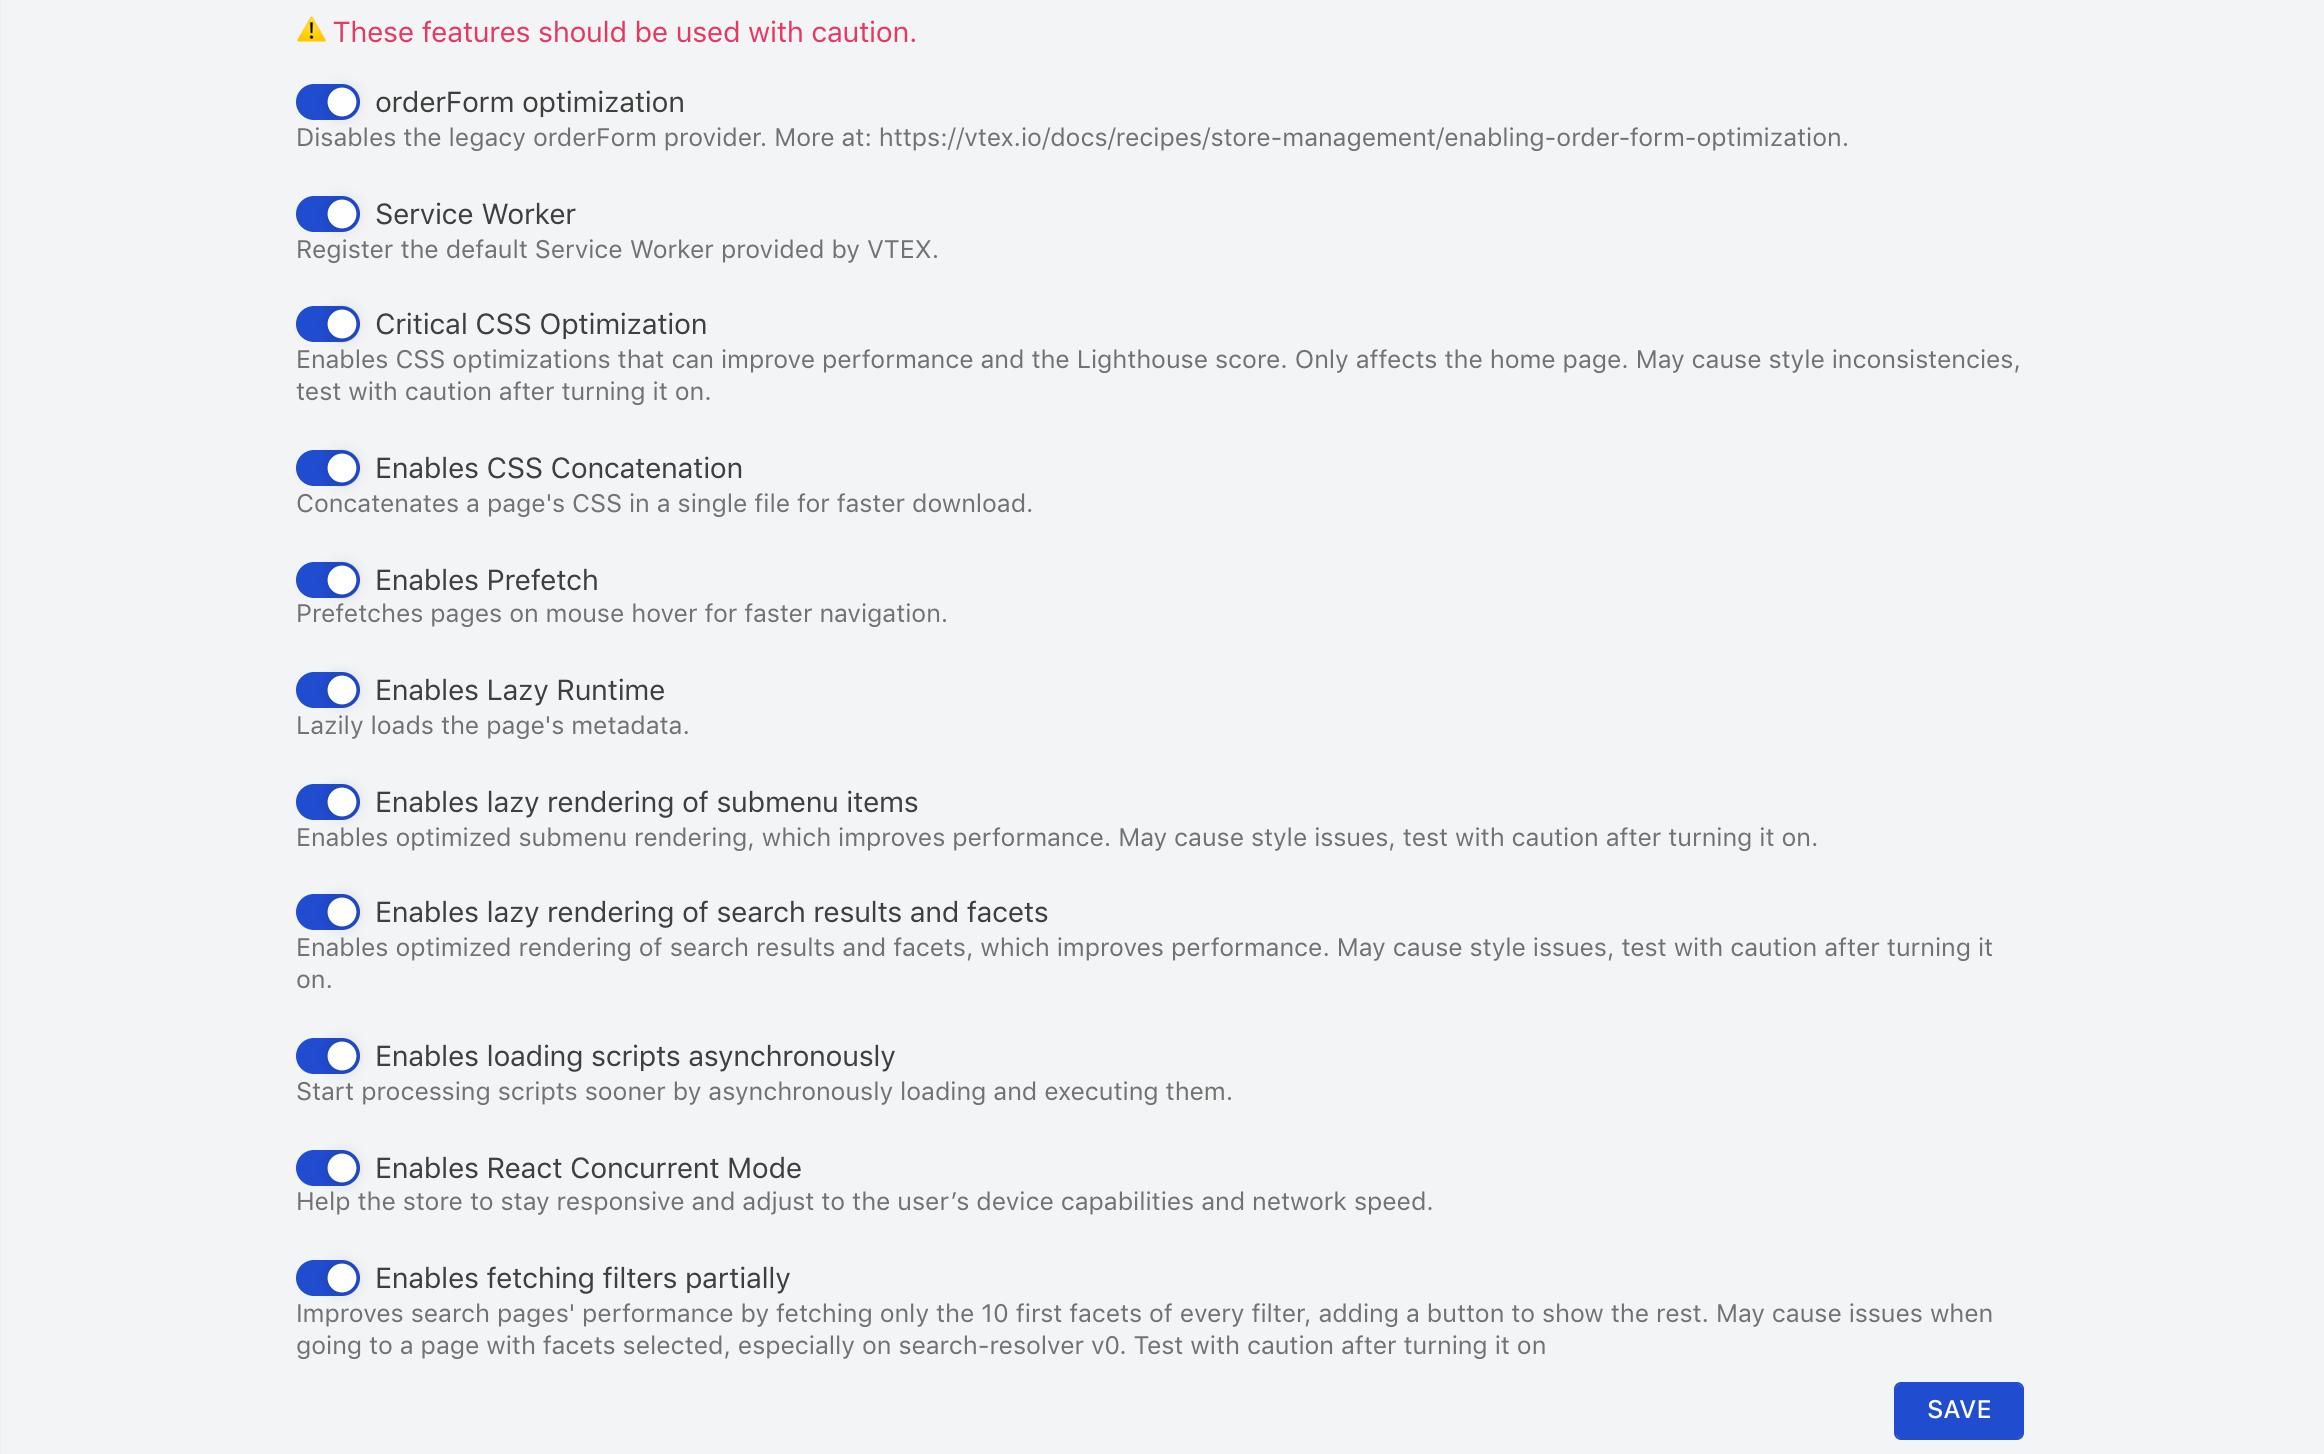
Store settings are actions you can configure directly in the VTEX Admin by navigating to Store Settings > Storefront > Store > Advanced.

OrderForm optimization
This action disables the legacy orderForm provider.
The orderForm is an object that stores and retrieves data from user orders, including each item added to the cart. To give other Store Theme blocks access to the data stored in the orderForm and allow them to render it, Store Framework runs the OrderFormProvider object on each store page. This object exports all the necessary orderForm information to these blocks.
However, all stores using VTEX IO Store Framework currently have two OrderFormProviders: a legacy version, still consumed by native blocks such as minicart and buy-button, and a newer version, better suited for replacement.
We recommend that stores using minicart.v2 and add-to-cart-button blocks (instead of minicart and buy-button, respectively) disable the legacy provider. Consuming a single provider will improve store performance.
Learn more in the guide Enabling OrderForm optimization.
Service worker
This action adds the default service worker provided by VTEX.
The VTEX IO platform provides a native service worker to every store using Store Framework. If you need to use a third-party service with its service worker, you may face conflicts. You can deactivate the native VTEX service worker to resolve this.
Learn more in the guide Deactivating the VTEX IO native service worker.
Critical CSS optimization
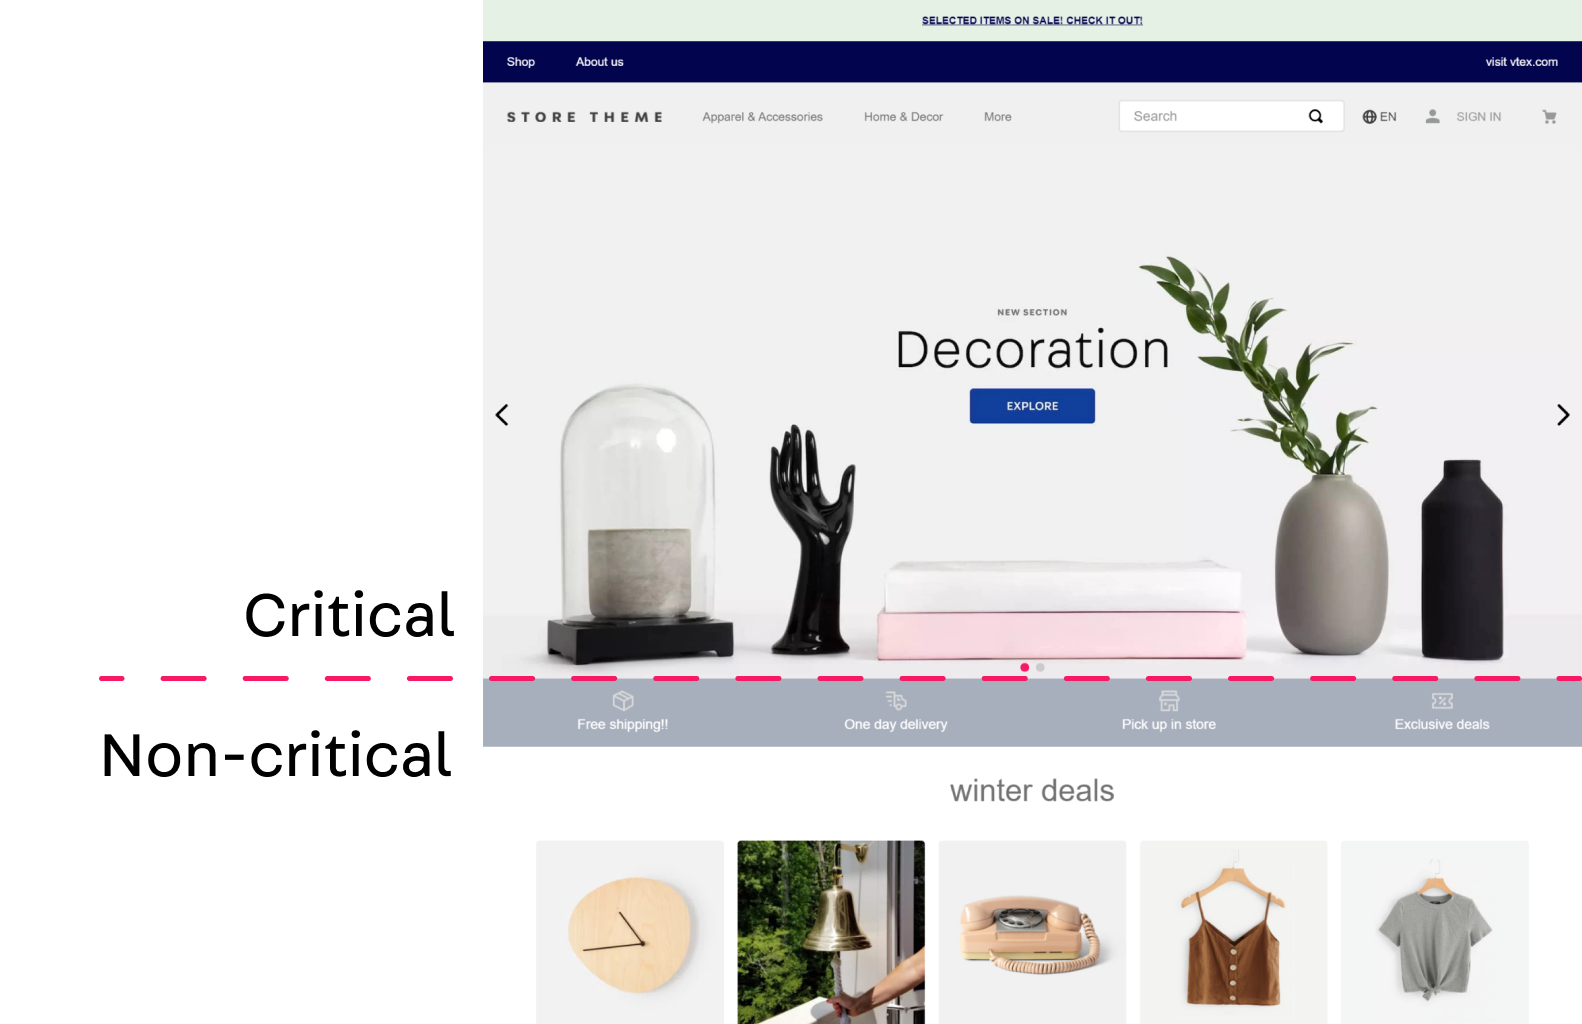
This action enables CSS optimizations on your pages to boost performance and improve Lighthouse scores. It lets the browser identify and load essential CSS needed for critical, above-the-fold content first, while loading the remaining CSS code asynchronously.

However, by default, the browser initiates the rendering of a web page after it finishes loading, parsing, and executing all related CSS files. Consequently, the more extensive the CSS code, the longer it takes to render the critical part of the page.
This optimization can be enabled for the following pages:
- Homepage
- Search page
- Custom pages
- Product page
Enabling these options might cause style inconsistencies in the store layout. Test these changes carefully before enabling them on a production workspace. If you notice any side effects, open a ticket with VTEX Support.
Enable CSS concatenation
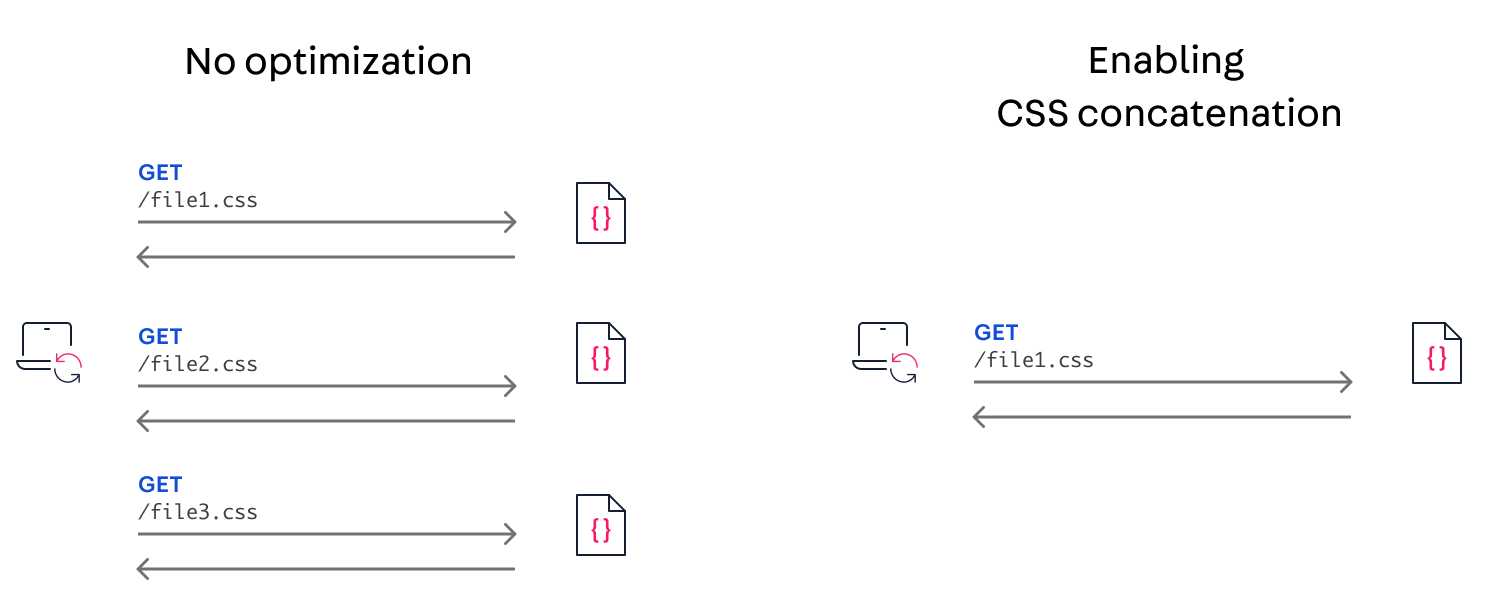
This action concatenates a page's CSS in a single file for faster download, reducing the HTTP requests required to load each CSS file separately.

Enable prefetch
This action prefetches pages when a user hovers over a link.
When enabled, the page content is proactively downloaded in the background when you hover over a link. This means that the page is already loaded or partially loaded when you click the link.
Enable lazy runtime
This action enables lazy loading of page metadata.
Before displaying a web page, the VTEX IO service app that renders server-side (Render Runtime) interprets the page metadata script. See the example below:
_10<script>_10 __RUNTIME__ = {"account":"vtexstore","amp":false,"bindingChanged":false,"binding":{"id":"aacb04t3-a8fa-4bab-b5bd-2d654d20dcd8","canonicalBaseAddress":"vtexstore.vtex.com"},"culture":{"availableLocales":[],"country":"USA","currency":"USD","language":"en","locale":"en-US","customCurrencyDecimalDigits":null,"customCurrencySymbol":"$"},"production":true,"query":{},"settings":{....
This script contains significant web page data and can be long, demanding significant browser processing. When you enable lazy runtime, the script is broken into smaller scripts to avoid compromising the total blocking time of the store website. This helps avoid lengthy tasks, leading to a faster store experience.
Some apps might not work as expected when this option is enabled. Test with caution before enabling it on a production workspace. If you notice any side effects, open a ticket with VTEX Support.
Enable lazy rendering of submenu items
By enabling this action, menus containing submenus automatically apply the experimentalOptimizeRendering prop. This configuration prevents the entire set of submenus from loading unnecessarily, as submenus only load when the user interacts with the parent menu where the prop is set.
Google won't be able to track the hidden submenu items for SEO, as their content only loads with user interaction. Make sure your SEO strategy is covered by the store sitemap or the first meaningfully painted content.
Enable lazy rendering of search results and facets
This action enables lazy rendering for the scrollable facet box and search results pages. Content within the user's viewport loads first, and content outside the viewport loads only as the user scrolls.
Enabling this option might cause unexpected behaviors, such as gaps while scrolling. If you notice any side effects, open a ticket with VTEX Support.
Enable loading scripts asynchronously
This action allows the browser to load and execute scripts asynchronously. This means the browser doesn't wait for the script to fully download and execute before continuing to parse and render the rest of the page. Instead, it can process other elements of the page concurrently while the script loads in the background.
Enable concurrent React mode
This action helps the store stay responsive by adjusting to the capabilities of the user's device and network speed. This means rendering tasks can be prioritized and interrupted based on user interactions or current network conditions.
For example, if a user begins typing in a search bar while other content is still loading, concurrent mode can pause loading to process your input, ensuring the search bar remains responsive. Once the input is handled, rendering can resume without perceived delays.
Enable fetching filters partially
When you enable this action, search results pages display a maximum of 10 facets per filter.
The search query won't automatically retrieve any additional facets or show them to the user. Instead, a Show more button allows users to load the remaining facets.
A facet is a filter value. For example,
Coloris a filter, andBlueis a facet of that filter.
Enable executing all GraphQL queries on the product page
This action allows the product page to fetch additional data necessary to render components positioned above-the-fold. This helps ensure that product details, images, and any other components in the main view display together without delays or missing information.
Enable this only if your product page truly needs it; otherwise, it may lead to deoptimization.
Enable lazy rendering of the page footer
This action renders the page footer and loads its assets lazily, which helps improve performance when first rendering the page.
Enable lazy loading of assets below the fold
This action enables lazy loading of the JavaScript files of the components below the _fold_ block. This keeps the initial load fast and reduces unnecessary bandwidth usage for users who never scroll.
Enable page number in meta title
This option adds a #{Number} to the HTML title. This helps both users and search engines know exactly which page they're viewing and avoids duplicate titles, which can impact SEO.
It's best suited for stores using traditional pagination. After enabling, review your page titles to make sure they remain clear and consistent.
Canonical URL without URL parameters
This action removes the map parameter from the canonical URL, so search engines focus on a single, clean address for each page.
This may cause issues when visiting a page with selected facets. Test with caution after turning it on.
Remove store name from title
This action removes the store name from the end of page titles on product and category pages, resulting in shorter titles that may highlight product keywords better for SEO.
Enable custom currency symbol
This action uses the Currency Symbol field defined in the trade policy. This ensures that prices are displayed in the format and symbol your customers expect, which is especially important for international or multi-currency stores.
[BETA] Show sponsored products on search results
This action enables stores in the Retail Media Network (RMN) pilot to place advertiser-sponsored products alongside organic search results.
This action is available only for stores that have joined the RMN pilot. For more information, email rmn@vtex.com.
Enable default browser navigation
Enabling this action means each store page loads separately with full reloads instead of rendering through the VTEX IO service app on the server (Render Runtime). This default browser navigation can be useful for troubleshooting or when experiencing issues with client-side routing.
Full-page reloads are generally slower and consume more bandwidth than the standard VTEX navigation. Use this only when necessary for testing or for compatibility, and consider whether the change impacts user experience or conversion rates.
Manual optimizations
In addition to the features configured in the VTEX Admin, you can apply manual optimizations directly in the project source code to enhance store performance.
Improving scrolling performance
Use the __fold__ block for scrollable pages. This allows you to specify which interface components load initially (above the fold) and which are lazy-loaded as the user scrolls.
You can also use the __fold__.experimentalLazyAssets block to define which theme blocks should load statically upon the first user interaction.
Learn more about fold blocks in the guide Lazy loading components.
If you notice any side effects, open a ticket with VTEX Support.
Reducing the number of menu blocks
If a menu block doesn't have a submenu, configure it to use menu-item blocks as props instead of children.
In the example below, the main menu items (Apparel & Accessories, Home & Decor, and More) can't be modified in their implementation. They must remain as children since they have a trigger to open a submenu.

However, the internal menu-items (Clothing, Accessories, and Eyeglasses) can be changed from children to props.
Previously, each menu-item was set up as an individual child/block. With the change, the menu-items group, declared as props, is treated as a single block, represented by a blue square.
This approach reduces the number of blocks from 3 to 1, improving store performance.
Learn more about applying both configurations in the Menu guide.
Adjusting image sizes
The size of images in your store directly impacts performance. To optimize image rendering, follow the practices outlined in the guide Optimizing image rendering, focusing on the media types used in your theme.
Improving search results
To avoid performance issues on search results pages, use the skusFilter and simulationBehavior props. These props control the SKUs returned for each product in the search query, determining whether the displayed search data will be current (skusFilter) or retrieved from the cache (simulationBehavior).
We recommend setting skusFilter to FIRST_AVAILABLE to return only the first available SKU for each product, and simulationBehavior to skip to display search data from the cache.
Learn more about prop configuration in the Search Result app documentation.
Using lazy loading for sliders
Build the shelf and carousel blocks of your theme using the Slider Layout component.
Slider Layout uses lazy loading to automatically load images and product information only when users interact with shelves or carousels, reducing page load time. However, having more products in these components may negatively impact website performance.
Learn more about using Slider Layout in the guides Shelf and Building a Carousel using Slider Layout.