6. Consuming data
Learn how to communicate with the backend system in VTEX IO using GraphQL APIs.
Now you need to learn how this new component will talk with the backend system, in other words, how it is going to consume and insert data in the platform.
Communication between storefront apps and VTEX IO is done through GraphQL APIs.
Understanding GraphQL
GraphQL is a language for APIs whose main advantage is to request specific data through a single endpoint, avoiding overfetching and underfetching.
To manage the data consumed in GraphQL, we will use a library called React Apollo that provides native components to perform data searches.
The main components in this library are:
| Name | Description |
|---|---|
| useQuery | React hook which, when executed, queries the server using the GraphQL API and returns what was requested in the query variables. |
| useMutation | React hook, which returns a function that, when executed, communicates with the server from the GraphQL API to send updates and overwrite data. |
The useQuery React hook returns an object with the following properties:
loading(boolean) - Returnstrueif the GraphQL API is still being executed. Otherwise, it returnsfalse.error(any) - Only assumes a value when an error occurs when communicating with the server.data(any) - Contains the object returned from the query execution.
The useMutation React hook returns an array containing:
- A function that can be called at any time to communicate with the server.
- An object that represents the current state of mutation that has the properties
loading,error, anddata.
Keeping in mind the objects received by the useQuery and useMutation React hooks, you can define what you want to render in React for the specific loading and error conditions, in addition to managing the content returned by queries made in the API (stored in data).
To better understand the detailed instructions below, we recommended having a basic knowledge of the GraphQL language. If you are not familiar with this solution, we recommended checking the documentation and reading it carefully before proceeding to the next steps.
Installing the React Apollo library
Using your terminal, access your app's directory and run the command shown below to install the npm React Apollo library:
_10yarn add react-apollo
Making queries in GraphQL
For your component to render the information provided by the VTEX IO platform, you have to query the data stored on the server using GraphQL APIs.
We will use the useQuery React hook to do this:
- Open your app's code in the code editor of your choice.
- In the
reactfolder, access theHelloData.tsxfile or create it if it does not already exist. - In this file, copy and paste the basic model below to build your GraphQL query:
_17import { useQuery } from 'react-apollo'_17import QUERY_VALUE from './helloData.gql'_17_17const HelloData = () => {_17 const { loading, error, data } = useQuery(QUERY_VALUE)_17_17 if (loading) {_17 return 'Loading…'_17 }_17 if (error) {_17 return `Error $\{error\}`_17 }_17_17 return `Done fetching $\{data\}`_17}_17_17export default HelloData
Note that the QUERY_VALUE property is being imported from another file called helloData.gql. The .gql extension hints that it is a file written in GraphQL. The content of this file varies depending on the query that the app will send as a request.
A simple example for helloData.gql would be:
_10query hello {_10 hero {_10 name _10 height_10 }_10}
The response, depending on the database, could be something like:
_10{_10 "hero": {_10 "name": "Luke Skywalker",_10 "height": 1.72,_10 }_10}
Note how the useQuery React hook returns an object with loading, error, and data as parameters, which are completed from the query done on the server. By holding the values of these parameters, you can condition what is rendered in the interface.
According to the example above, if loading returns true, the message Loading... will be rendered. If an error occurs, the message Error {error description} will be rendered instead. Finally, if the data parameter receives the values of the executed query correctly, the message Done fetching {data obtained from the query} will be rendered.
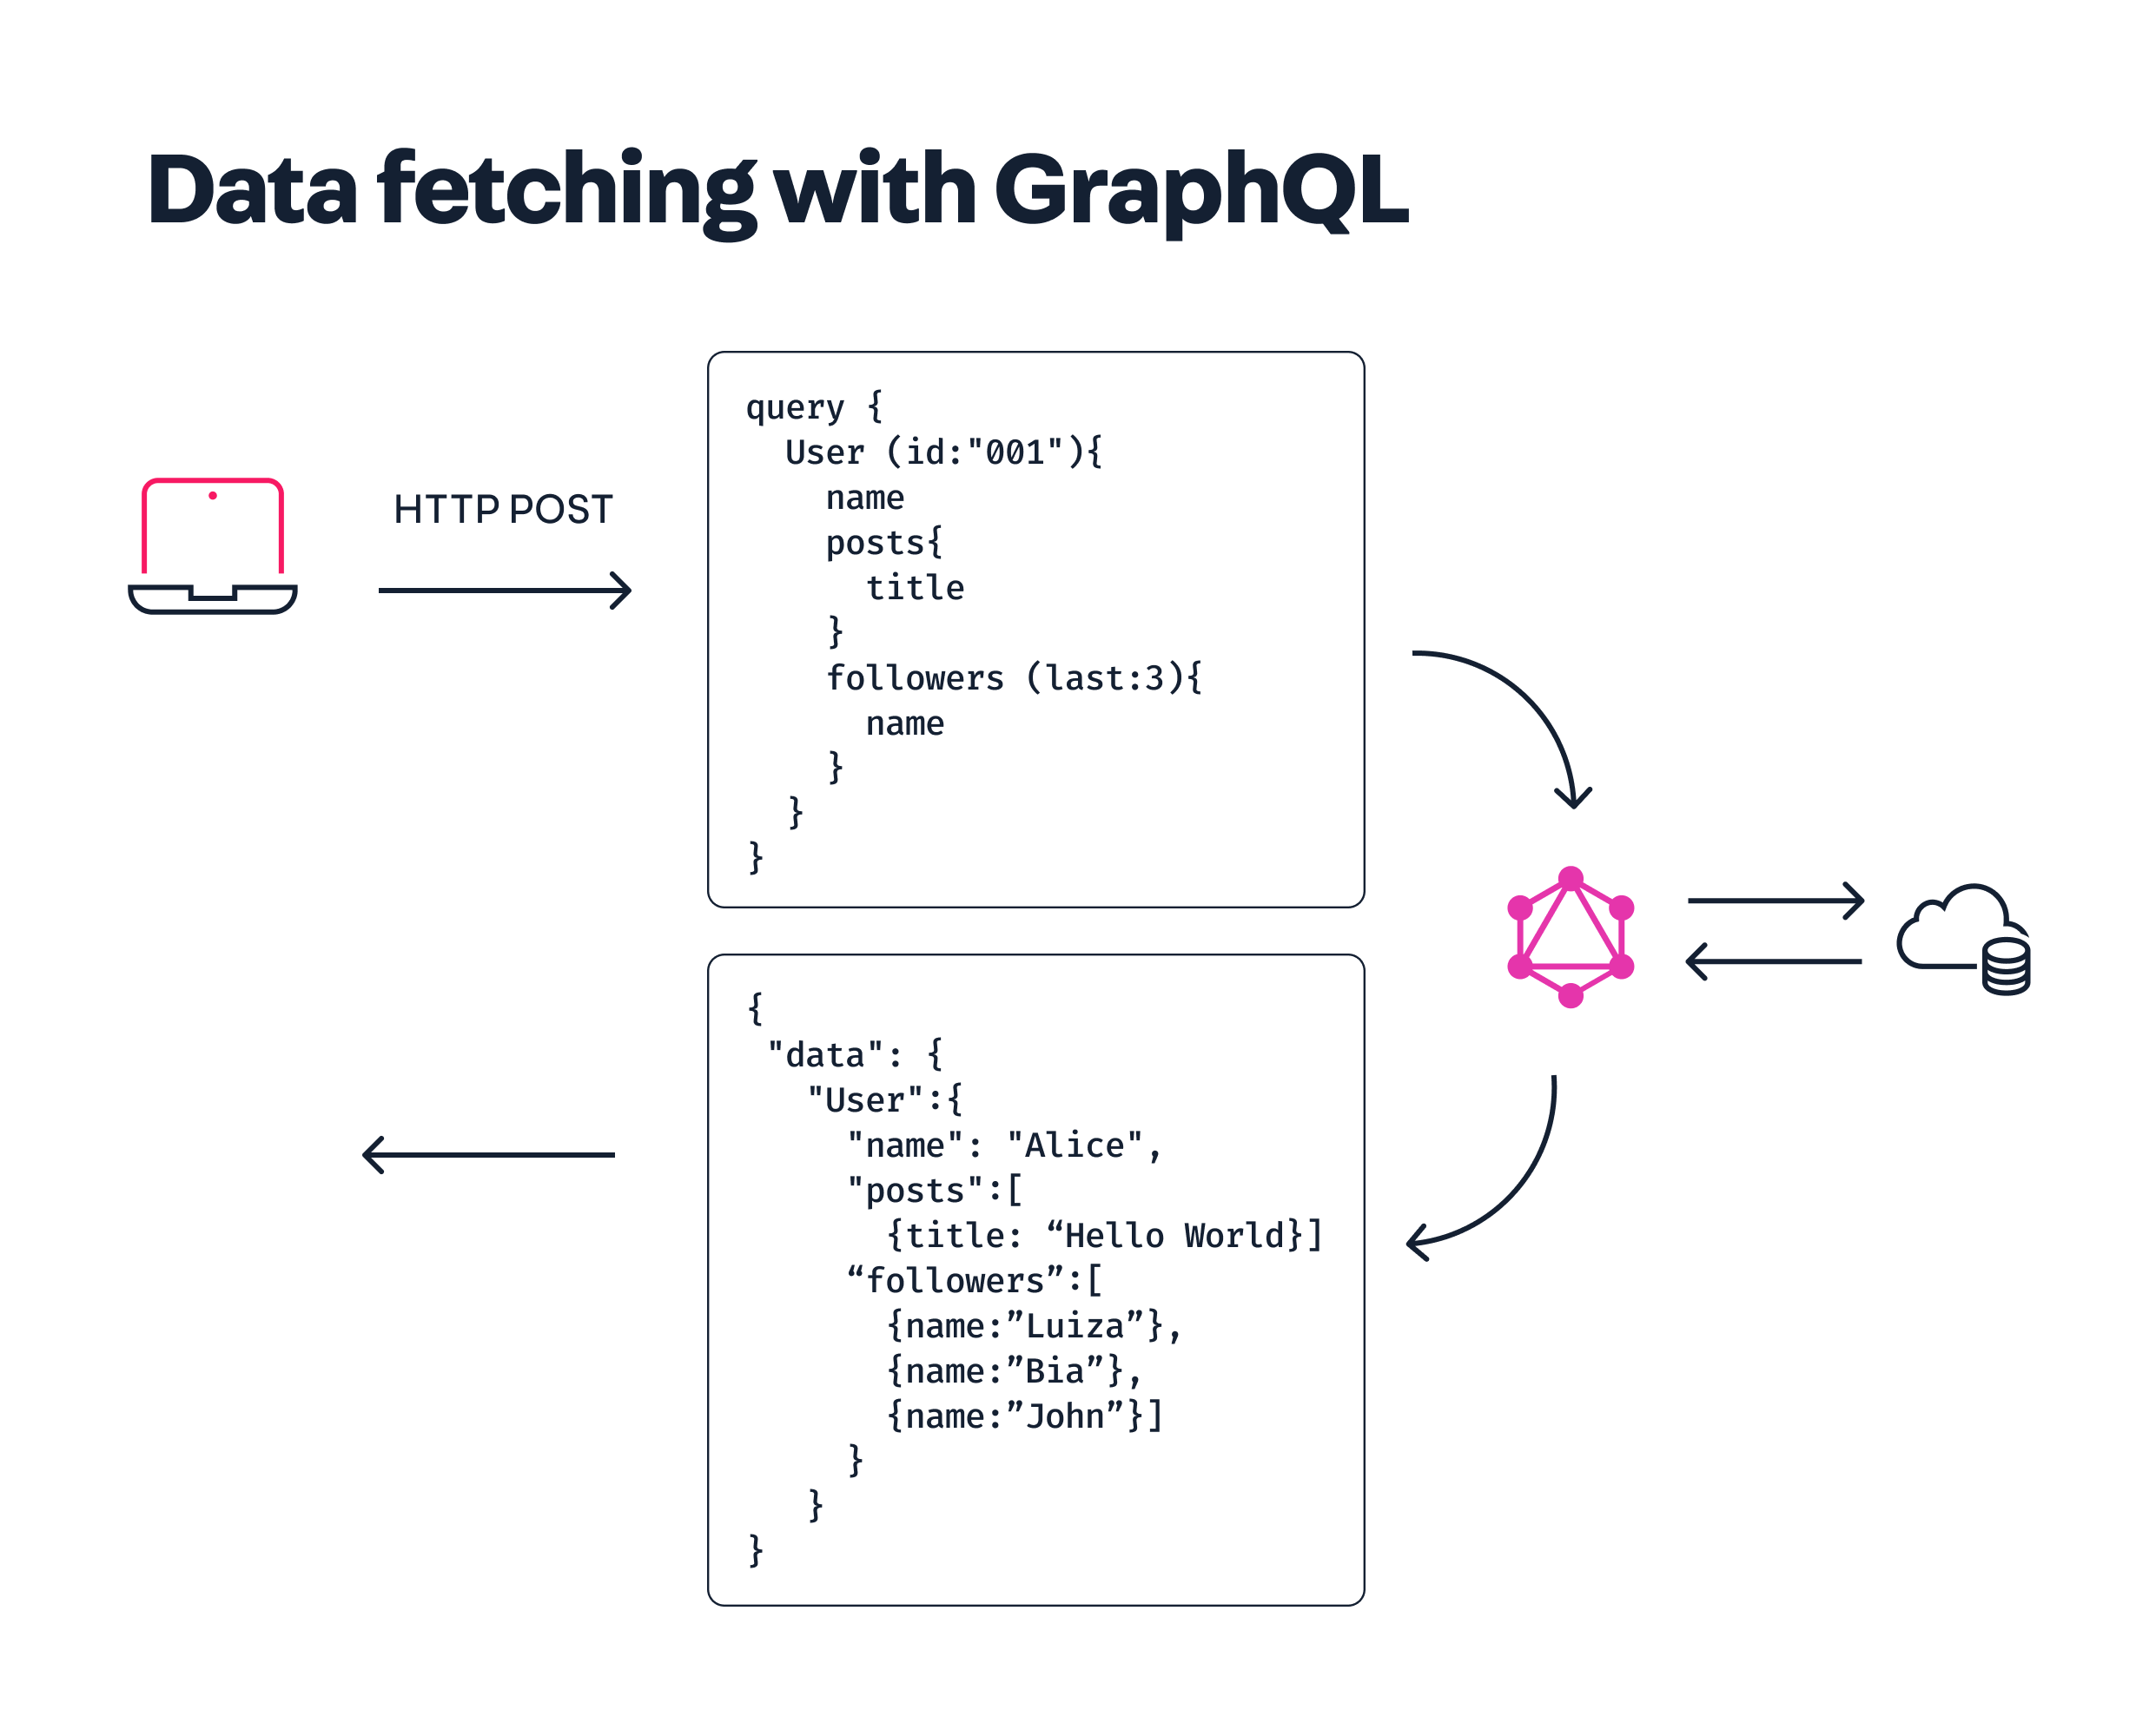
Check this practical example of a GraphQL query.
Mutating in GraphQL
In addition to queries, mutations are another type of operation available for GraphQL APIs.
Mutations are used to insert or modify data that already exists on the platform. They are used for sending updates to the server.
- Open your app's code in the code editor of your choice.
- In the
reactfolder, access theHelloMutation.tsxfile or create it if it does not already exist. - In this file, copy and paste the basic model below to run a mutation
gqlusing the React component:
_10import { useMutation } from 'react-apollo'_10import MUTATION_VALUE from './helloMutation.gql'_10_10const HelloMutation = () => {_10 const [doSomething] = useMutation(MUTATION_VALUE)_10_10 return <button onClick={() => { doSomething() }}>Click me</button>_10}_10_10export default HelloMutation
In this case, unlike the useQuery hook where the query is executed immediately, the call to the server will only be made after calling the function returned by the useMutation hook (doSomething in this example).
You can add mutation parameters as doSomething function variables.
Suppose that one of the mutation variables you are running is the name of a city (cityName). One way to pass this variable would be:
_10- return <button onClick={() => { doSomething() }}>Click me</button>_10+ return <button onClick={() => { doSomething({ variables: { cityName: 'Rio' ) }}>Click me</button>
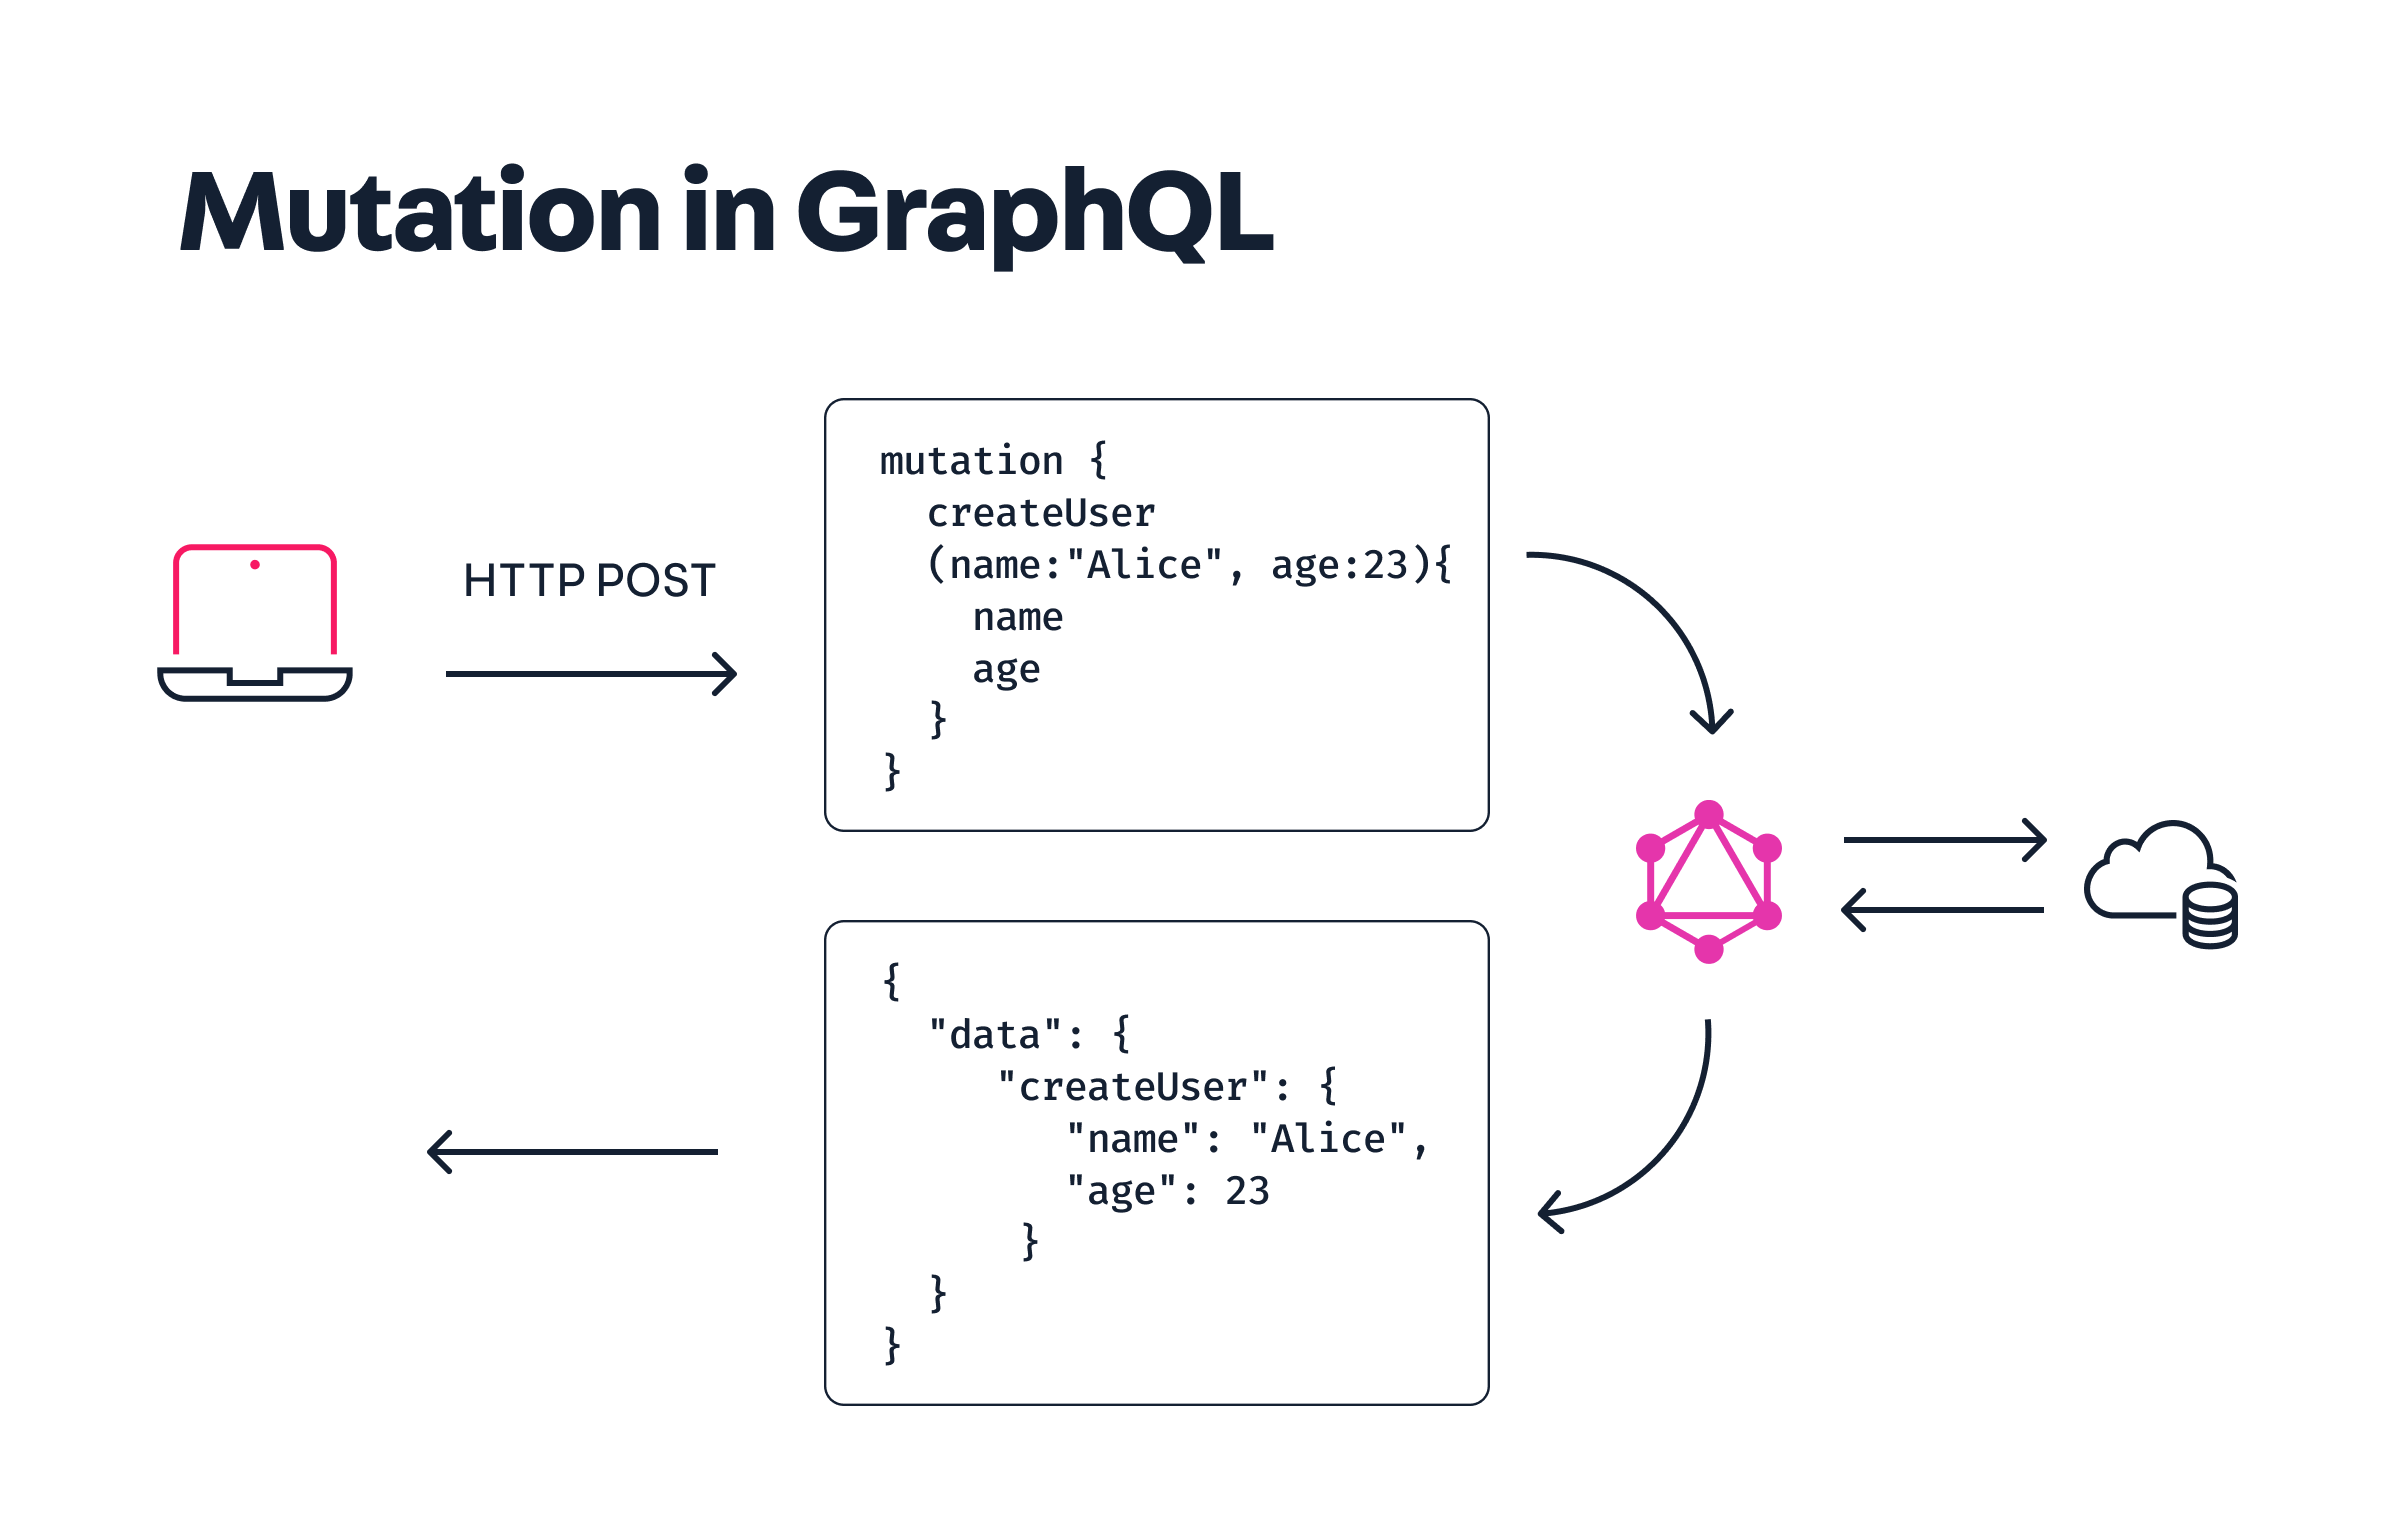
Check this practical example of a GraphQL mutation.
Debugging queries and mutations in GraphQL
To test GraphQL queries and mutations, we will use the GraphQL IDE app.
To install this app on your VTEX account, run the following command on your terminal:
_10vtex install vtex.admin-graphql-ide
Once the app is installed, follow the steps below:
- Access the Admin.
- In the sidebar, go to Apps.
- Look for GraphQL IDE in the installed apps list.
- In the
Choose your app from the list belowfield, select the app you want to debug/test. In this case, you need to choose the name of the app you are developing.
Remember that, until now, the front app you have been developing has been living in your local files, connected to the VTEX platform only by the
link. To find the name of your app in this list and be able to debug, it needs to be available (published) and properly installed in the account's master workspace. The necessary settings to make your app publicly available are described in the last section of this walkthrough.
- On the left side of the text editor, enter the query or mutation that you want to run for testing purposes.
- Then, click the play button, and the API query response will appear in the text editor to the right.
If you need help, there is a docs tab on the right corner of your screen that describes the queries and mutations available for the selected app.
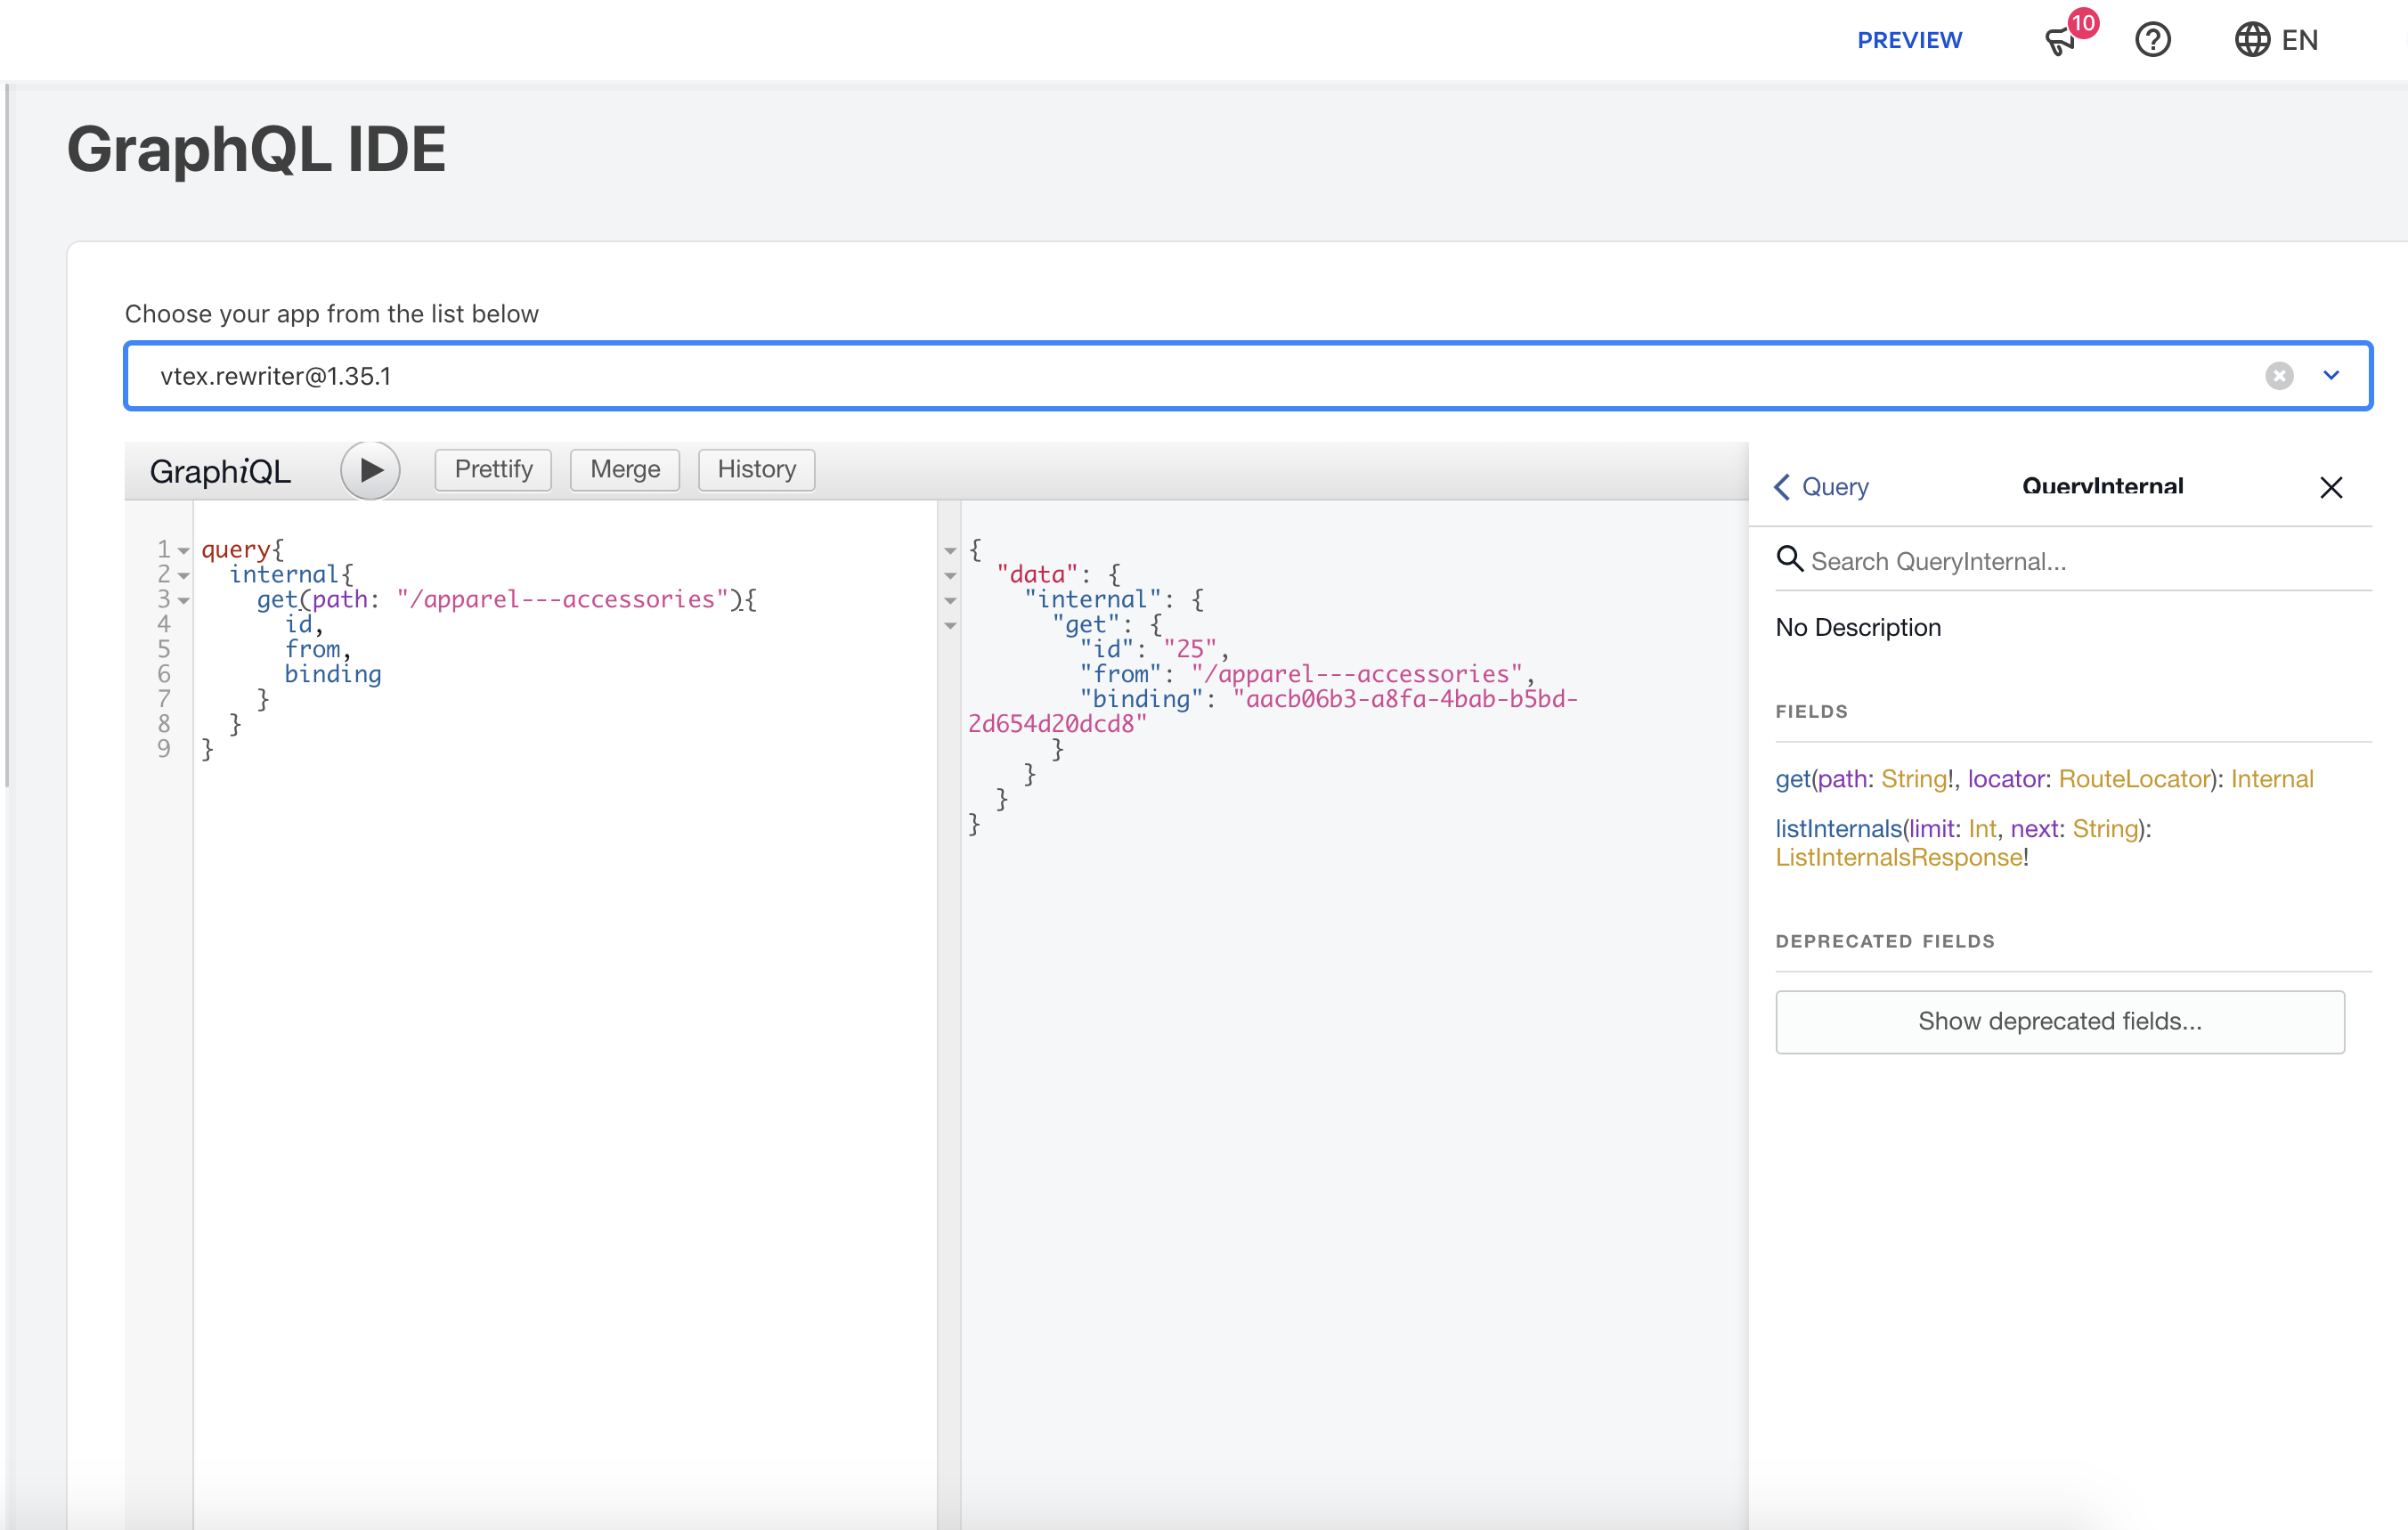
The example above shows how to use the GraphQL IDE Admin to query an internal route in the vtex.rewriter app.