Local setup and development
Learn the daily development workflow for adding and updating CMS component schemas, from creating a schema file to syncing it with the CMS Admin and verifying the result.
After completing the Getting started with CMS guide, you can start adding and updating the component schemas that define what content editors can manage in the CMS Admin.
This guide covers the daily workflow for adding or changing a component, along with best practices for schema management.
Before you begin
Make sure you have completed all steps in the Getting started with CMS guide, including:
- VTEX IO CLI and Content plugin installed.
- CMS Admin app (
vtex.admin-content-platform-ui) is installed in your account. - CMS folder structure scaffolded in your storefront project (
cms/{storeId}/components/andcms/{storeId}/pages/).
Workflow overview
The cycle you will repeat every time you add or change a component is:
- Edit a
.jsoncschema file in thecms/{storeId}/components/directory. - Sync the schema to CMS using the CLI.
- Verify the component appears correctly in the CMS Admin.
The following sections walk through each step in detail.
Step 1 - Creating a component schema
Open your store code in a code editor of your preference and create a .jsonc file inside the components/ folder. The filename must follow the pattern cms_component__{componentKey}.jsonc.
For example, to create a Hero Banner component in a FastStore project, create the file cms/faststore/components/cms_component__heroBanner.jsonc:
_32{_32 "$extends": ["#/$defs/base-component"],_32 "$componentKey": "HeroBanner",_32 "$componentTitle": "Hero Banner",_32 "type": "object",_32 "required": ["title", "image"],_32 "properties": {_32 "title": { "type": "string", "title": "Title" },_32 "image": {_32 "type": "object",_32 "title": "Image",_32 "required": ["src", "width", "height"],_32 "properties": {_32 "src": {_32 "type": "string",_32 "title": "Image",_32 "widget": {_32 "ui: widget": "media-gallery",_32 "restrictMediaTypes": {_32 "video": true,_32 "image": ["png", "jpg", "jpeg", "webp"]_32 }_32 }_32 },_32 "width": { "type": "number", "title": "Width" },_32 "height": { "type": "number", "title": "Height" },_32 "alt": { "type": "string", "title": "Alt text" }_32 }_32 },_32 "link": { "type": "string", "title": "Link URL" }_32 }_32}
Each schema must include:
$extends: References the base component definition.$componentKey: A unique identifier for the component.$componentTitle: The display name editors will see in the CMS Admin.properties: The fields editors can complete, each with atypeandtitle.
For the full schema reference, including all field types, available widgets, and how sections differ from components, see Understanding components and sections.
Step 2 - Syncing the schema
After saving your schema file, sync it to the CMS. The command depends on your storefront technology.
FastStore projects
Run the following command from the root of your FastStore project:
_10vtex faststore cms-sync
This command auto-detects the FastStore version from package.json, generates the schema, and uploads it in a single step.
Other storefront technologies
Use the individual Content plugin commands:
_10vtex content generate-schema cms/{storeId}/components cms/{storeId}/pages_10vtex content upload-schema
During sync
Regardless of the command used, the CLI will:
- Detect the content source and generate the schema.
- Prompt you for the store ID to associate the schema with.
- Show the current published version and suggest the next version number.
- Ask you to confirm before uploading.
Choosing a version number
The CLI follows semantic versioning (major.minor.patch). When prompted, choose a version type based on the nature of your change:
| Change type | Version bump | Example |
|---|---|---|
| New optional field or component added | Minor | 1.5.0 → 1.6.0 |
| Bug fix or small correction | Patch | 1.5.0 → 1.5.1 |
| Breaking change (removed or renamed field) | Major | 1.5.0 → 2.0.0 |
Always review your schema before confirming the upload. If you release a new schema version that isn't a pre-release (for example,
1.6.0instead of1.6.0-beta), it will replace the current production schema. To test changes without affecting production, append a pre-release tag such as-betato the version (e.g.,1.6.0-beta.1).
After confirmation, the CLI uploads the schema and prompts you to delete the local schema.json file. This file is a generated artifact and doesn't need to be committed to your repository, so you can safely delete it or keep it for debugging purposes.
Step 3 - Verifying in the Admin
After syncing, do the following to check the new component:
- Open the Admin and go to Storefront > Content > All Content.
- Navigate to any page (for example, the Home page), and check the section picker. Your new component, in this case, Hero Banner, should appear as an available option with the fields you defined.
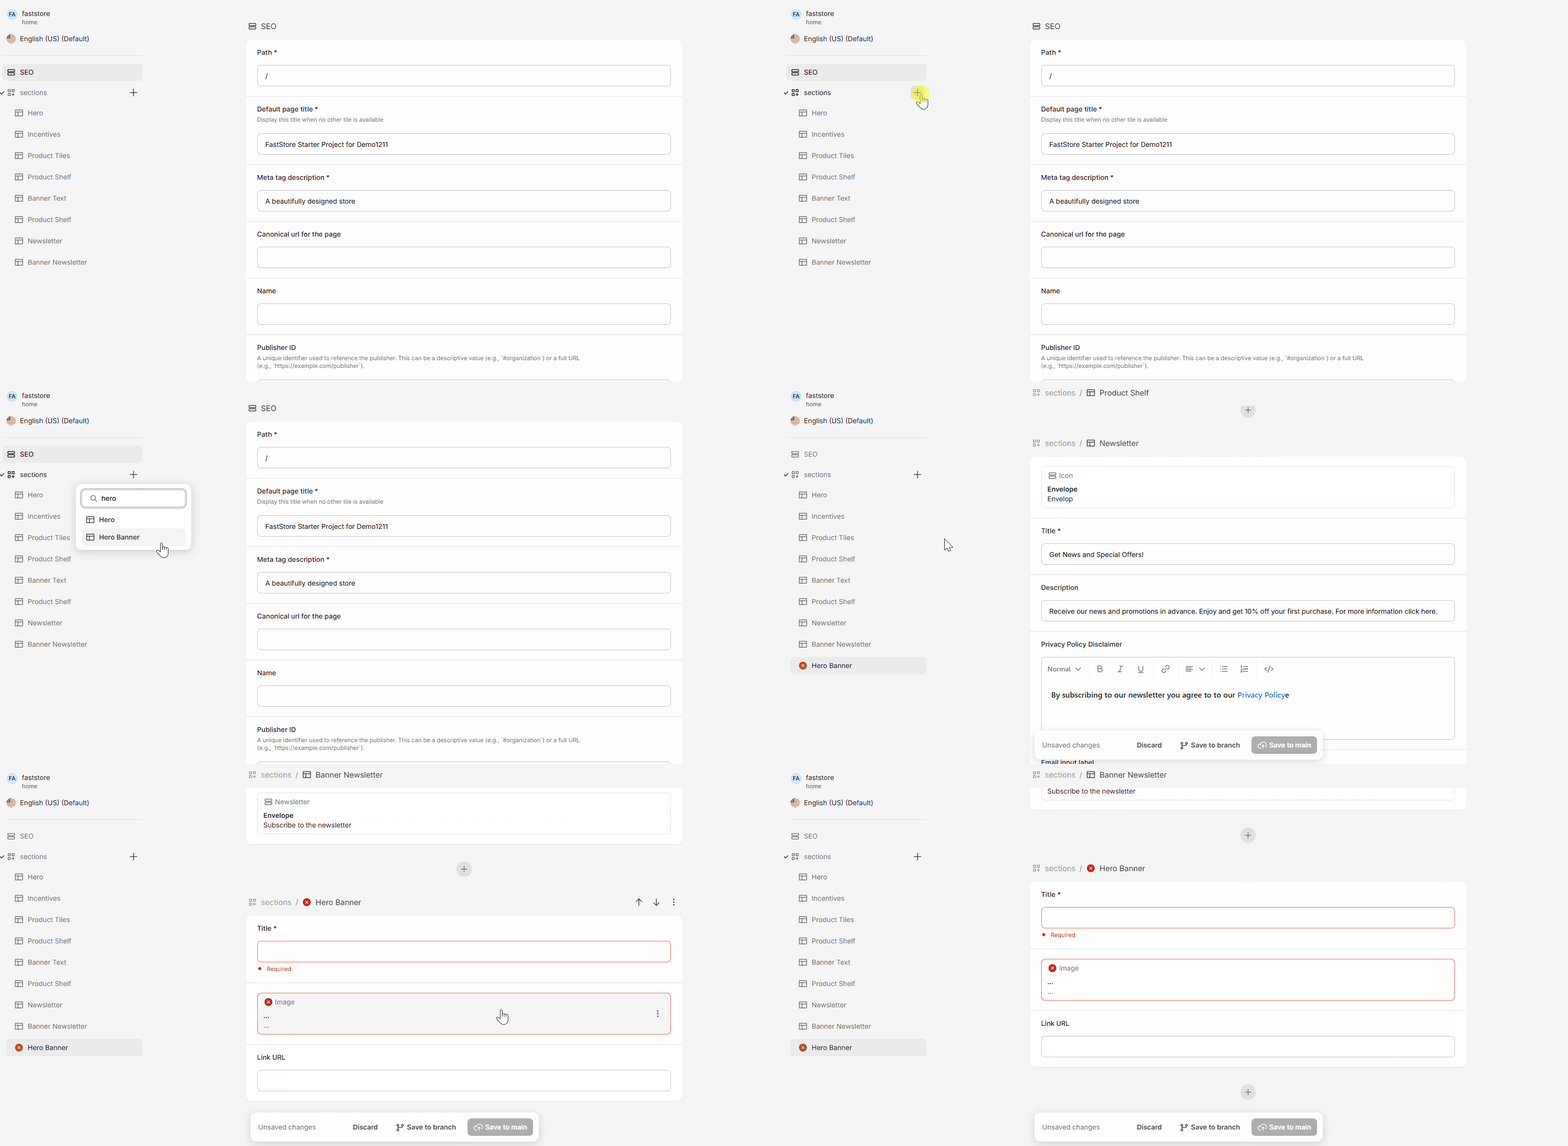
If the component doesn't appear, see the Troubleshooting CMS schema sync errors guide.
Development workflow best practices
Adding and removing fields
Adding a new optional field to an existing component is a safe, non-breaking change. Existing content entries simply won't have a value for the new field, and editors can populate it when needed.
Removing or renaming a field that already has saved content will break validation for those entries. Before removing a field, either clear the affected content first or deprecate the field by marking it as optional and hidden, then remove it in a future release once no content references it.
Debugging schemas with --full
The default generate-schema command produces a delta schema that references the storefront base definitions. If something behaves unexpectedly, generate a fully inlined schema for inspection:
_10vtex content generate-schema cms/{storeId}/components cms/{storeId}/pages --full -o cms/{storeId}/schema_debug.json
This output includes all inherited definitions resolved inline, making it easier to spot issues.
Keeping schemas and components in sync
Since schema files define what data your frontend components receive, keep the cms/ folder in the same repository as your component source code (for example, src/components/). A pull request that adds a new frontend component should include the corresponding schema file so both stay in sync through code review.
Automating uploads in CI/CD
The upload-schema command prompts for confirmation by default. To skip the prompt in a CI/CD pipeline, pass the -y flag:
_10vtex content upload-schema -y
This is useful for automating schema deployments as part of your build and release process.