Creating a new custom page
Learn how to create a new custom page for your store developed using Store Framework.
Stores consist of several pages, each with a unique layout and content. When you create a store in VTEX IO, several default pages with predefined URLs are available, such as:
store.home: Homepagestore.product: Product pagestore.search: Search results pagestore.account: Client account pagestore.login: Login pagestore.orderplaced: Order placed page
You can manage the title and template of each page in the Pages section of the CMS in the VTEX Admin.
You can also develop custom pages to meet your store's specific needs, such as landing pages for special campaigns or institutional pages.
In this guide, you'll learn how to create a new custom page for your Store Framework store.
Instructions
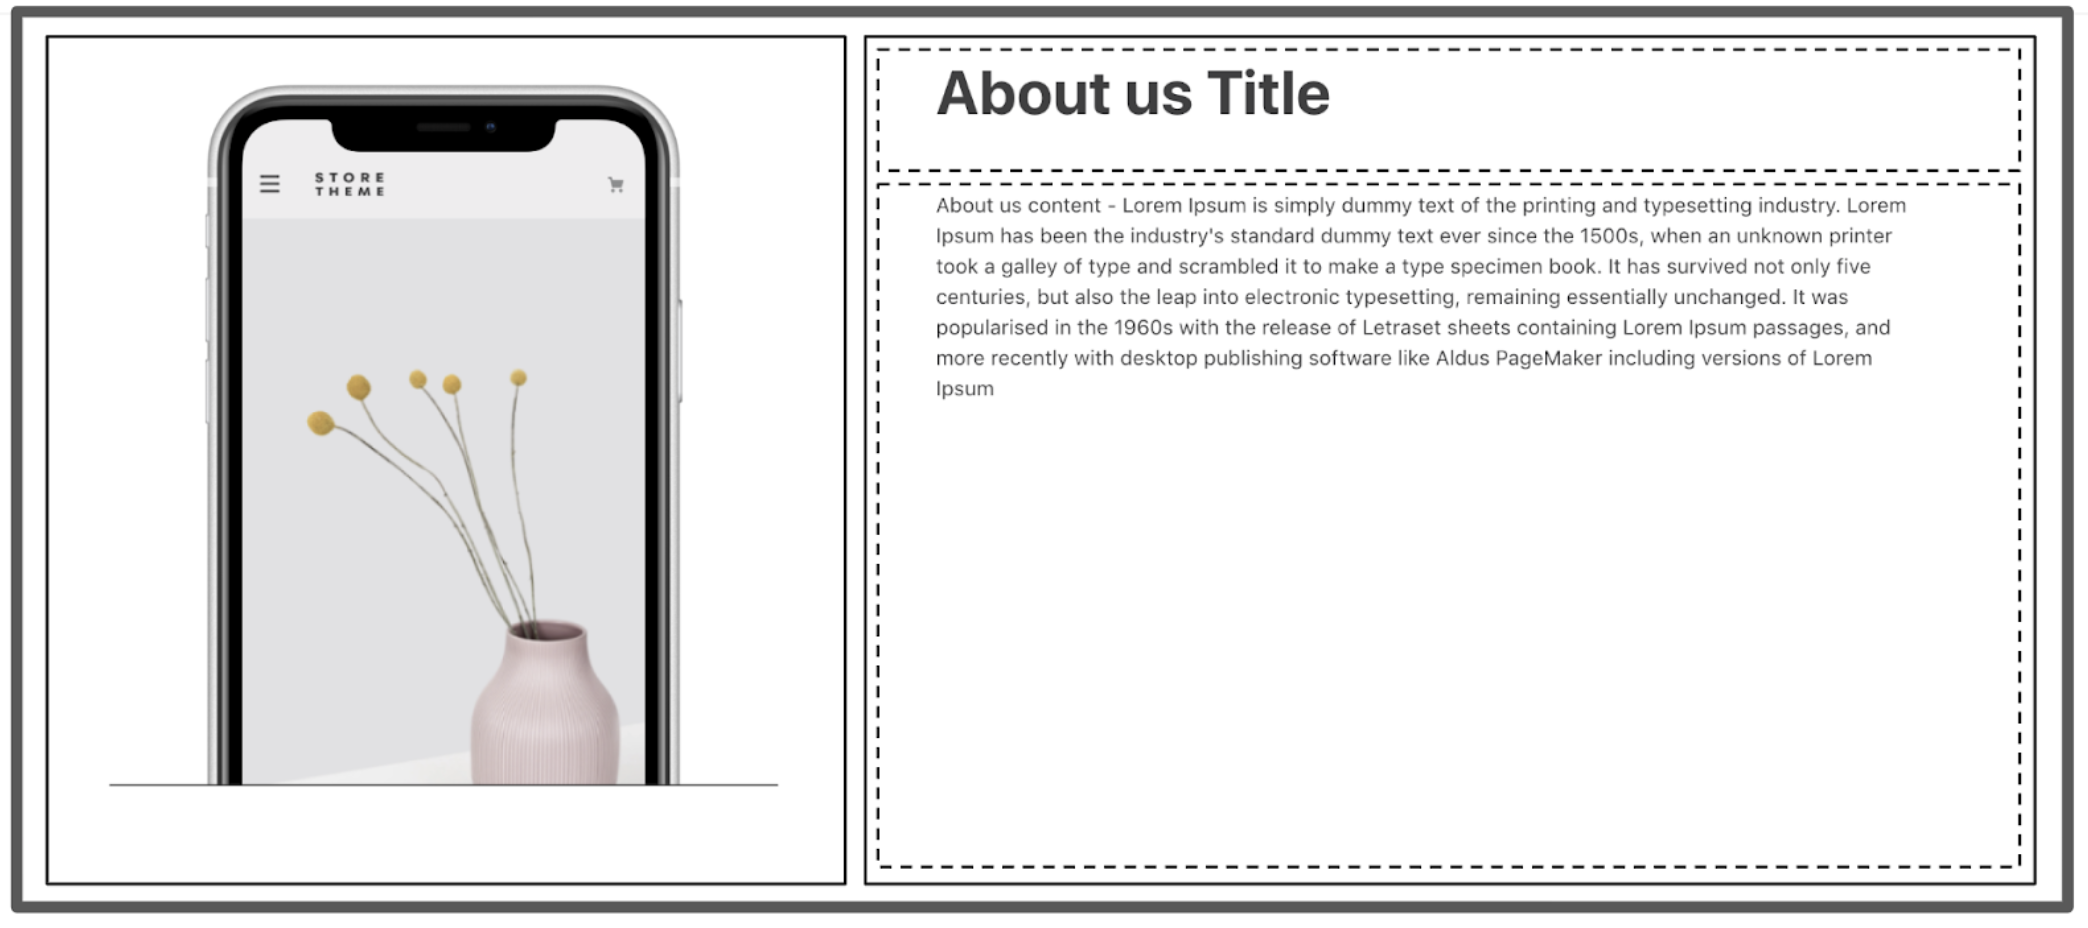
As an example, consider that you want to create a custom About us page for your store with an image in the left column and a title and text in the right column:
Step 1 - Creating the new template
First, define the template the new page will use. There are three template types:
- Product: For pages that display content for a single product, like a product detail page. When a new product is added, a product page is automatically generated.
- Product collections: For pages containing a group of products, such as the search result page.
- Standard: For pages with no specific product content, such as the homepage.
Even though
Standardpages aren't directly linked to a specific product, they can display shelves or lists for any chosen group of products. The main difference is that the group of products shown on a standard page depend on the shelf settings, not on the URL query.
Then follow the steps below:
- In your Store Theme's code, declare a new template within your
blocksfolder orblocks.jsoncfile as follows:
_10{_10 "store.custom#about-us": {_10 "blocks": [ _10 ]_10 }_10}
- Complete it with the blocks that will set the desired layout. For example:
_40{_40 "store.custom#about-us": {_40 "blocks": [_40 "flex-layout.row#about-us"_40 ]_40 },_40 "flex-layout.row#about-us": {_40 "children": [_40 "image#about-us",_40 "flex-layout.col#text-about-us"_40 ]_40 },_40 "flex-layout.col#text-about-us": {_40 "children": [_40 "rich-text#about-title",_40 "rich-text#about-content"_40 ],_40 "props": {_40 "preventVerticalStretch": true_40 }_40 },_40"rich-text#about-title": {_40 "props": {_40 "text":_40 "# About us Title"_40 }_40 },_40 "rich-text#about-content": {_40 "props": {_40 "text":_40 " About us content - Lorem Ipsum is simply dummy text of the printing and typesetting industry. Lorem Ipsum has been the industry's standard dummy text ever since the 1500s, when an unknown printer took a galley of type and scrambled it to make a type specimen book. It has survived not only five centuries, but also the leap into electronic typesetting, remaining essentially unchanged. It was popularised in the 1960s with the release of Letraset sheets containing Lorem Ipsum passages, and more recently with desktop publishing software like Aldus PageMaker including versions of Lorem Ipsum"_40 }_40 },_40 "image#about-us": {_40 "props": {_40 "src": "https://storecomponents.vteximg.com.br/arquivos/mobile-phone.png",_40 "maxHeight": "600px"_40 }_40 }_40}
For more information, see the Flex Layout documentation.
Step 2 - Creating the new page's path
To make the new page accessible in your store, you must declare its path. You can do it by updating the Store Theme code or using the VTEX Admin.
Updating the Store Theme code
- In your theme's source code, access the
routes.jsonfile. You can find it in thestorefolder. - In that file, add the path to the JSON file for the template you recently created:
_10"store.custom#{templatename}": {_10 "path": "/{URL}"_10}
- Save your files.
- Link the theme to a Development workspace. You'll be able to access and see your new page live through your workspace using the following format:
{workspaceName}--{accountName}.myvtex.com/{pathName}.
Using the VTEX Admin
To set the new page path using VTEX Admin, you must first release the changes you made to create the template and install the new version of your Store Theme in a production workspace.
Once your changes are set up in a production workspace, you can use the CMS in the Admin to create the page path:
- In the VTEX Admin, go to Storefront > Pages.
- Click
Create new. - Choose the desired URL and one of the templates you created, such as the About Us page template previously created.
A template only defines the page layout. Therefore, you can apply any new template to any page that accepts templates of the same type.
When editing any content using the CMS section, When editing content in the CMS, we recommend making your changes in a production workspace. Make sure you do not create your new custom page in the store's master workspace.
Step 3 - Adding the content
You can define your page content either by making changes directly in the Store Theme app or by using Site Editor in the VTEX Admin.
When editing directly in the Store Theme app, you can visualize your changes by linking the theme to your development workspace.
To edit the page in Site Editor, you can browse to your custom page or enter its URL in the Page URL field.

Step 4 - Making your theme content publicly available
If you're satisfied with the changes to your Store Theme, make your new page publicly available. For detailed instructions, see the guide Making your theme content public.