Marketplace
Integration guide for VTEX or external Marketplaces and Sellers
Help us improve our documentation! Tell us about your experience with this article by filling out this form.
We define marketplace as the environment where sellers expose their products and also where consumers make purchases and pay for an order. Sellers in turn are commonly the owners of the products and responsible for delivering the products to shoppers. Because VTEX promotes digital collaboration in different settings, in addition to selling their products in other marketplaces, sellers can become marketplaces themselves. Learn more about partners and growth opportunities in Marketplace Strategies at VTEX.
Understanding the marketplace architecture
The architecture of a VTEX store allows merchants to become marketplaces or sellers in other VTEX stores without the need for any additional development, that is, every VTEX store is a seller in its own marketplace environment and can also be a seller in other environments like VTEX marketplaces (native marketplaces) or external (certified marketplaces or partners).
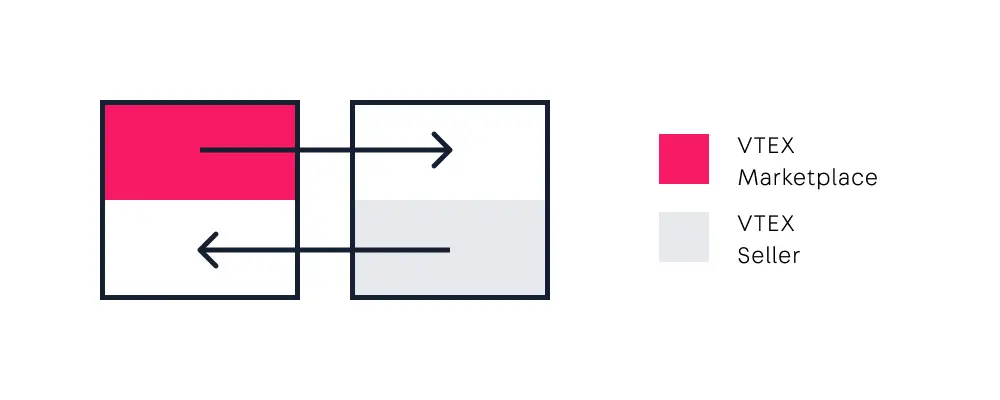
- VTEX Marketplace: Store environment hosted on the VTEX platform responsible for product sales, checkout, and payment.
- External Marketplace: Showcase store hosted on platforms external to VTEX and responsible for product sales, checkout, and payment.
- VTEX Seller: Store hosted on the VTEX platform that owns the products and is usually responsible for fulfilling orders to the consumer.
- External Seller: Store hosted on another platform, or that is not yet hosted on any platform, which owns the products and is usually responsible for fulfilling orders to the consumer. A VTEX marketplace may be interested in integrating with this external store, in order to offer its products.
Configuring VTEX Marketplace
To operate as a marketplace, it is necessary to configure your store according to the steps described in Configuring VTEX Marketplace.
The actions that can be performed via API are the following:
- Adding seller
- Configuring seller selection at checkout
- Customizing the marketplace storefront
- Configure payments
Customizing the marketplace storefront
As a VTEX marketplace, your storefront is where approved seller offers are displayed and where shoppers complete checkout. After integrating sellers and cataloging offers, you can customize how products and seller information appear to customers.
The customization approach depends on your storefront technology. See Getting started with storefront solutions to compare FastStore, Store Framework, and CMS Portal (Legacy), including marketplace support for each option.
Store Framework
With Store Framework, you customize the storefront by composing blocks exported by VTEX apps in your theme. For marketplace specific use cases, see Displaying sellers and approved offers.
FastStore
FastStore does not provide a native seller selector component. To display seller information or offers in a custom way, you can override existing components or create a new section to build the storefront content your marketplace needs.
Common marketplace storefront customizations
Beyond the storefront technology guides above, there are marketplace-specific behaviors that affect what shoppers see, regardless of your storefront stack. These are driven by catalog and seller settings rather than by the theme alone, as described in the sections below.
Displaying sellers and approved offers
When more than one seller offers the same SKU, you can let shoppers compare offers and choose where to buy. In Store Framework, the Seller Selector app renders the available sellers for a product, including price, shipping, and a buy button per seller.
To enable it, add the link-seller block to your product page (store.product) template. It displays a link with the number of sellers for the product and opens the Seller Selector page:
_12"flex-layout.col#right-col": {_12 "props": {_12 "preventVerticalStretch": true,_12 "rowGap": 0_12 },_12 "children": [_12 "product-name",_12 "link-seller",_12 "product-price#product-details",_12 "flex-layout.row#buy-button"_12 ]_12}
Keep in mind that an approved offer is only displayed in the storefront if the seller is mapped to the Sales channel used by that store. If an offer is approved but does not appear in the storefront, the trade policy mapping is the first thing to check.
Controlling price and availability before the shopper sets a location
During navigation stages where the store does not yet know the shopper's location (such as the home page, category pages, and shelves), the storefront cannot evaluate every seller's delivery area. In this context, VTEX shows price and availability based only on the main seller and on comprehensive sellers.
A seller is comprehensive when its isBetterScope property is set to true, which tells VTEX that its products can be shown in navigation contexts without a defined location. This behavior also applies in the cart until the shopper informs a delivery ZIP code.
Set a seller as comprehensive only when its delivery area is relevant to most of your customer base. If you set a seller with restricted coverage as comprehensive, shoppers may see price and availability that do not apply to their region, and they will only find out after entering the ZIP code, hurting the experience.
Seller selection at checkout
When multiple sellers offer the same SKU, the white label seller selection algorithm determines which seller fulfills the item, considering criteria such as price and delivery conditions for the shopper's address. To configure how sellers are selected and displayed during checkout, see Checkout overview.
Integrating External Marketplaces or External Sellers
The Marketplace Protocol is a set of API requests and definitions to help you integrate external sellers into a VTEX marketplace, as well as external marketplaces into VTEX sellers.
- External seller protocol: If you are a VTEX marketplace and want to integrate offers from an external seller into your catalog, see our External Seller Integration Guide.
- External marketplace protocol: If you are an external marketplace that wants to integrate with a VTEX seller, see External Marketplace Integration Guide to learn how to develop a custom connector to integrate with the architecture and catalog of VTEX sellers.
Phase overview
After choosing the appropriate integration model, the marketplace workflow can be broken down into four main phases.
| Phase | Section | Main actors |
|---|---|---|
| Seller onboarding | 1. Marketplace: Adding Sellers | Marketplace, Seller |
| Suggestions | 2. Sending and managing suggestions | Seller |
| Cataloging | 3. Marketplace: Cataloging offers | Marketplace |
| Ongoing sync | 4. Managing Catalog | Seller, Marketplace |
1. Marketplace: Adding Sellers
VTEX marketplaces that want to make products from sellers available in their store must go over some processes. The first step is to find out if the seller you want to connect to is a VTEX seller or an external seller. For external sellers, verify the External Seller Integration Guide and for VTEX sellers, follow the steps below.
Marketplace: Adding a seller to the Seller Portal
The Seller Portal is an edition of the VTEX platform with essential functionalities available, so that external or VTEX sellers can quickly integrate into VTEX marketplaces.
The Seller Portal has default version developed by VTEX and if the marketplace wants its own customized version, it can develop from the VTEX version following the Seller Portal Edition App guide.
To integrate a partner's products to your marketplace using the Seller Portal as a solution, there is a flow of actions to be performed by marketplace and seller, see the image below.
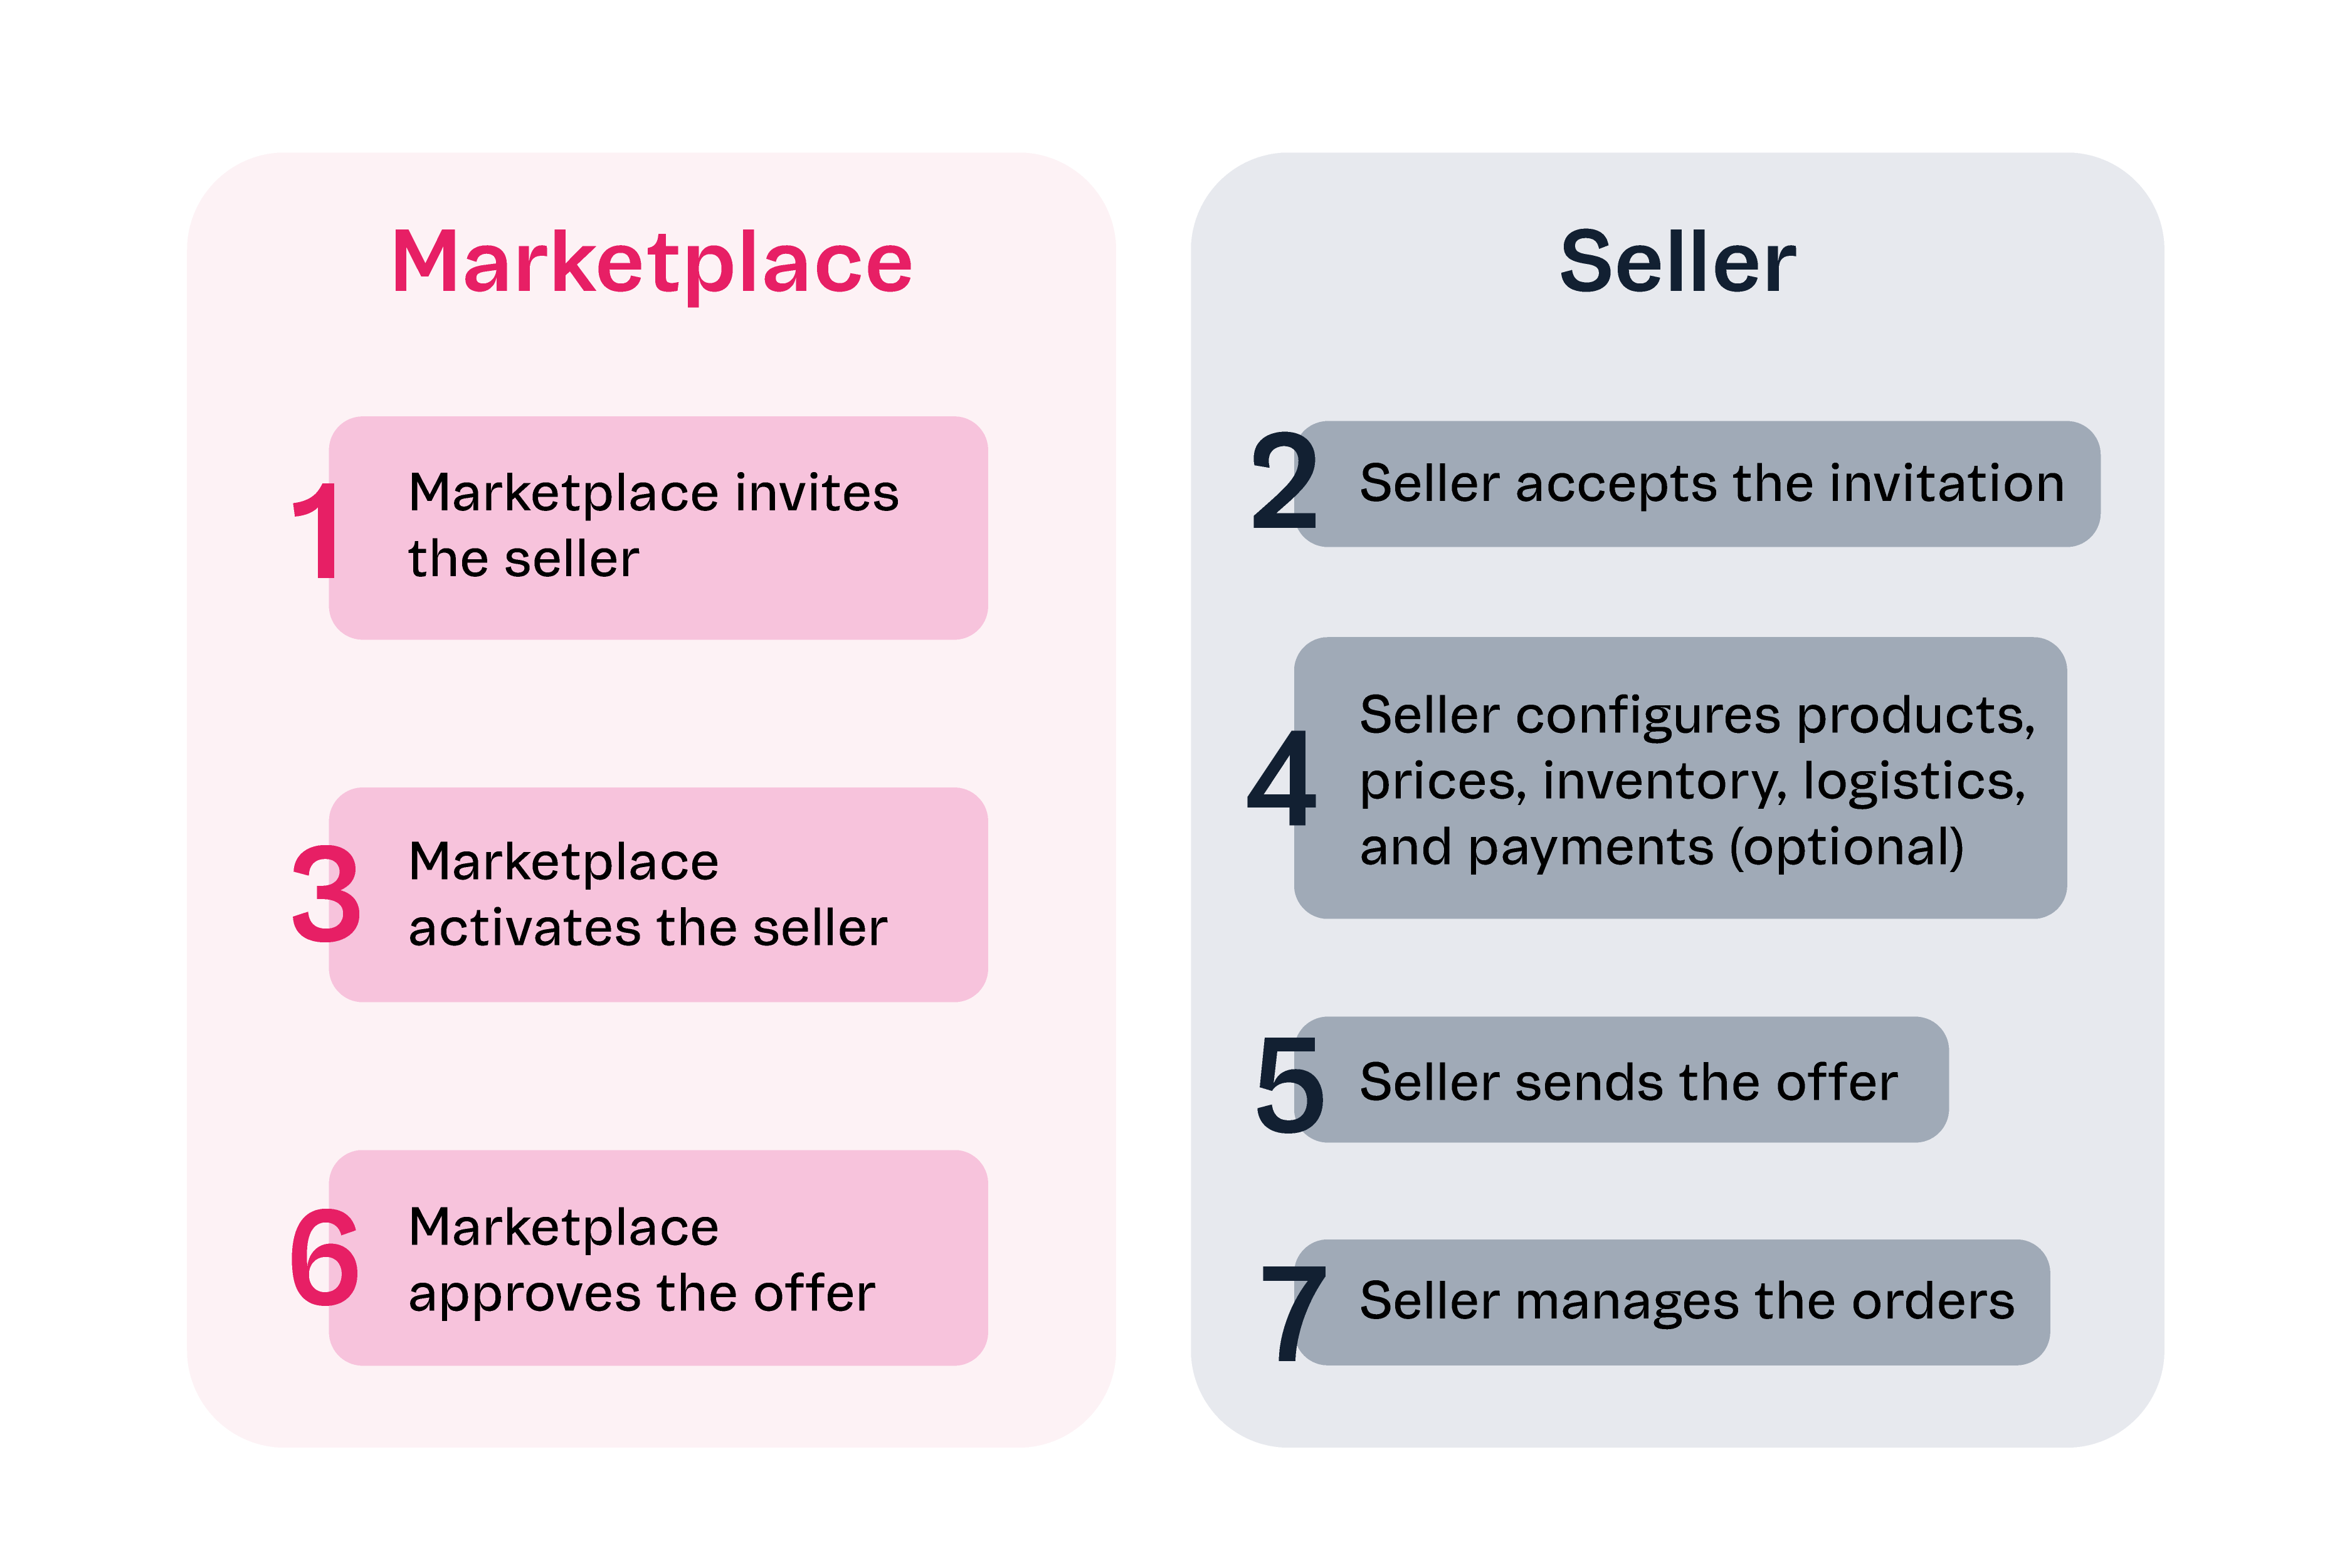
The marketplace is responsible for onboarding new sellers. In other words, it is the role of the marketplace to support the seller's experience in the Seller Portal. For information about seller actions, see Seller Portal: First Steps for the Seller.
To invite and activate sellers, the marketplace must follow the endpoints listed below in the order represented. For the action of approving offers, see the section Cataloging offers.
- POST - Invite Seller Lead
- PUT - Accept Seller Lead
- PUT - Create Seller from Lead
In the same category of Seller invite, you will also find the endpoints:
- GET - List Seller Leads: Returns a list of all sellers that have been invited by the marketplace.
- GET - Get Seller Lead's Data by Id: Marketplace gets a list of the sellers invited to its own environment.
- PUT - Resend Seller Lead Invite: Marketplace resends the invitation to the desired seller.
- DELETE - Delete Seller Lead: Allows the marketplace to delete a seller previously invited to its environment, if the seller has not yet accepted the invitation.
Sellers: Configuring your Seller Portal environment
To learn how to configure your brand new Seller Portal environment and other seller actions, see Seller Portal: First Steps for the Seller. To integrate with your ERP, check out our ERP integration guide.
Catalog integration must be done manually through the Seller Portal interface or massively through REST API, using Catalog API - Seller Portal. It is not possible to integrate Catalog via spreadsheet nor via SOAP API (Webservice).
Marketplace: Adding and configuring a seller's account to VTEX Commerce
To add and configure a registered seller account and update accounts that are not hosted on the Seller Portal, the marketplace will use the following endpoints.
- POST - Configure Seller Account: Configure a specific seller's account, ultimately adding a seller to a marketplace's environment.
- PATCH - Update Seller by Seller ID: for when the marketplace needs to make updates to the settings of a specific seller.
- PUT - Upsert Sales Channel Mapping: when the seller has two affiliates pointing to the same marketplace, the account settings will be done through this endpoint.
After configuring the account, the marketplace will be able to verify the settings made.
- GET - List Sellers: Retrieve a list of sellers registered in the marketplace, and this list can be filtered by the configured sales channel.
- GET - Get Seller data by ID: Retrieve information on a specific seller, it is also possible to filter by sales channel.
- GET - Get Sales Channel Mapping Data: Retrieve information about mapping between your sales channels and a specific seller.
Configuring seller's commission
The marketplace will configure the seller's commissions after the initial configurations. To perform this action, one of the following endpoints can be used.
- PUT - Upsert Seller Commissions in Bulk: To apply the same commission rule to all categories of a seller already registered in the marketplace.
- PUT - Upsert Seller Commissions by Category ID: To apply a commission rule to only one category of the respective seller.
The query and management of applied commission rules will be performed through the following endpoints.
- GET - List Seller Commissions by seller ID: Retrieve the list of commissions defined for a seller.
- GET- Get Seller Commissions by Category ID: Retrieve the commission list defined for a specific category of a specific seller.
- DELETE - Remove Seller Commission by Category ID: Removes a previously defined commission for a category of a seller.
When completing the steps listed above, the marketplace will have completed the integration of a seller into its store.
Multilevel Omnichannel Inventory (MOI)
Multilevel Omnichannel Inventory (MOI) is a VTEX setting that allows franchise accounts or white label sellers' inventory to be sold in marketplaces connected to the main seller account — without integrating each franchise individually with the marketplace.
In a three-level architecture, the marketplace (level 1) sells products fulfilled by franchise accounts or white label sellers (level 3) through a direct seller (level 2). Orders follow the chain order flow.
MOI is available only for integrations between VTEX marketplaces and VTEX sellers. The feature has been discontinued for external marketplaces.
Configuring MOI via API
When adding or updating a seller, configure MOI through the Configure Seller Account endpoint by setting the fulfillmentEndpoint field. See Setup for VTEX marketplaces for the required format and parameters.
For a complete integration guide, see:
- Multilevel Omnichannel Inventory
- Multilevel Omnichannel Inventory API integration
- Integrating with the Multilevel Omnichannel Inventory (Orders overview)
2. Sending and managing suggestions
When the seller is integrated into a marketplace, it will begin to suggest products from its catalog to the marketplace. The APIs mentioned in this section refer to the Received SKUs page of VTEX Admin.
Sellers: Sending Suggestions
When the seller wants to suggest that one of their SKUs be sold on the marketplace, we say that the seller is sending a suggestion.
Before sending suggestions, the seller can check if the SKU already exists in the marketplace. If it does not exist, the Get SKU bindings by SKU ID call should be made after sending the suggestion to notify the marketplace that the SKU in question is a new suggestion.
- GET - Get SKU Bindings by SKU ID
- PUT - Send SKU Suggestion
Marketplace: Deleting Suggestions
If the marketplace wants to remove a submitted suggestion, they should use this call to delete the suggestion of a specific SKU.
- DELETE - Delete SKU Suggestion
3. Marketplace: Cataloging offers
When the seller sends a product suggestion to the marketplace with configured price and inventory information, after approval by the marketplace, this suggestion becomes an offer. However, before approving a seller's suggestion, it is important to ensure that the product information sent corresponds to the business strategy of the marketplace. When cataloging offers, consider the quality of information sent by the seller, such as price, product description and image.
Cataloging can be performed manually or automatically by VTEX Matcher and/or by external matchers. VTEX Matcher is a default tool used by marketplaces to analyze offers submitted by sellers and accelerate their cataloging process.
Matching
When matching received suggestions, the marketplace can perform this action either in bulk or individually.
autoApprove
Received SKUs will be approved automatically, regardless of their Matcher score, if the autoApprove feature is activated.
- PUT - Activate autoApprove in the Marketplace's Account: Will be used by the marketplace to activate the autoApprove feature with the default parameters for all received SKU modules, so that all sent SKUs are automatically approved.
- GET - Get Account's Approval Settings: After activating the autoApprove feature, the marketplace can use this endpoint to check the current settings of automatic approval acting in its store.
- PUT - Save Account's Approval Settings: Updates the VTEX Matcher's approval parameters in the Received SKU page.
- GET - Get autoApprove Status in Account Settings: Checks the autoApprove's status for a specific seller.
- PUT - Activate autoApprove Settings: The marketplace will use this to activate the autoApprove with the default parameters for a specific seller identified by sellerId.
- GET - Get Seller's Approval Settings: Checks the current automatic approval configuration for a specific seller identified by sellerId.
- PUT - Save Seller's Approval Settings: Updates the matcher's approval parameters for a specific seller identified by
sellerId.
4. Managing Catalog
There are several actions that a marketplace or a VTEX seller can perform in catalog management. In the following sections, you will find the main actions for a marketplace and a seller.
For Marketplaces
The following endpoints will be used by the marketplace to query information about sellers in a store.
Suggestions
- GET - Get all SKU Suggestions: Retrieves information about all suggestions sent by a seller.
- GET - Get SKU Suggestion by ID: Retrieves the matcher status and score information of a specific suggestion.
Versions
- GET - Get all Versions: Retrieves information about the versions of a suggestion sent by the seller.
- GET - Get Version by ID: Retrieves information about a specific version of the suggestion.
- GET - Get Matched Offers List: Retrieves the available offers in the marketplace.
- GET - Get Matched Offer's Data by SKU ID: Retrieves the list of offers available for a specific SKU ID in the marketplace catalog.
- GET - Get Matched Offer's Data by Product ID: Retrieves a list of all offers available for a specific product ID in the marketplace catalog.
For Sellers
The endpoints presented will be used by sellers already connected to a marketplace to notify external marketplaces or VTEX whenever there is a price or inventory update to their SKUs.
5. Sellers: Offer Management
Offer Management is the VTEX feature that provides sellers with more visibility into the process of sending a product to external channels, such as marketplaces. Offer Management helps sellers identify updates and resolve errors in their offers during the sending process, ensuring that they can be sent to the marketplace and synchronized correctly.
Check our Offer Management Integration Guide for more details.