Layout Development Guide for payment methods in Smart Checkout VTEX
This is a guide intended for those responsible for integrating new payment methods into VTEX's Smart Checkout. In addition to the integration with PCI Gateway, it is essential that integrators provide a UI that aligns with the visual identity of the payment method being presented.
All layout updates made through this guide will only apply to Checkout v6.
When a consumer selects their payment method at checkout, they express their interest in using it. Therefore, it is important to communicate, briefly and clearly, how each payment method works and what are the advantages of using each one of them.
As part of a layout, information such as contact details (e.g. phone number or email), can help the consumer to solve any problem or question at the time of purchase.
The following sections show how to create a layout to be used for payment methods in VTEX's Smart Checkout.
You cannot create a new layout for custom payment methods (those developed by the merchant and that only work in their stores, such as notes payable, co-branded, or private label cards).
Layout Requirements
User interface: structure and code
Bootstrap Framework
The Smart Checkout code is based on Bootstrap v2.3.2 standards. Classes such as grid, alignment, and others, can be used to structure the HTML and CSS code.
CSS and LESS
The styling code can be written to be interpreted by our CSS preprocessor, LESS. When writing that code, the following rules are mandatory:
- Global selectors which can interfere with the structure or other elements of the page are not permitted.
- IDs cannot be used as selectors.
- A maximum of two nested selectors is permitted.
- All classes must be in English, with lowercase letters and words separated by a hyphen. E.g. .my-payment-method.
Additionally, it is recommended to use only classes as selectors.
Responsiveness
The developed interface must meet the following interfaces:
- Desktop/Horizontal Tablet: width greater than or equal to 768 pixels. The container is 462 pixels wide, and its height can vary between 200 and 330 pixels, depending on the content.
- Vertical/Mobile Tablet: width less than 768 pixels. The container is 100% wide, with a margin of 30 pixels and padding of 15 pixels.
Additional breakpoints can be used freely.
User interface: design and elements
Color and images
The use of colors and images can follow the visual identity of the payment method, without restrictions. The images must be optimized and grouped into one, using the technique of css sprites.
Typography
Following the Bootstrap pattern, the fonts adopted in Smart Checkout are, in this order:
- Helvetica Neue
- Helvetica
- Arial
- Sans Serif
It is not recommended to use other fonts for texts. If it is extremely necessary, these fonts must be part of the standard system package, as it is not possible to import new fonts.
Scripts and links
Scripts and links are not essential for closing the purchase, as they distract the consumer and even take him out of the checkout.
The use of scripts and links are not permitted.
All content available at the checkout area should be informative only. The Checkout button must be the only call-to-action presented on the screen.
Internationalization
All texts must be produced in:
- en-US: US English (mandatory) and,
- Languages of the countries/regions where you intend to operate (if not in English). See ISO 639-1 Standard Language Codes.
In addition to localizing the texts, images should be altered to better suit each language.
Development
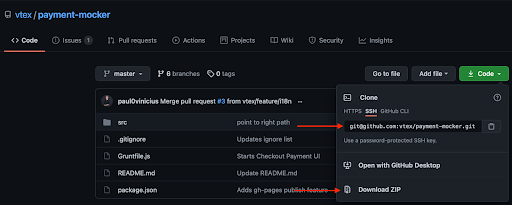
Use Payment Mocker to test your layout rendering within VTEX's Smart Checkout to ensure expected behavior.
Follow these steps to create your layout:
-
Download the repository to your local machine (either through the Github clone or by downloading the repository from the download option).
-
Install the NodeJS.
-
Enter the following commands in the terminal to install Grunt and Sass:
- Grunt:
sudo npm i -g grunt-cli - Saas:
sudo npm install -g sass
- Grunt:
-
Still in the terminal, go to the project folder and run the command
npm i; wait for the project's dependencies to be installed. -
Run the command Grunt on the project folder.
-
Open your preferred browser and go to the link
http://localhost:8080. -
Modify the following files in accordance with the requirements of the User interface: structure and code section:
- src/partials/payment.html: This file is where you should insert the HTML structure of your layout. When adding information about a new payment method, change the text
newpaymentin the file to the name of the payment method created. For example, when creating the Safety Pay payment method, replace the informationnewpaymentwithSafetyPay. - src/assets/css/less/style.less: This is where you insert the classes responsible for styles, spacing, fonts, and other CSS customizations in your layout. Remember to follow the guidelines described in the section above.
- src/assets/img: Here you should insert and refer to all the images used in your layout.
- src/i18n: Inside this folder you are going to find four files, each one corresponding to one language (pt-BR, en-US, es, and fr). You should change the values for the keys and check if the languages are rendered correctly by clicking on the flags located in the upper left corner in the Payment Mocker, see the example in the section below.
- src/partials/payment.html: This file is where you should insert the HTML structure of your layout. When adding information about a new payment method, change the text
-
Open the file src/assets/css/less/style.less, get access to the property #payment-group-template-PaymentGroup .payment-group-item-text and update the attribute background-image, in order to insert the icon referring to your payment method.
If there is no change in the attribute background-image, no icon will be rendered next to the payment method label.
- Open the file src/i18n/{language}.json, and change the value of the paymentData.paymentGroup.title key, in order to customize the label that your payment method will be rendered on checkout.
If the value of the paymentData.paymentGroup.title key is not changed, the payment method will be rendered with the default label. Likewise, if the name chosen for your new payment method is the same or similar to one of the existing payment method on the VTEX platform, it will not be possible to register it. To check the payment methods already registered, access the VTEX Admin, and go to Store Settings > Payments > Settings > Payment Conditions.
Delivery
To deliver the code (which is a repository of the Payment Mocker containing all modifications related to your payment methods), you must compress it in .zip or .rar extensions, and submit it by opening a ticket on the VTEX Support Portal.
You must delete any additionally files or folders created during the compilation process of the project, such as, the folder node_modules or file yarn.lock (e.g. for those use yarn package manager).
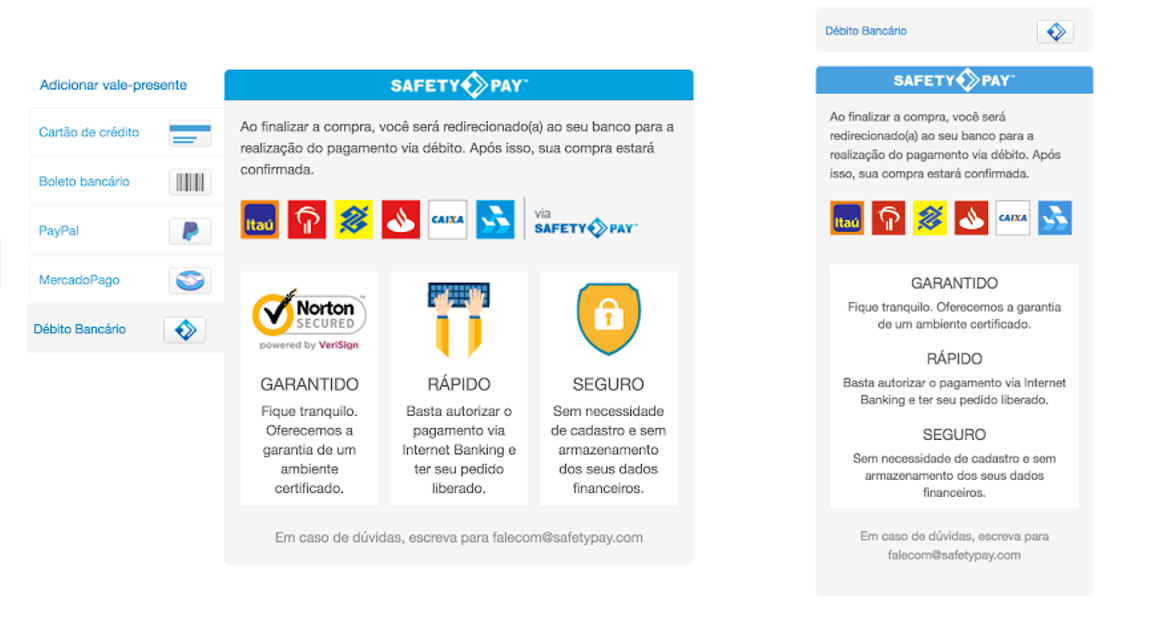
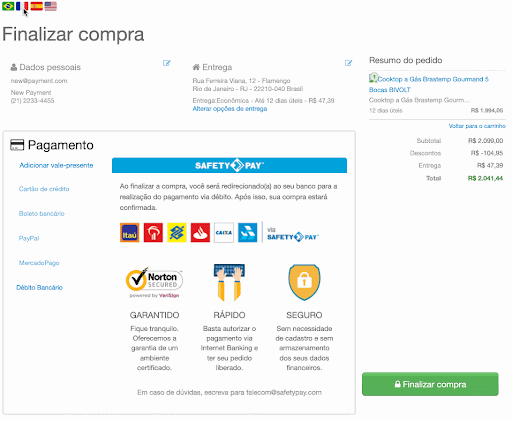
Layout Example
See below an example of layout and language switching (Brastemp) for payment methods located in VTEX's Smart Checkout payment methods.
Any manual language switching is only available in the Payment Mocker for testing purposes. Once the layout is deployed, the language switching is made by the Checkout automatically.