B2B Organizations
️ The B2B Organizations app is part of the VTEX B2B Suite solution: a collection of apps that allow stores to manage organizations, storefront roles and permissions, and checkout settings for B2B commerce relationships. We recommend using it alongside the other apps in this suite to ensure that all features work as expected.
In the B2B model, sales goals go beyond achieving a high conversion rate. They include simplifying the relationship between companies, reducing costs, and increasing performance by delivering the best possible shopping experience to customers.
B2B commerce relations are usually complex and often require a customized service. In this scenario, it is common to group various users from the same company under an organization and define custom payment methods, product selections, and prices for each customer. These tasks are part of the daily routine in B2B commerce.
The B2B Organizations app enables you to group B2B users into organizations. You can assign specific payment methods, price tables, and product collections to each organization, allowing all organization users to share the same commercial conditions. Additionally, each organization can be further segmented into one or more cost centers, each with its own shipping addresses.
Before you begin
First, make sure you have the VTEX IO CLI (Command Line Interface) installed in your computer.
Please note that when you install the B2B Organizations app, the Storefront Permissions will also be installed as a dependency app. This is because Storefront Permissions allows you to assign specific storefront roles to B2B users within an organization. This is particularly useful for organizations with multiple users who have different responsibilities, such as placing orders, approving orders, or managing organization users. Read the Storefront Permissions app documentation to learn more about the available roles and how to customize their permissions.
If you want to manage roles and permissions in the VTEX Admin, you must install Storefront Permissions UI as well.
Installation
You can install the B2B Organizations app by running the command vtex install vtex.b2b-organizations in your terminal, using VTEX IO CLI.
User widget configuration
To enable the user widget in your storefront, this app provides a b2b-user-widget block that you can add to the account store theme. We recommend adding it to the store header, as shown below.

Follow the instructions below to display the user widget.
-
Open your store theme app repository in your local files.
-
In the
manifest.jsonfile, underdependencies, add"vtex.b2b-organizations": "1.x":_10"dependencies": {_10"vtex.b2b-organizations": "1.x"_10}, -
Within your store's theme
store>blocks>headerfolder, edit theheader.jsoncfile, placing theb2b-user-widgetblock in the desired location, as exemplified below.We recommend placing it on the top row of the store header. Note that the
b2b-user-widgetblock does not accept any props._16"header-layout.desktop": {_16"children": [_16"flex-layout.row#0-desktop",_16"flex-layout.row#1-desktop",_16"flex-layout.row#2-desktop",_16"flex-layout.row#3-desktop",_16"sticky-layout#4-desktop"_16]_16},_16_16"flex-layout.row#0-desktop": {_16"children": ["b2b-user-widget"],_16"props": {_16"fullWidth": true_16}_16}, -
Publish and install the modified store theme. Read our documentation on Making your theme content public for more information.
Configuration
This is the store header for only one associated organization: 
This is the store header for more than one associated organization:

b2b-user-widget
| Prop name | Type | Description | Default value |
|---|---|---|---|
showDropdown | boolean | Controls whether the dropdown menu is displayed when multiple organizations are associated with the same email address. | true |
Customization
To apply CSS customizations to this and other apps, follow the instructions in Using CSS handles for store customization.
CSS handles are available for the Organization Request Form component and the User Widget component.
| CSS handles |
|---|
newOrganizationContainer |
newOrganizationInput |
newOrganizationAddressForm |
newOrganizationButtonsContainer |
newOrganizationButtonSubmit |
userWidgetContainer |
userWidgetRow |
userWidgetItem |
userWidgetButton |
userWidgetImpersonationItem |
userWidgetImpersonationButton |
userWidgetImpersonationError |
How the app works
The B2B Organizations app adds the following functionalities and components to your VTEX store, which are divided into three categories: VTEX Admin, Master Data v2, and Storefront features.
| Public | Category | Location | Feature |
|---|---|---|---|
| B2B store admin | VTEX Admin | Organization Requests page | Reviews organization requests. |
| Organizations page | Manages organizations. | ||
| Organization Details page | Manages cost centers associated with organizations. | ||
| Manages collections associated with organizations. | |||
| Manages payment terms associated with organizations. | |||
| Manages price tables associated with organizations. | |||
| Manages organization users. | |||
| Message Center Templates page | Manages email templates for the B2B Organizations app. | ||
| B2B store admin or developers | Master Data v2 | Master Data API v2 | Retrieves and edits information related to organization requests, organizations, and cost centers stored in Master Data v2. |
| B2B customer (organization user) with required permissions | Storefront | Storefront form | Requests a new organization. |
| My Organization | Manages organizations. | ||
| Manages cost centers | |||
| Manages users. | |||
| Impersonates users. | |||
| Storefront navigation | User widget |
This app can also be used together with B2B Quotes, allowing order quotes to be managed at the organization level. Please read our B2B Quotes documentation for more details.
VTEX Admin
After installing and configuring the B2B Organizations app, you can find its VTEX Admin capabilities accessing Account Settings > B2B Organizations & Cost Centers.
Organization Requests
To request the creation of an organization, B2B customers must complete the Request New Organization form.
Once the customer completes this step, B2B store admins can review the organization request by navigating to VTEX Admin > Account Settings > B2B Organizations & Cost Centers > Organization Requests (or by accessing /admin/b2b-organizations/requests).
On this page, admins can view a list of all the organization requests placed in their store.
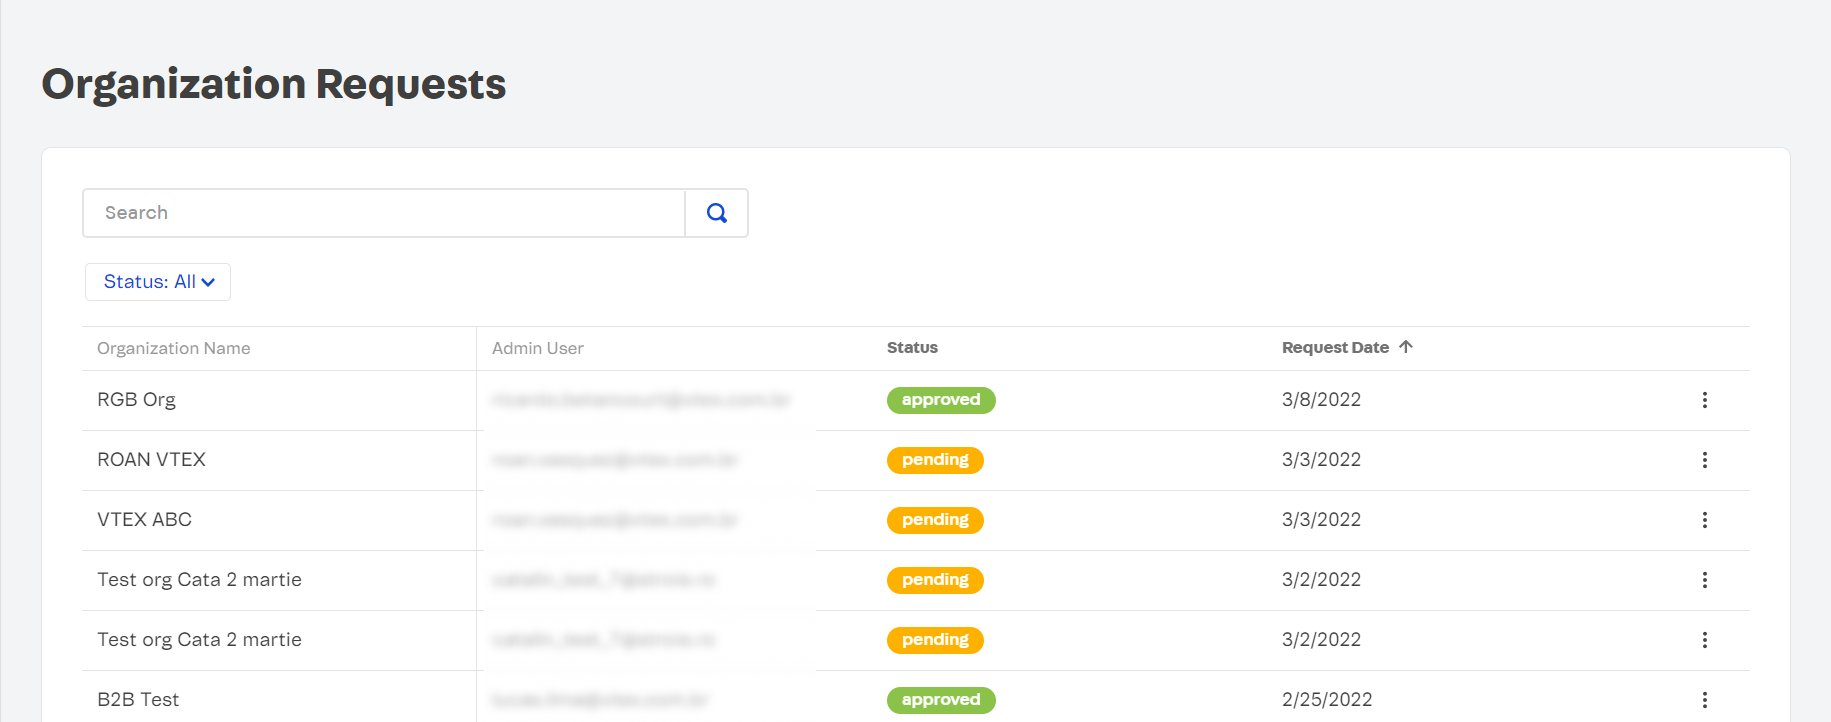
Each organization within the system can be assigned one of the following statuses: pending, approved or declined. Pending requests are the ones awaiting review.
To review a request, follow these steps:
- Click a request from the table or click
 >
> View. - Leave a comment in the Add note field, if necessary.
- Click
ApproveorDecline.
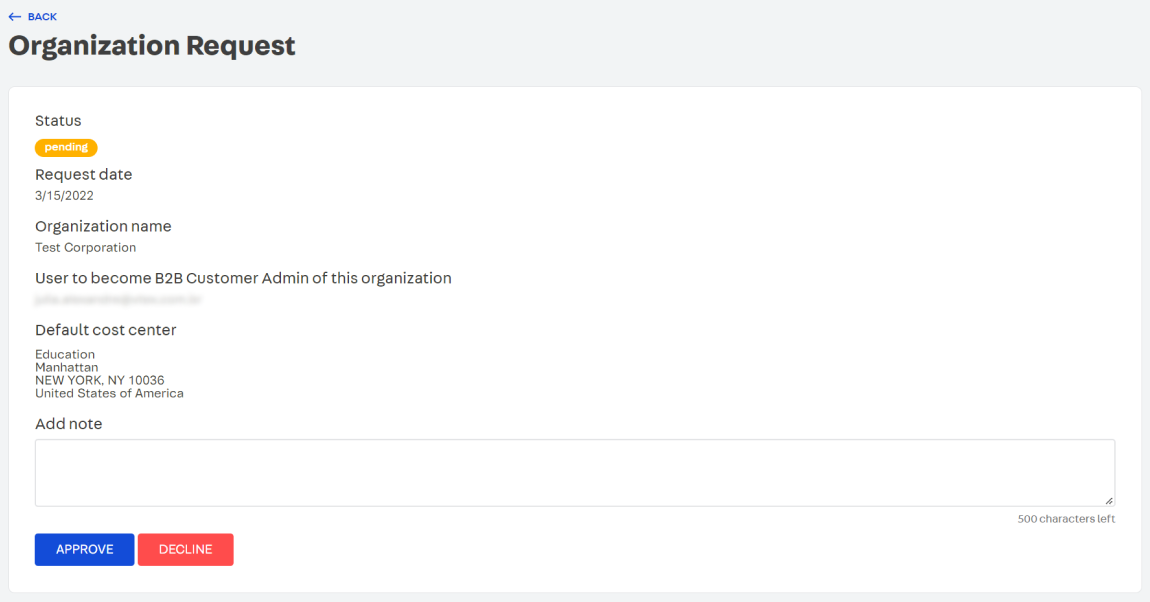
Upon approval, the request status will change to Approved, and the organization will be created. Notifications will be sent via email to both the Organization Admin and the Sales Admins to inform them of the approval. You can learn more about this notification in the Email templates section. In addition, the user designated as the Organization Admin will be granted access to the My Organization tab on the My Account page of your storefront.
If the organization request is declined, the request status will be changed to Declined, and the organization will not be created. The user assigned as the Organization Admin will receive an email notification informing this outcome. For further information about this notification, please refer to the Email templates section.
Organizations
The Organizations page displays a list of all the organizations created in your store and their respective statuses. It also allows store admins to:
- Add organizations.
- Access the Organization details page, which includes organization data, cost centers, collections, payment terms, price tables, and users.
To access the page, go to Account Settings > B2B Organizations & Cost Centers > Organizations in the VTEX Admin (or access /admin/b2b-organizations/organizations).
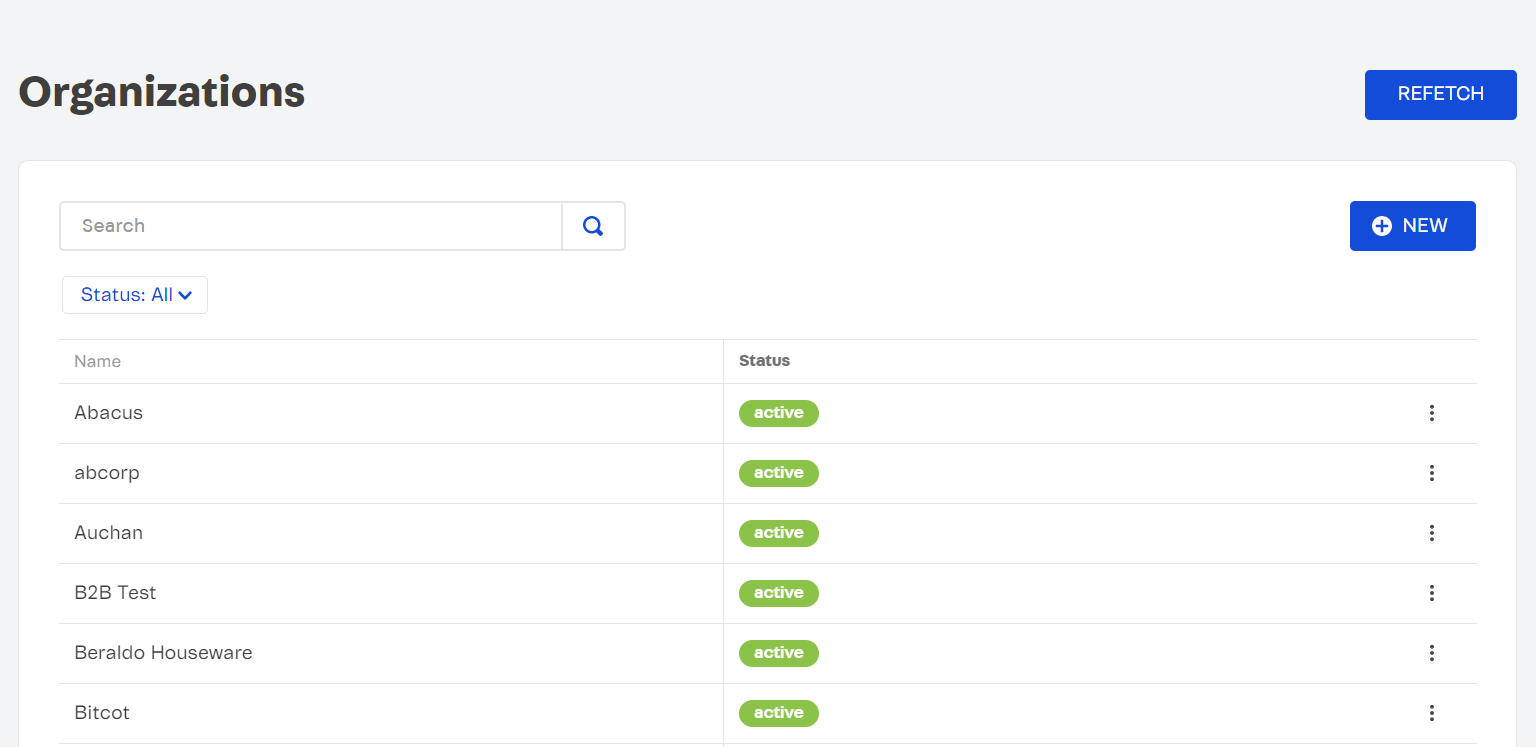
You can click Refetch to refresh the organization list on this page and retrieve information about recently created organizations.
To find a specific organization, you can use the search bar to search by name or apply filters based on the organization status.
Each organization can have one of the following statuses:
- Active: The organization has been approved by the store admins and is currently active.
- On hold: The organization is currently paused, which means its users are temporarily unable to complete purchases.
- Inactive: The organization has been deactivated by the store admins, so users will not be able to log in.
Adding organization
To manually create a new organization on the Organizations page, please follow these steps:
- Click the
Newbutton. - Fill in the required information about the new organization, as illustrated in the image below.
- Name of organization: Name of the organization you want to create.
- Name of cost center: Name of the initial cost center associated with the organization.
- Country: Country where the cost center is located.
- Postal code: Postal code of the cost center address.
- Address Line 1: Main address information, including the street number and street name where the cost center is located.
- Address Line 2: Optional field for additional address information.
- City: City where the cost center is located. This field will be completed automatically based on the postal code informed.
- State: State where the cost center is located. This field will be completed automatically based on the postal code informed.
- Receiver: Name of the person who will receive the orders at the specified address.
- Click
Add.
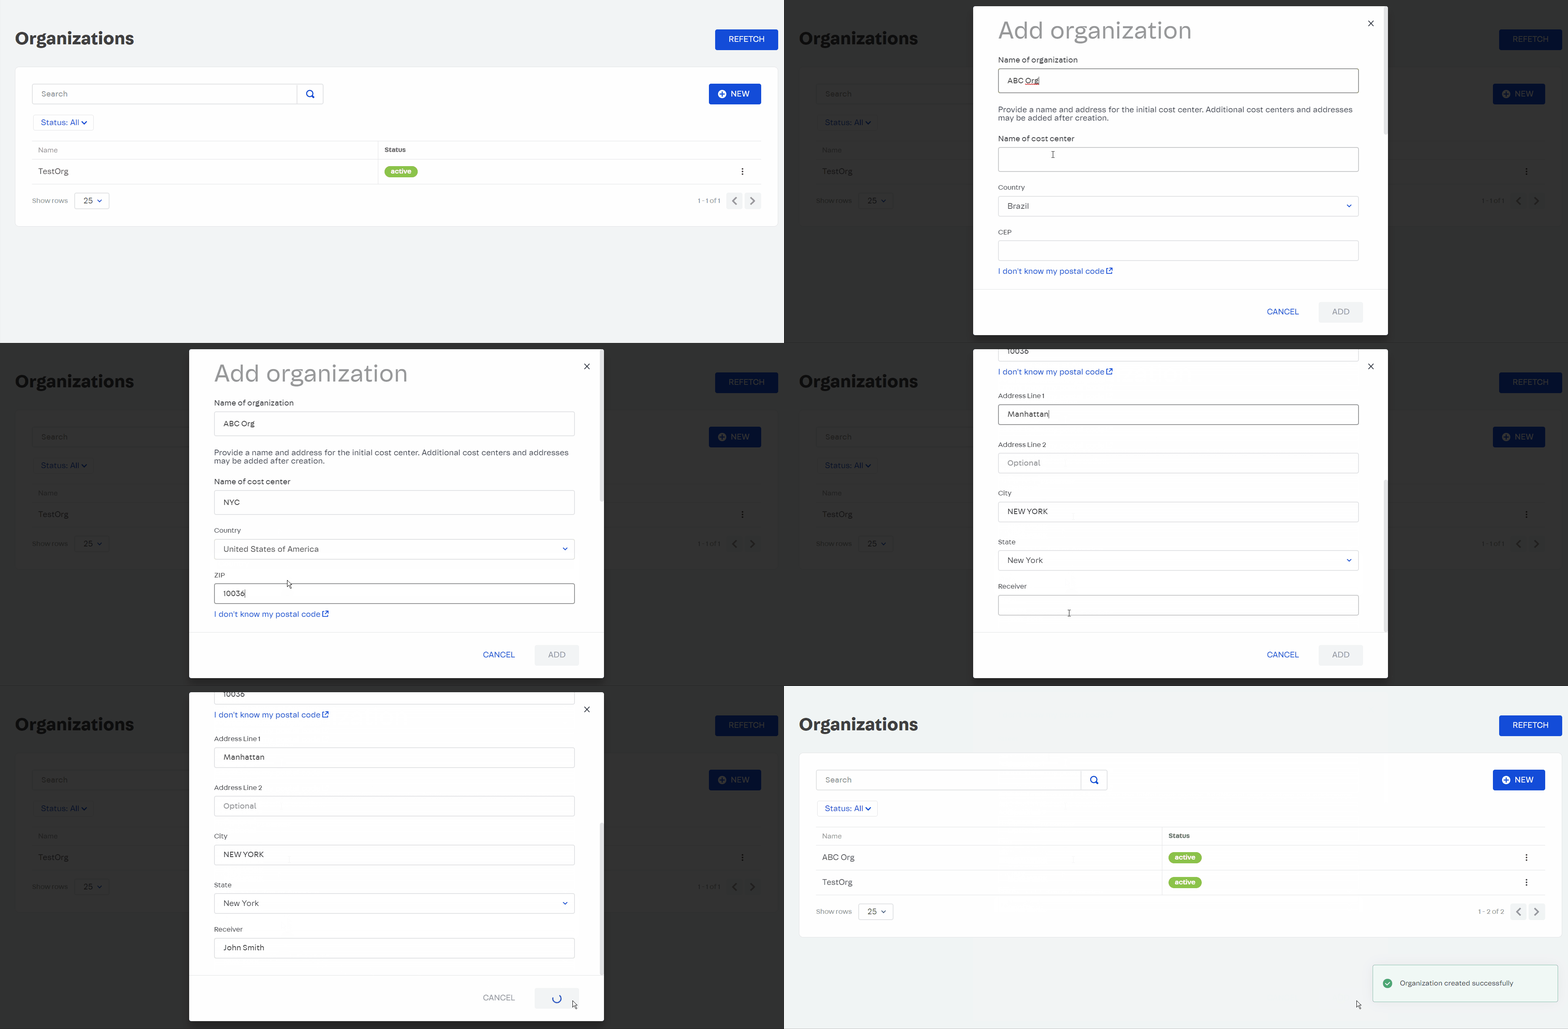
After creating the organization, you can add additional cost centers and addresses. The process for doing so is explained in the next section of this documentation.
Organization Details
On the Organizations Details page, you can view and edit the following information of an existing organization:
You can access this page by going to Account Settings > B2B Organizations & Cost Centers > Organizations in the VTEX Admin and clicking the organization whose details you want to view, or ![]() >
> View.
Note that assigning collections, payment terms, and price tables to an organization is optional. If these are not assigned, users belonging to the organization will see the store default catalog, have access to all payment methods, and view the store default pricing.
Organization name and status
In the top section of the page, you will find the following information:
- Organization Name: Name of the organization. You can edit this information.
- Status: Status of the organization. You can set it to Active, On Hold or Inactive by selecting from a list.
- Created: Date when the organization was created.

Cost Centers
In the Cost Centers section, you can view all cost centers associated with the organization. VTEX Admin users can view and manage cost centers for any organization.

Each organization must have at least one cost center.
By default, each cost center allows the payment terms that have been assigned to the parent organization. However, Organization Admin users can enable or disable individual payment terms at the cost center level. For more information on managing cost centers, please refer to the Managing Cost Centers section.
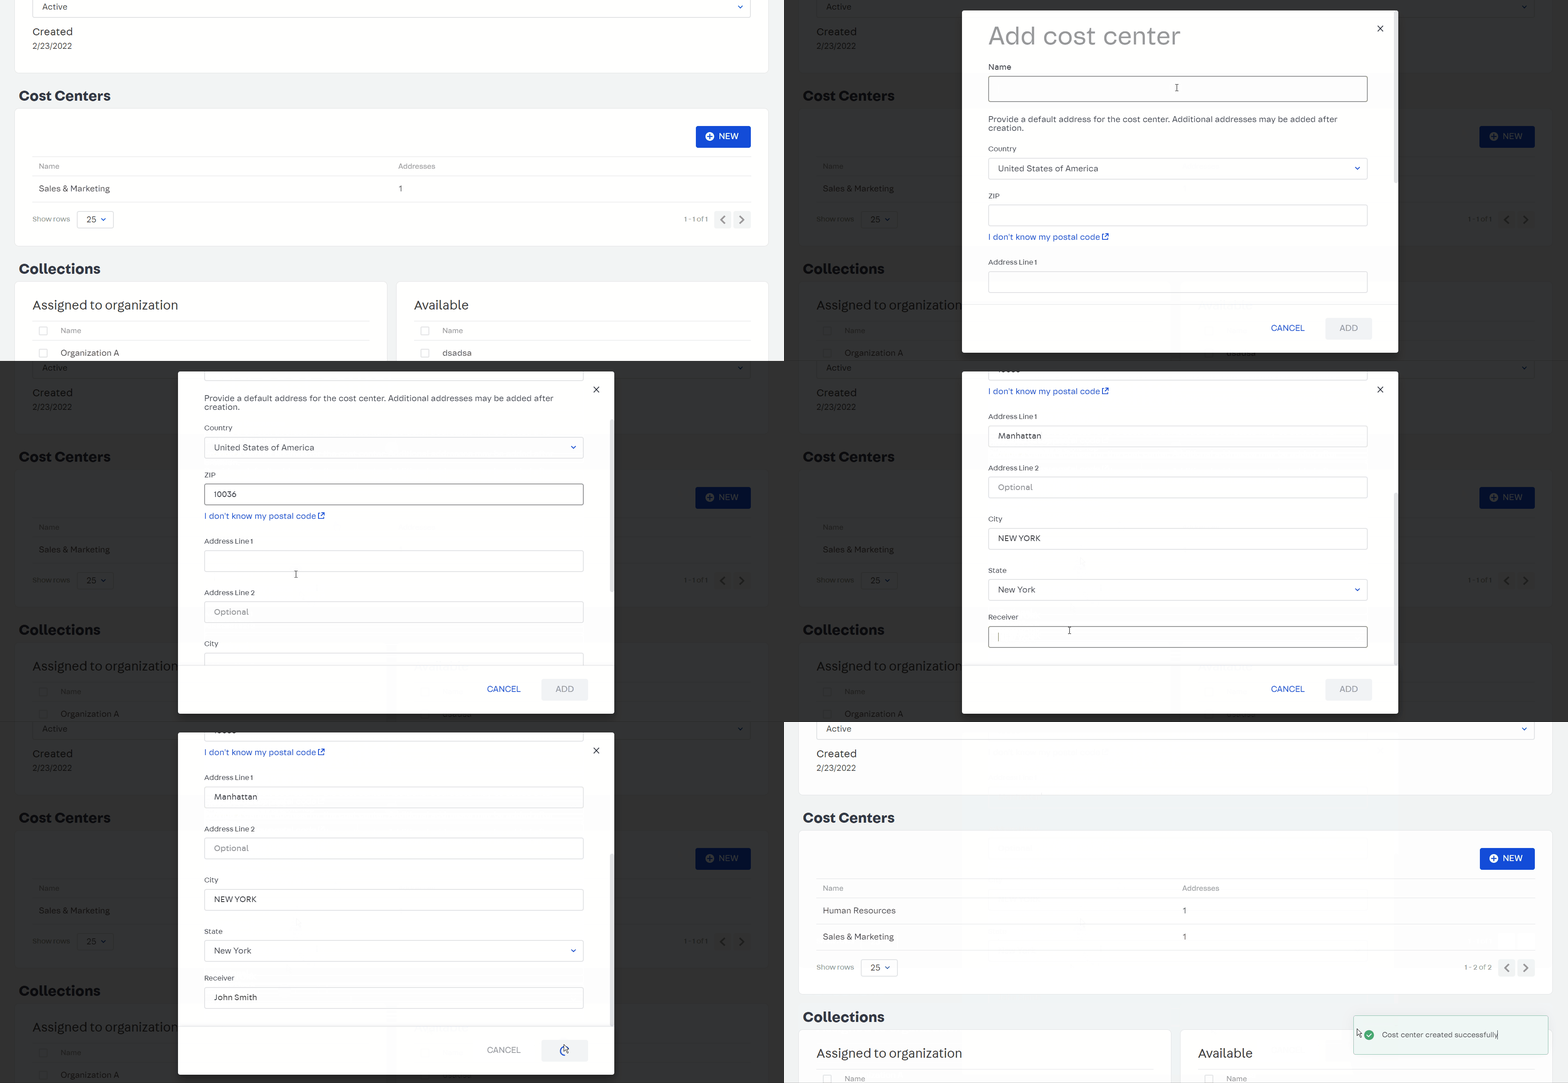
To create a new cost center, follow the steps below.
- Click the
Newbutton. - Enter the required information about the new cost center, as illustrated in the image below.
- Name: Name of the cost center.
- Country: Country where the cost center is located.
- Postal code: Postal code of the cost center address.
- Address Line 1: Main address information, including the street number and street name where the cost center is located.
- Address Line 2: Optional field for additional address information.
- City: City where the cost center is located. This field will be completed automatically based on the postal code informed.
- State: State where the cost center is located. This field will be completed automatically based on the postal code informed.
- Receiver: Name of the person who will receive the orders at the specified address.
- Click
Add.
Cost Center Details
You can view or edit the details of an existing cost center by clicking on it on the Organization Details page.
This will lead you to the Cost Center Details page, where you can:
- View or edit the cost center Name and Addresses.
- View or edit the cost center Business Document.
- Add a new shipping address associated with the cost center.
- Delete the cost center.
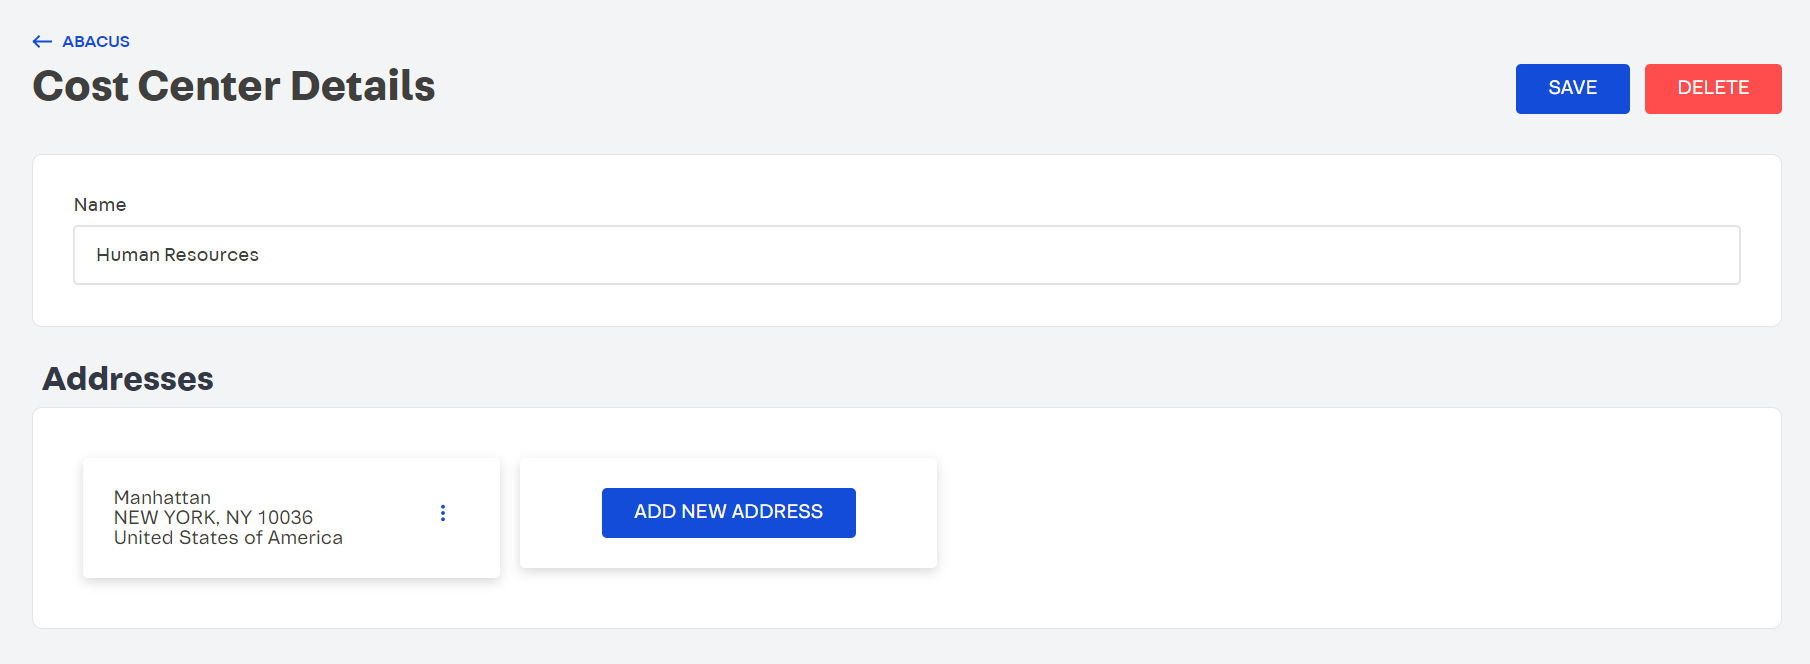
The Business Document field is optional and can be utilized to store business identifiers such as Tax ID, VAT ID, CNPJ, or similar identification numbers. If a Business Document is specified in a user's cost center, it will be automatically applied as the corporateDocument in the user's profile. Additionally, this business document will be attached to any orders placed by the user.
Please note that the shipping addresses assigned to a cost center will only be accessible to users belonging to that specific cost center during the checkout process if you have installed B2B Checkout Settings. Other addresses will not be available. Therefore, each cost center must have at least one shipping address.
To edit or delete an existing address, click ![]() next to it and select Edit or Delete.
next to it and select Edit or Delete.
To add a new shipping address for a cost center, follow these instructions:
- Click
Add new address. - Enter the required information for the new address.
- Country: Country where the cost center is located.
- Postal code: Postal code of the cost center's address.
- Address Line 1: Main address information, including the street number and street name where the cost center is located.
- Address Line 2: Optional field for additional address information.
- City: City where the cost center is located. This field will be completed automatically based on the postal code informed.
- State: State where the cost center is located. This field will be completed automatically based on the postal code informed.
- Receiver: Name of the person who will receive the orders at the specified address.
- Click
Add.
Make sure to click Save in the top right of the Cost Center Details page to save any changes made.
If you want to delete the cost center, click Delete instead.
Collections
You must use the Collections Beta solution to be able to associate collections with organizations using B2B Organizations. Read our article on Creating Collections Beta for more information.
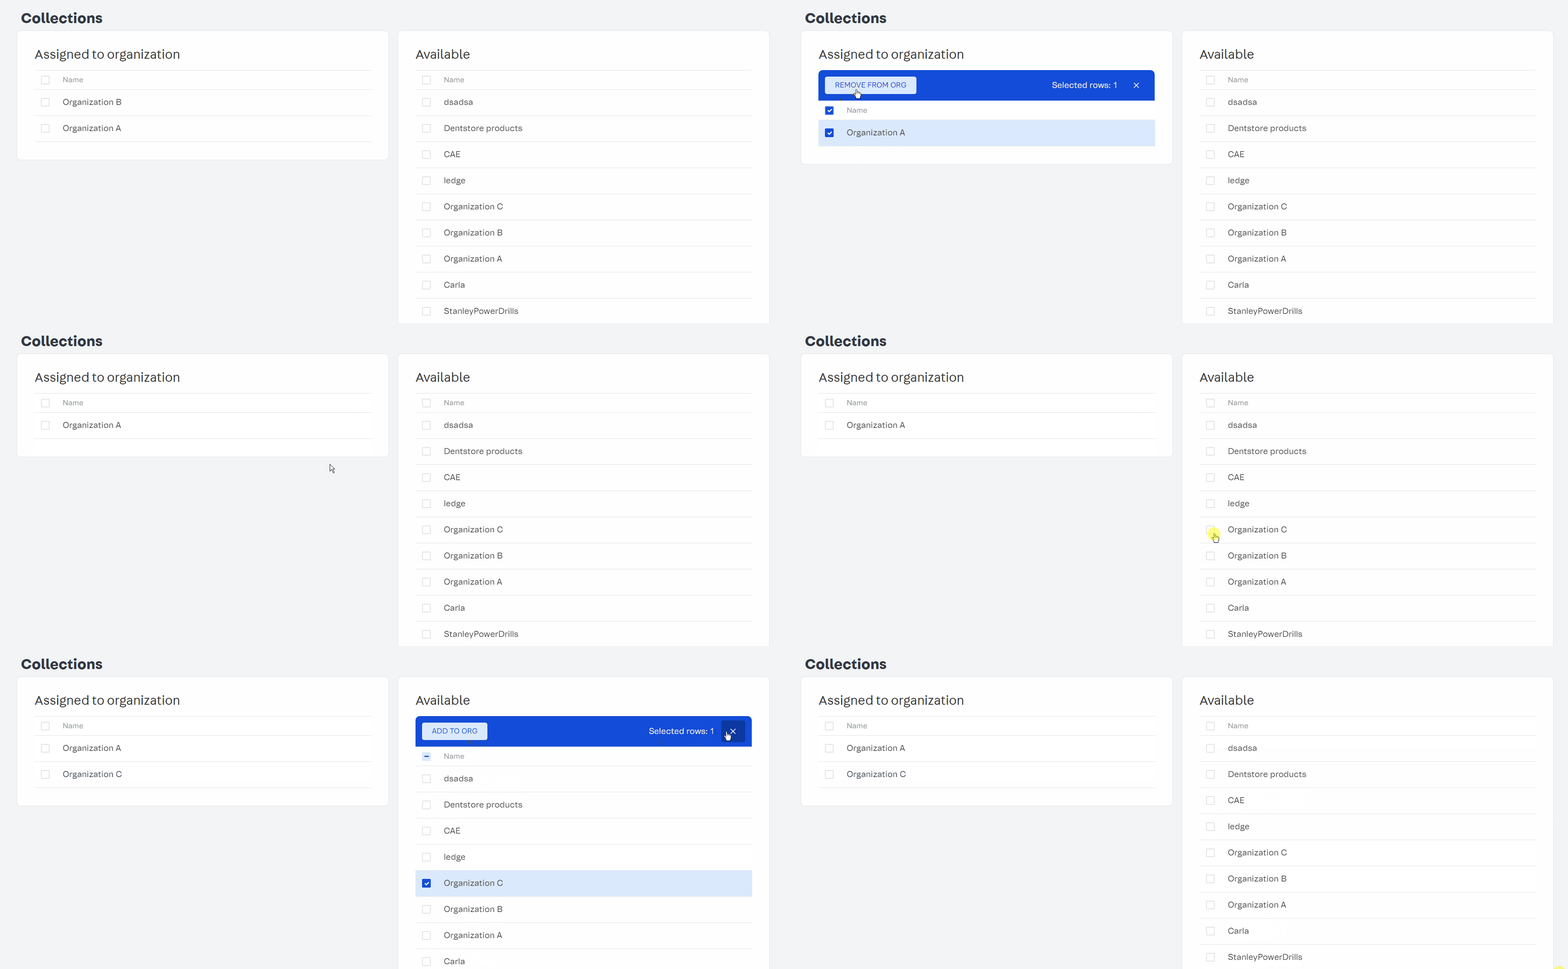
This section allows you to manage the product collections assigned to the organization, which determines the assortment of products visible to organization users in the storefront.
To add a collection, select the collection you want to add from the Available list and click Add to org.
To remove a collection, select the collection you want to remove from the Assigned to organization list and click Remove from org.
Payment Terms
In this section, you can choose which payment conditions are assigned to the organization, which determines which payment options are available to organization users during checkout.
Note that the available payment options can be further customized per cost center by the Organization Admin. See the Managing Cost Centers section for more information.
To add a payment term, select the option you want to add from the Available list and click Add to org.
To remove a payment term, select the option you want to remove from the Assigned to organization list and click Remove from org.

To customize the checkout according to each organization user role, you need to install and configure B2B Checkout Settings.
Price Tables
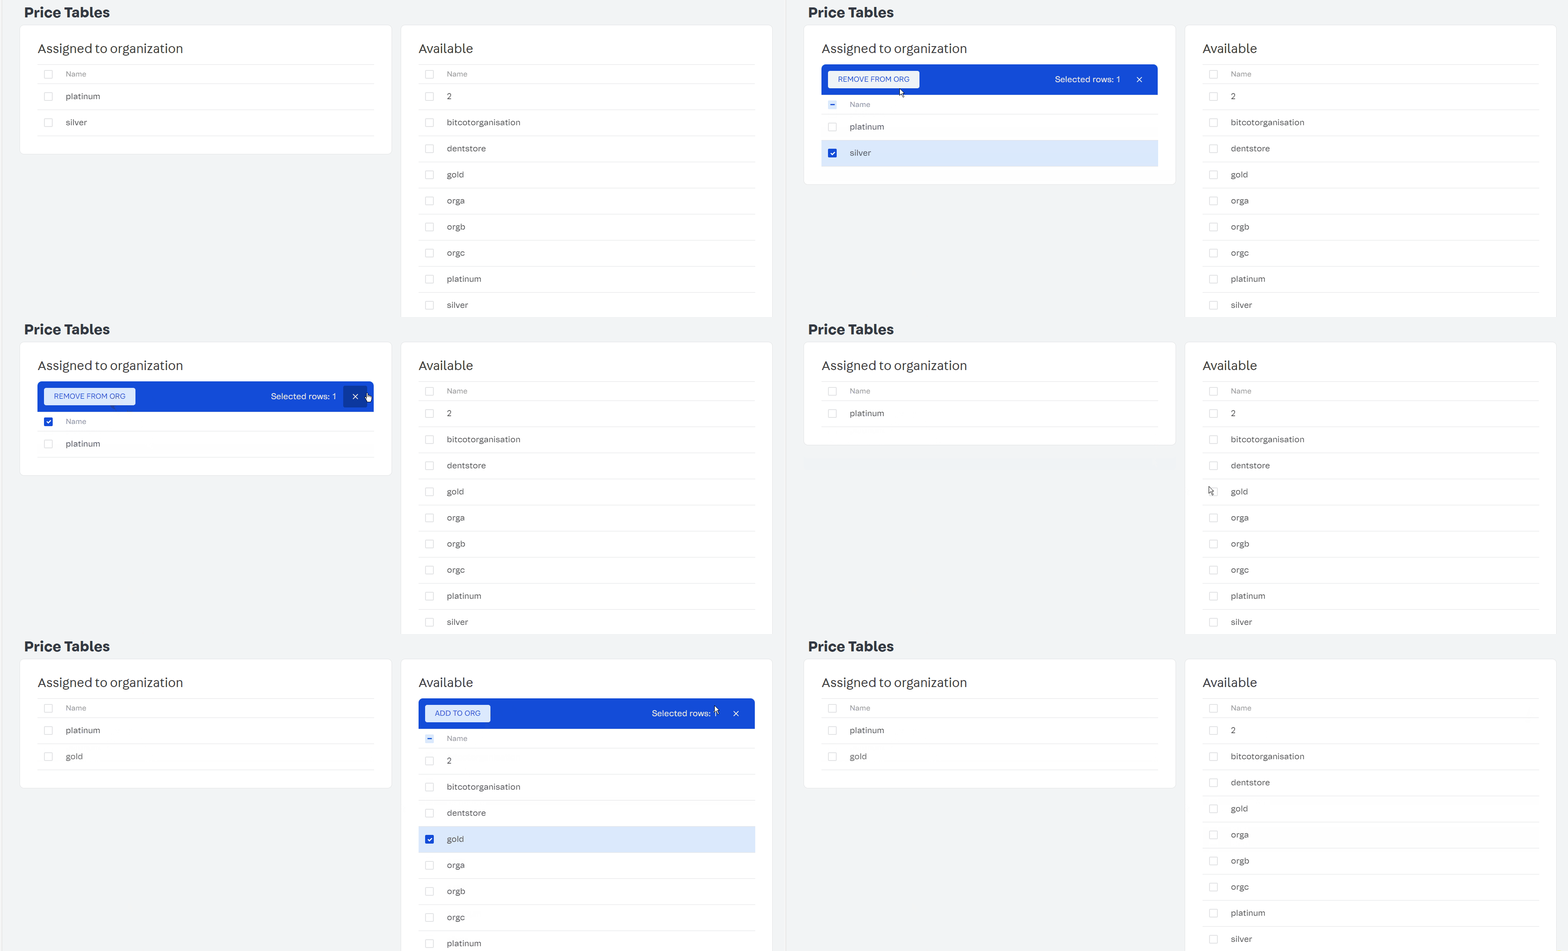
This section allows you to choose which price tables are assigned to the organization. The prices displayed to organization users in the storefront are determined by the selected price tables.
To add a price table, select the option you want to add from the Available list and click Add to org.
To remove a price table, select the option you want to remove from the Assigned to organization list and click Remove from org.
Users
This section displays a list of users associated with the organization, showing their Email, Role in the organization, and the Cost Center they are associated with.

To add a new user to the organization, follow these steps:
- In the Users list, click the
Newbutton. - Enter the user information, as illustrated below.
- Name: Full name of the user.
- Email: Email address of the user.
- Cost Center: Cost center the user will be associated with.
- Role: Role the user will have in the storefront. See more details on the available roles in the Storefront Permissions documentation.
- Click
Add.
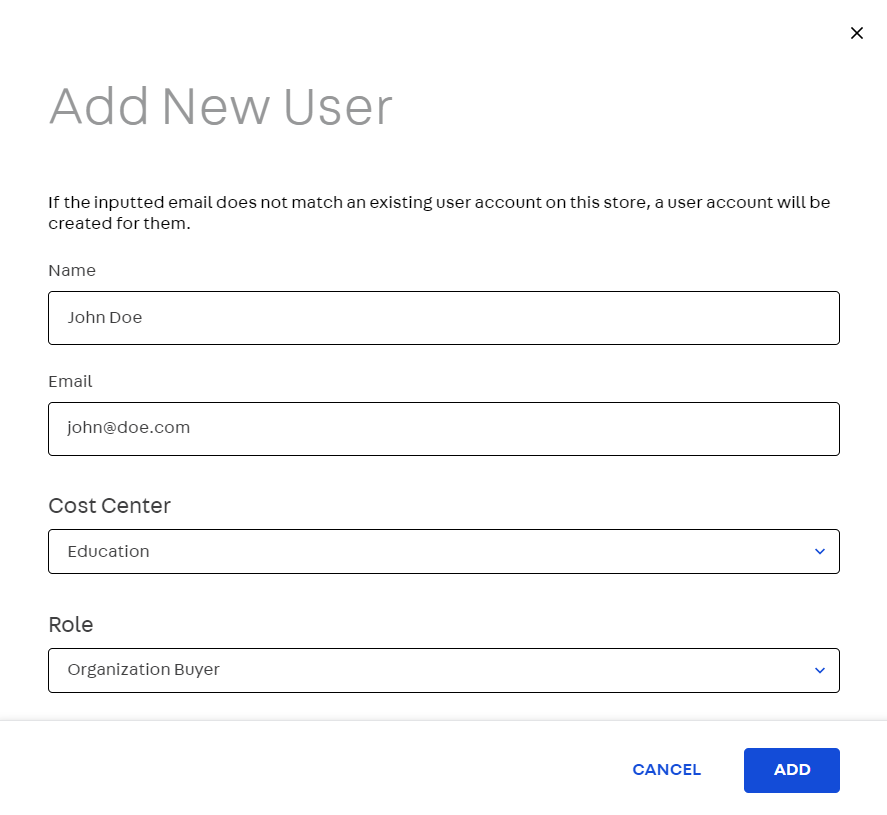
Once you add a new user to the organization, a customer account will be created if an account does not already exist in your store for the provided email address.
To edit or remove an existing user, follow these steps:
-
Click the user you want to edit or delete in the Users list.
-
Edit the desired information.
You can change the user's Cost Center and their Role.
If you want to remove the user from the organization, click
Remove userand skip the next step. -
To apply your changes, click
Save.
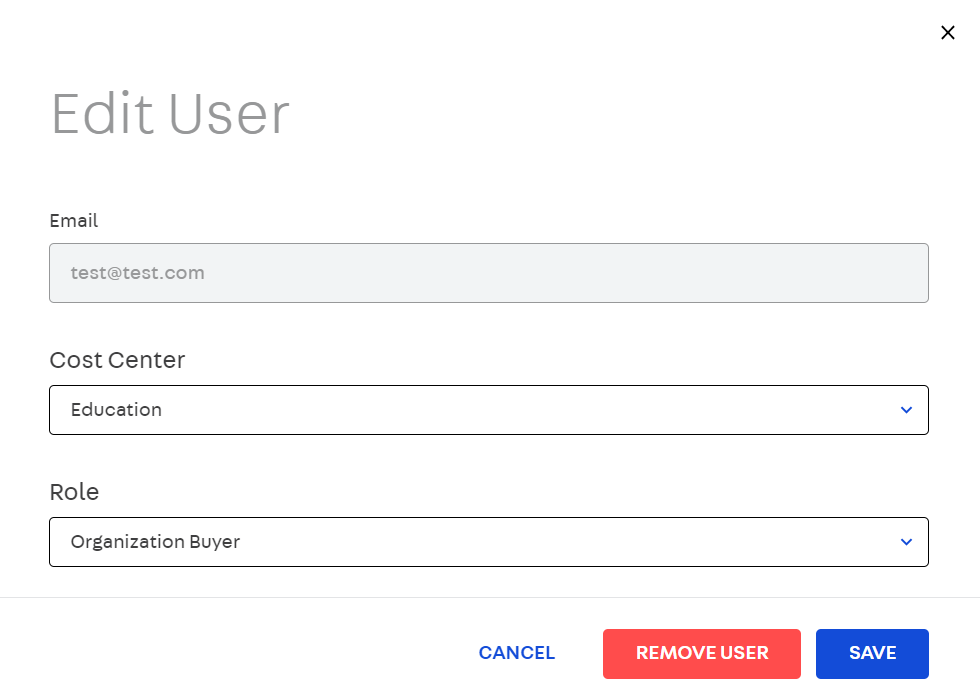
If a user is removed from an organization, their account will continue to exist in the store, but they will no longer be associated with an organization, cost center, or B2B role. Thus, they will lose access to the details of their organization on the My Organization page. Instead, they will have the option to request the creation of a new organization, if necessary.
As an optional feature, you can install the Admin Customers app for additional customer management capabilities on the VTEX Admin.
Email templates
The B2B Organizations app provides a set of four email templates to be sent to B2B organization users, which are triggered automatically based on specific changes:
| Template name | Recipient | Trigger |
|---|---|---|
| Organization Approved | Users with the Organization Admin role | The organization request has been approved. |
| Organization Created | Users with a Sales Admin role | The organization has been created. |
| Organization Declined | Users with the Organization Admin role | The organization request has been declined. |
| Organization Status Changed | Users with the Organization Admin role | The organization status has changed. |
If you want to view or edit these templates, follow the steps below.
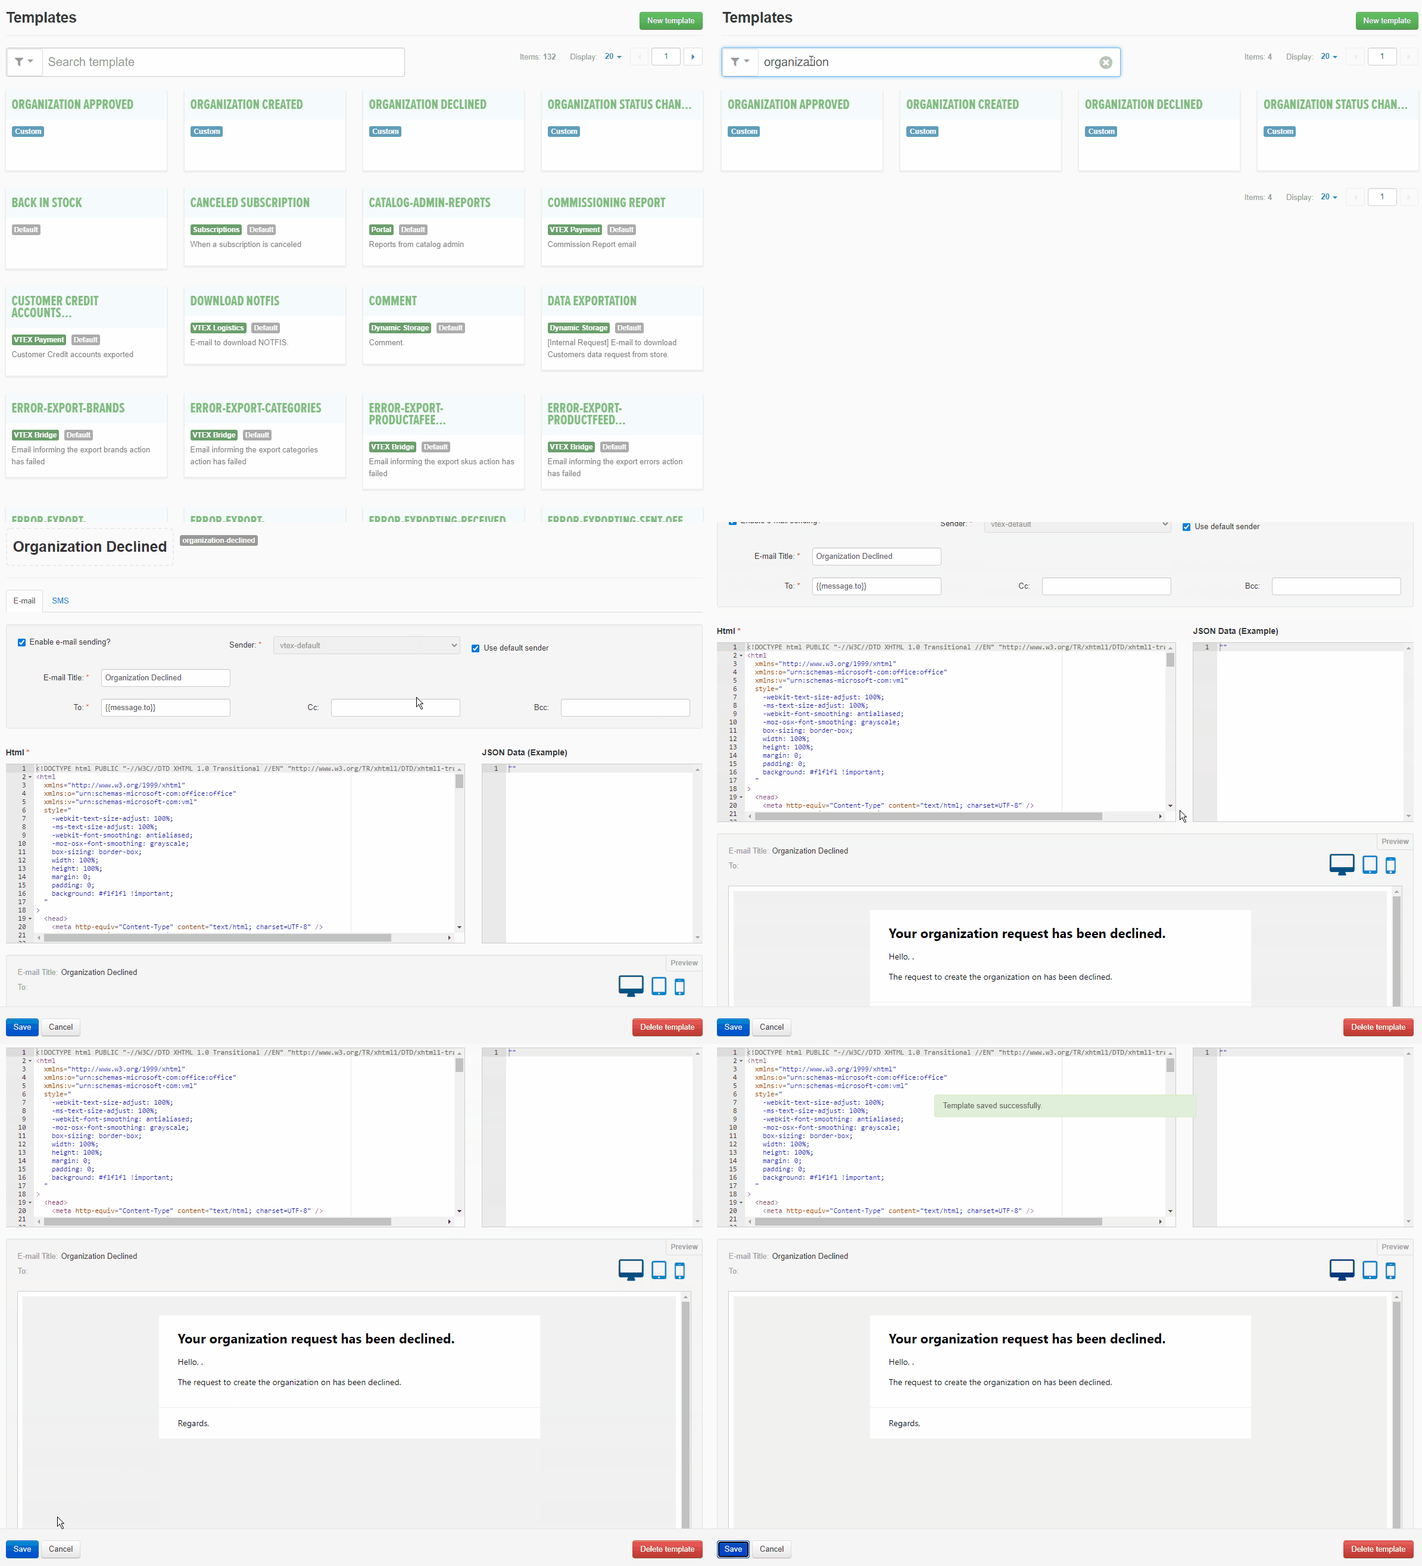
- In the VTEX Admin, go to Customer > Message center > Templates.
- Type
organizationin the search bar. - Click the template you want to view or edit.
- Make the desired changes in the template. For detailed instructions on editing Message Center templates, refer to our documentation on How to Create and Edit Transactional Email Templates.
- Click
Save.
Master Data v2
The B2B Organizations app stores information about organization requests, organizations, and cost centers in Master Data v2.
This means that store admins or developers can retrieve this information via the Master Data API v2 by using their data entity name as the value for the data_entity_name parameter.
You can see the data entity names in the table below.
| Data entity names |
|---|
organization_requests |
organizations |
cost_centers |
Storefront
Storefront capabilities, in turn, are accessible to B2B customers who visit a supplier store, provided that they are logged in and have the required permissions.
The following sections describe what your customer can do in your storefront after you have finished setting up the B2B Organizations app.
Requesting a new organization
If a B2B user is not currently associated with any organization, they have the option to request the creation of a new buyer organization in your store by completing the Request New Organization form. They can follow the steps below to do so.
- Access the store website.
- Click My Account > My Organization.
- Provide the required information, as shown in the image below.
- Organization Name: Name of the organization.
- User to become Organization Admin: Section where you must provide information about the first user of the organization, who will be assigned as the Organization Admin.
- First Name: First name of the Organization Admin user.
- Last Name: Last name of the Organization Admin user.
- Email Address: Email address of the Organization Admin user.
- Default Cost Center: Section where you must provide information about the first cost center associated with the organization.
- Cost Center Name: Name of the cost center.
- Business Document: Optional field for a business document such as a Tax ID, Company registration number, etc.
- Country: Country where the cost center is located.
- Postal code: Postal code of the cost center's address.
- Address Line 1: Main address information, including the street number and street name where the cost center is located.
- Address Line 2: Optional field for additional address information.
- City: City where the cost center is located. This field will be completed automatically based on the postal code informed.
- State: State where the cost center is located. This field will be completed automatically based on the postal code informed.
- Receiver: Name of the person who will receive the orders at the specified address.
- Click
Submit.
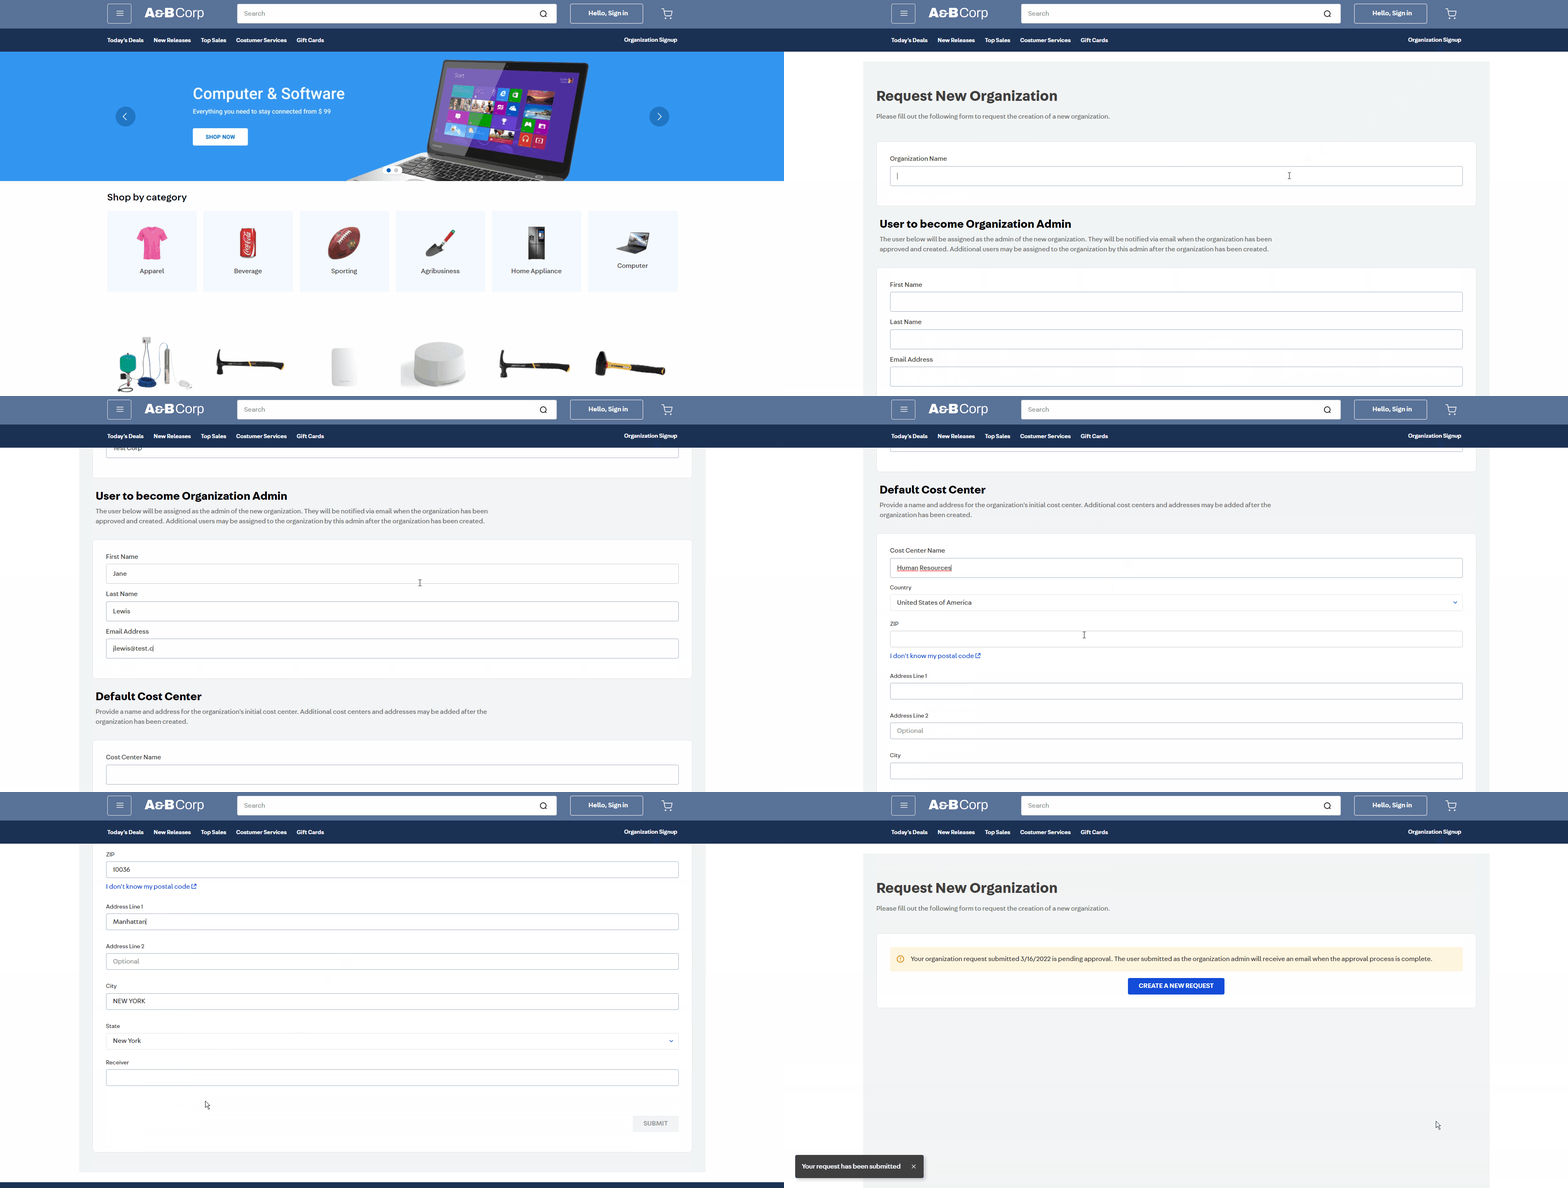
After submitting the form, the request will be sent to a queue for review by the B2B store administrator. See the Organization Requests section for more information.
The user designated as the Organization Admin for the new organization will receive an email notification when the request has been approved or declined by the store admin. Learn more about this notification in the Email templates section.
My Organization
Users designated as the Organization Admin or Sales Admin can manage their organization's details in the storefront on the My Organization page.
Users with the Organization Buyer or Organization Approver roles can also view a read-only version of this page.
To access My Organization, follow the instructions below.
- Access the storefront and log in.
- Click
Hello, {name}. - Click My Account.
- Go to My Organization on the sidebar. You will see the page below.
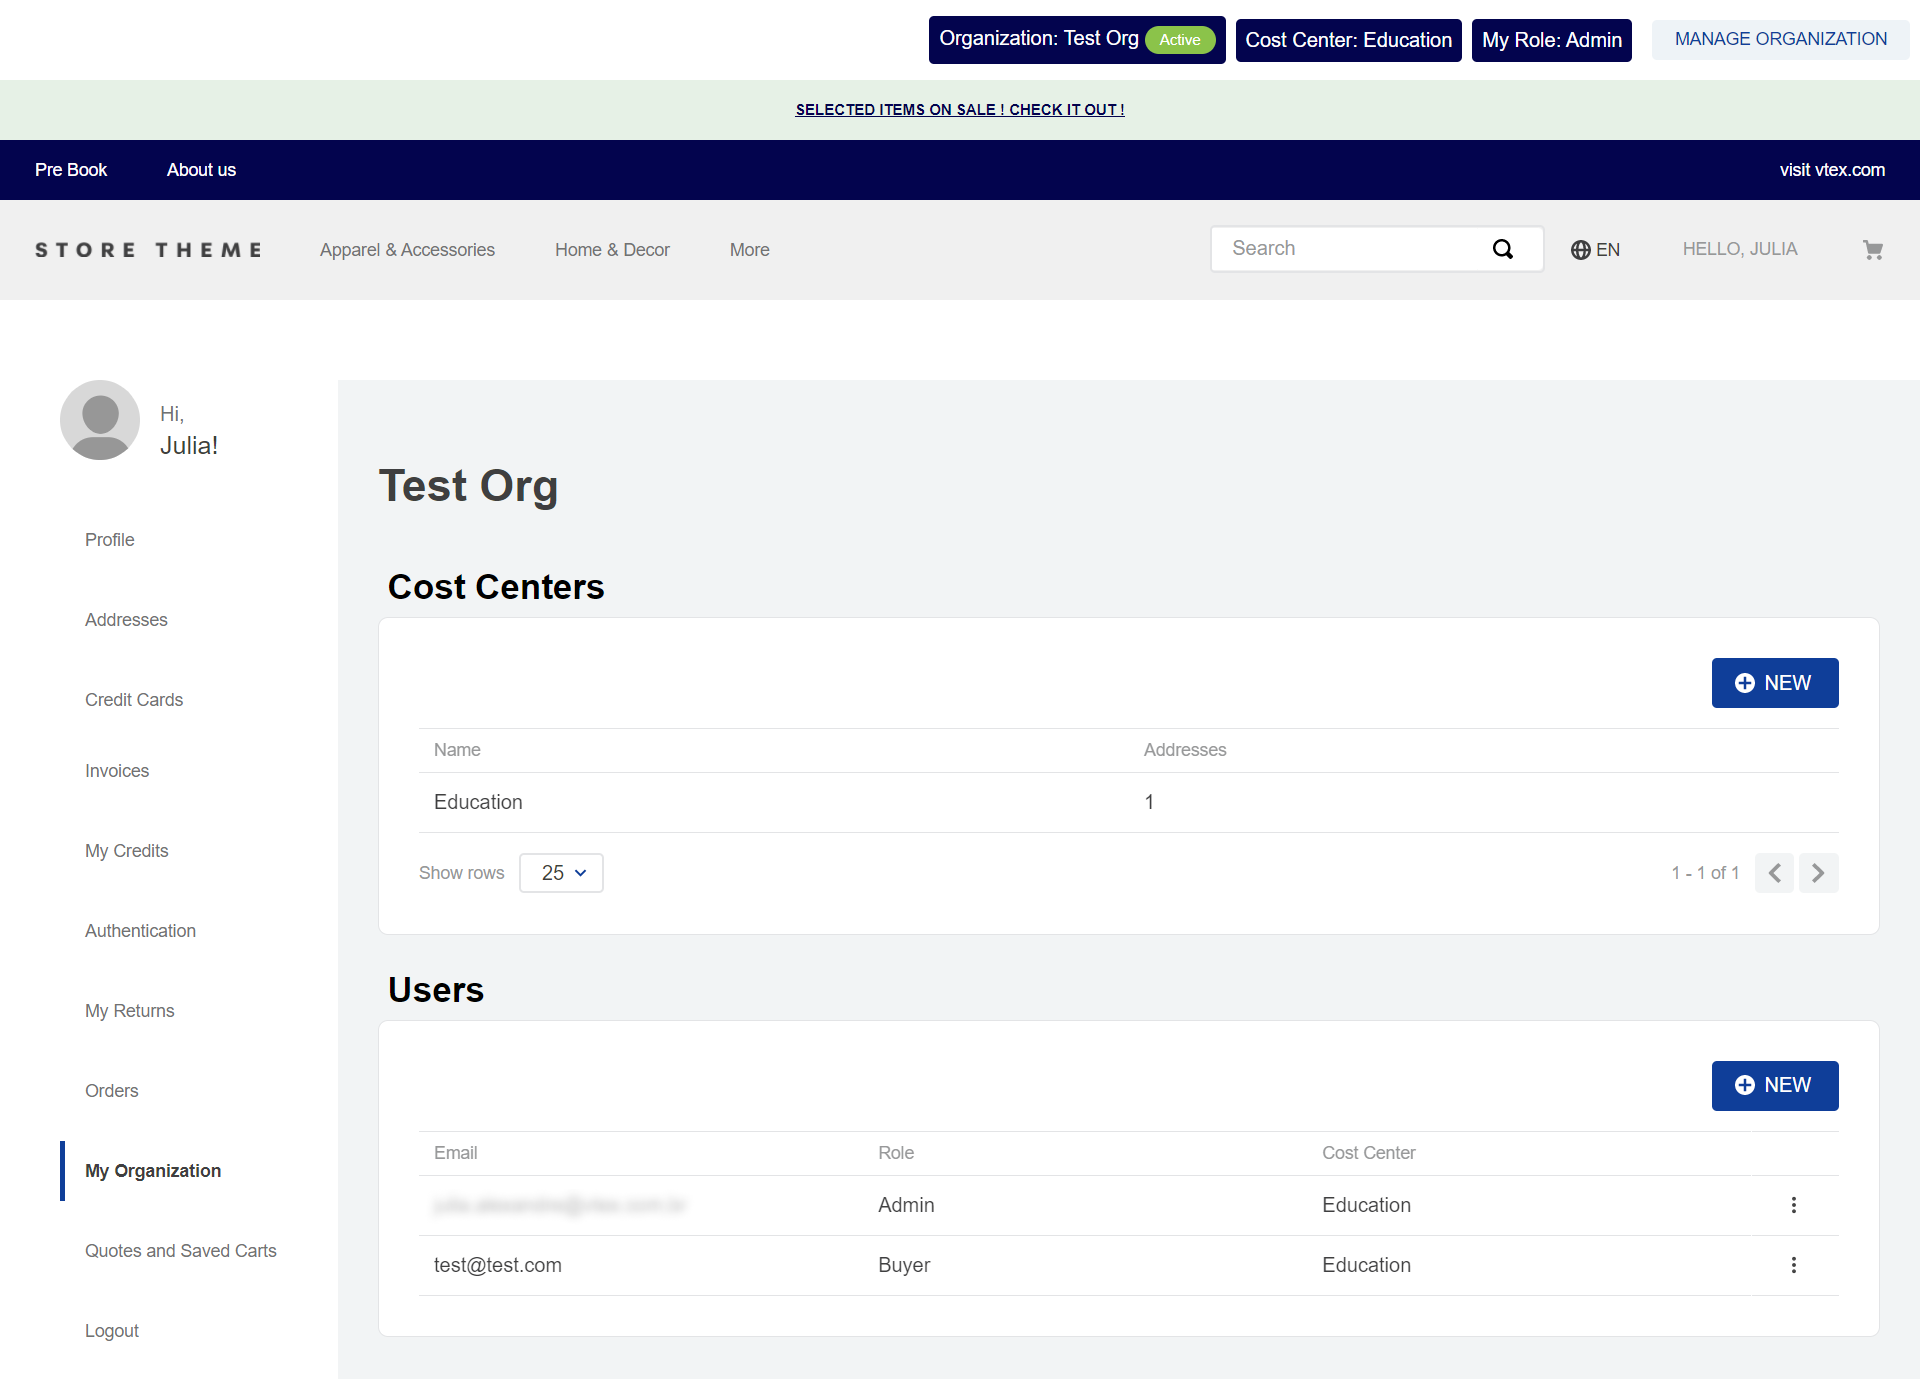
On this page, the user with the Organization Admin or Sales Admin roles can do the following:
Managing cost centers
Storefront users who have the Organization Admin or Sales Admin role can navigate to the Cost Centers section on the My Organization page to view the cost centers associated with their organization.
To add a new cost center, they should go to My Account > My Organization, where they will have access to the same options as described in the Cost Centers section. They can view or edit the details of an existing cost center by clicking on it, similar to the process described in the Cost Center Details section.
Organization Admins can also view and/or edit the Business Document associated with each cost center, as described in Cost Center Details.
In addition, Organization Admins can enable specific payment terms for a cost center by using the switch button to activate or deactivate the payment terms assigned to the organization, as shown below.
This section will only be available on the My Organization page if payment terms have been previously assigned to the organization by the VTEX Admin users.

Managing users
Organization Admin or Sales Admin storefront users can also view and manage the users of their organization in the Users section of the My Organization. To access this section, they can go to My Account > My Organization, where they will have access to the same options described in the Users section of this documentation.
Users with the Organization Admin role can add, edit, or remove users with any of the following roles: Organization Admin, Organization Approver, and Organization Buyer.
Users with the Sales Admin role may add, edit, or remove users with any of the following roles: Sales Admin, Sales Manager, and Sales Representative.
Impersonating users
In telesales, assisted sales, or customer support scenarios where the B2B customer needs help from a salesperson to navigate the store or place orders, it is common to use impersonation.
In the B2B Organizations app, users with a profile with at least one of the permissions impersonate-users-all, impersonate-users-organization, or impersonate-users-costcenter will be able to impersonate another user. These permissions are available in the Storefront Permissions and can be added to the user's profile using the Storefront Permissions UI.
When impersonation is activated, it temporarily applies the email, organization, and cost center of the impersonated user to the storefront session. This allows impersonating users to do the following:
- Browse the store and view prices, products, shipping addresses, and payment methods as the impersonated user would see them.
- Take actions on behalf of the impersonated user, such as placing orders.
- Use the regular permissions of the impersonated user.
To use impersonation, users with Sales roles or the Organization Admin role must follow the steps below.
- In the Users section of My Organization, click
 in the row of the user they want to impersonate.
 - Click Impersonate User.

It is not possible to impersonate emails with Sales roles.
User widget
To give storefront users visibility into their currently assigned organization, cost center, and role, this app provides a user widget that can be added to the account store theme:

To display the user widget, you must follow the instructions in the User widget configuration section.
If users click Manage organization, they can access the My Organization page directly.
In case impersonation is currently active, this block will also show the email of the user being impersonated, as well as the Stop impersonation button:
