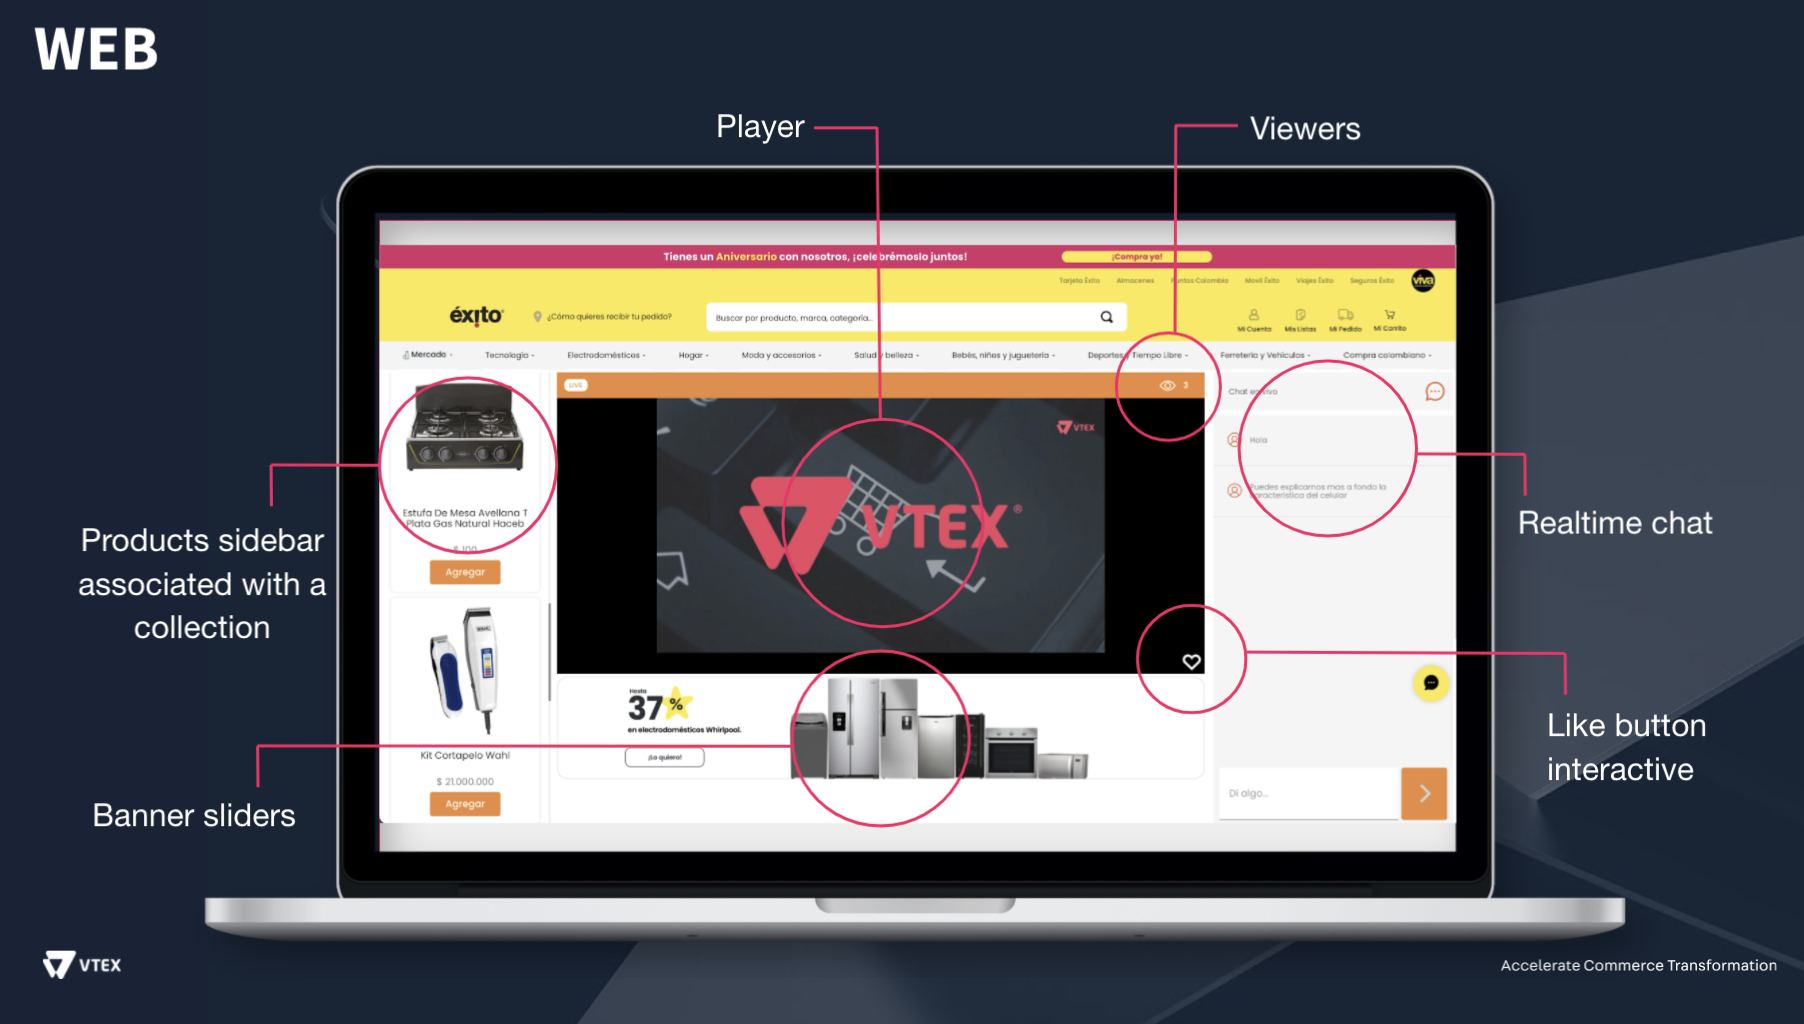
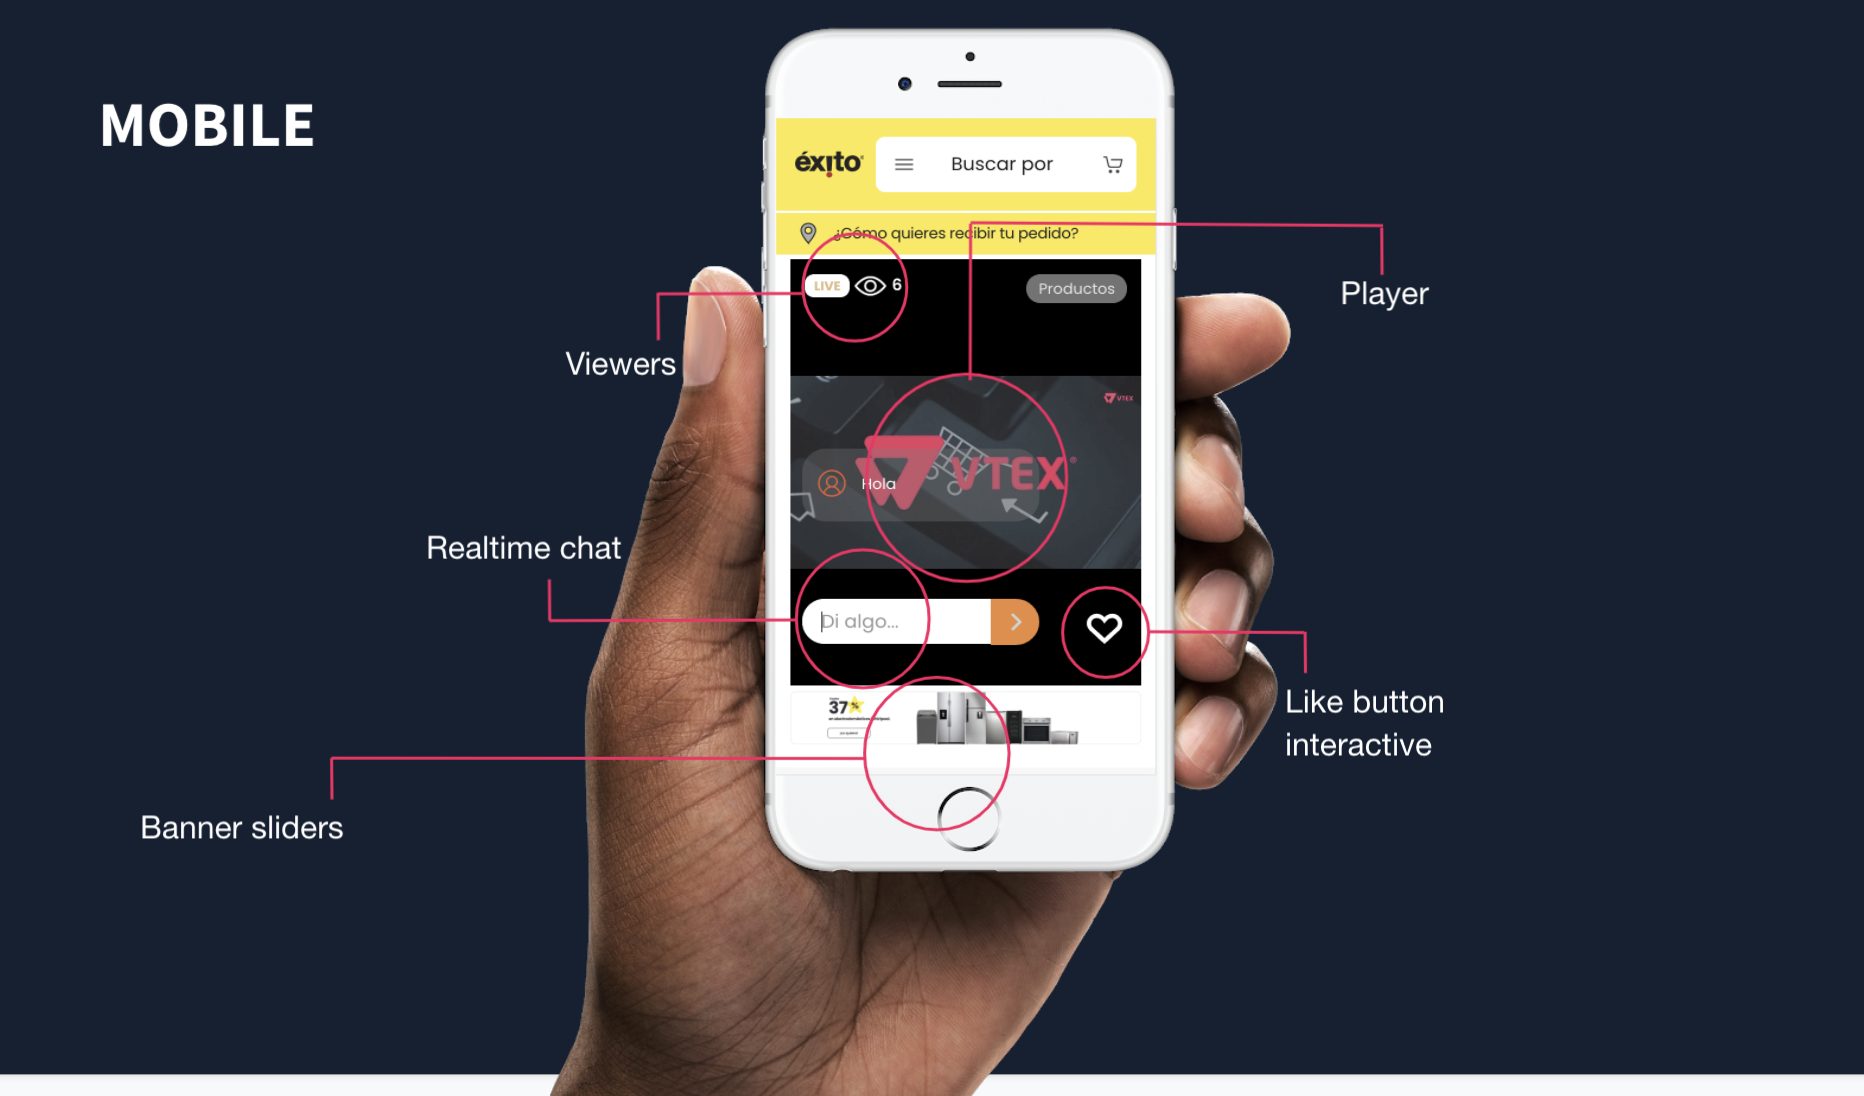
The Live Shopping app allows businesses to engage with their customers in real time by live streaming on their store websites. The app is compatible with both desktop and mobile devices.
Before you start
Live Shopping is a paid app with different subscription plans: Lite, Standard, and Pro. The subscription cost depends on your chosen plan, each providing a specific number of monthly live stream minutes.
For more information about the plans and pricing, refer to the Live Shopping App Store page.
Installation
Prerequisites
- It is necessary to have the CLI VTEX. Go to the next documentation for install it: VTEX IO CLI
Initial Steps for VTEX IO and VTEX CMS/Headless accounts
- Access the Live Shopping app page on the VTEX App Store.
- Click the
Get appbutton to install the app in your VTEX account. - Once the app is successfully installed, open your account's Store Theme app using the code editor of your preference (e.g., Visual Studio Code).
To integrate the Live Shopping into a project using FastStore, check the guide Implementing Live Shopping for FastStore. If your storefront technology is FastStore v1 or v2, refer to the guide Implementing Live Shopping for FastStore previous versions.
For VTEX IO
- In the
manifest.jsonfile, add the app to the theme's peer dependencies list:
_10 "peerDependencies": {_10 "vtexventures.livestreaming": "0.x"_10 }
- Include the livestreaming blick in the desired template. For example:
_10 "store.home": {_10 "blocks": [_10 "livestreaming"_10 ]_10 }
- Deploy your changes to the Store Theme app by publishing a major version. For details, refer to the guide: Making Your New App Version Publicly Available.
Note: Adding a new peer dependency to the Store Theme app requires deploying a new major version of the app. After making the changes, publish this new major version and install it in a productive workspace (not master) to ensure it works as expected before deploying it to the live environment.
- In the productive workspace, follow the guide Migrating CMS Settings After a Major Update to update the content for the new version.
Note: Proceed with caution to avoid deleting store content..
- Validate the workspace and confirm the configured content. Once ready, promote the workspace to master (it will be automatically deleted after promotion).
For VTEX CMS/Headless
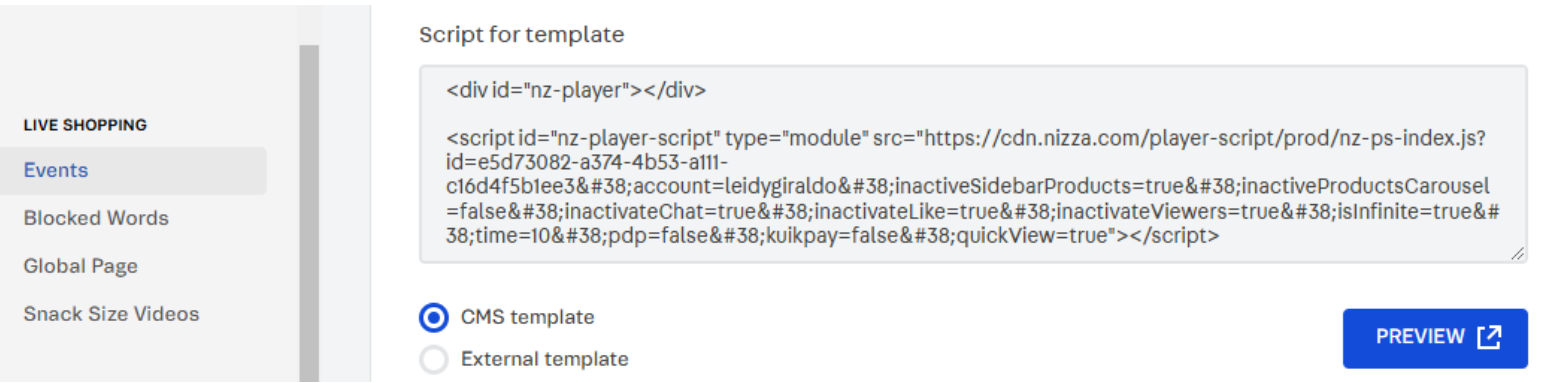
Once the application is installed, go to the VTEX Admin and search for the Live Shopping Events module (Apps > Live Shopping > Events).
After creating an event and accessing its details, scroll to the bottom of the event details page. You’ll find a section called Script for Template, which contains a <div> and a <script>. These must be added to the store.
For CMS/Legacy accounts, ensure that CMS Template is selected.
For Headless accounts, ensure that External Template is selected.
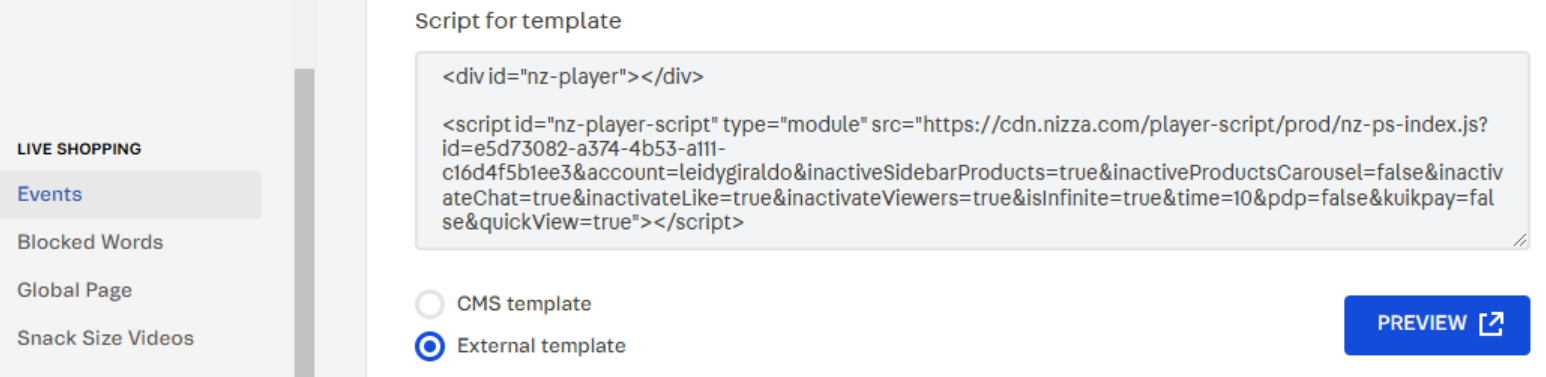
The id query parameter corresponds to the event ID, which can be found at the top of the event details page and changes for each event. The account query parameter represents the account name (e.g., leidygiraldo) and remains constant once set.
It is recommended to copy and paste the full <script> tag for each event.
- Add the
<div>and<script>tags to render the Live Shopping app in the store (cache updates may take 5–10 minutes).
Include them anywhere in the store, such as the home, landing, category, or other pages; for example:
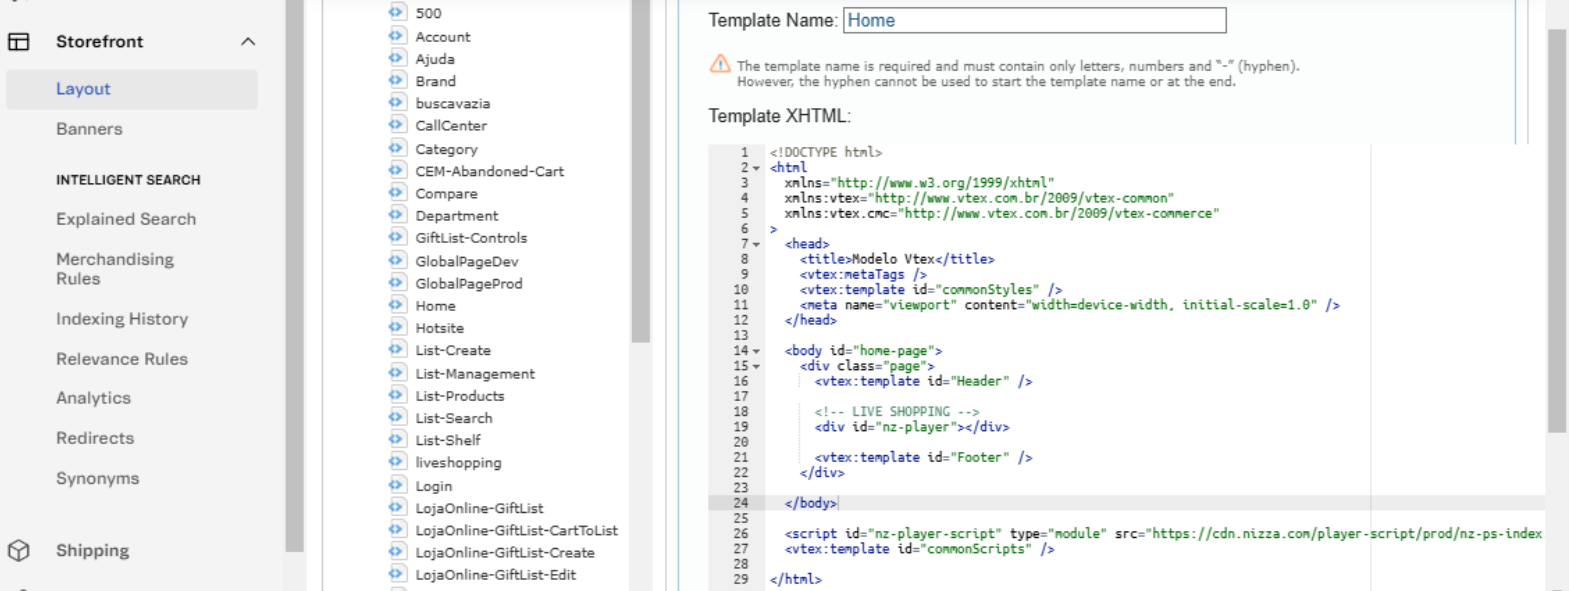
Home page:
_10<div id="nz-player"></div>_10_10<script id="nz-player-script" type="module" src="https://cdn.nizza.com/player-script/prod/nz-ps-index.js?id=e5d73082-a374-4b53-a111-c16d4f5b1ee3&account=leidygiraldo&inactiveSidebarProducts=true&inactiveProductsCarousel=false&inactivateChat=true&inactivateLike=true&inactivateViewers=true&isInfinite=true&time=10&pdp=false&kuikpay=false&quickView=true"></script>
Add the tags for active events and remove them once the event ends to avoid displaying the recording.
Once you have everything set up (whether for VTEX IO, CMS, or Headless), check out the app behavior on VTEX Admin
Learn about the Live Shopping configuration of events and configuring a landing page.
For FastStore
Live Shopping is available as a native solution for FastStore. A step-by-step guide on how to integrate this feature into your project can be found in Implementing Live Shopping for FastStore.
If your storefront technology is FastStore v1 or v2, refer to the guide Implementing Live Shopping for FastStore previous versions.