Migrating from Store Framework to FastStore
Migrate your storefront from Store Framework to FastStore, validate it end-to-end, and gradually move traffic before going live.
In this guide, you'll learn how to migrate your storefront from Store Framework to FastStore. This includes preparing both storefronts to run in parallel, validating the new storefront with real traffic, and completing the cutover.
During this process, you'll use an isolated QA subaccount to create a production-like FastStore domain. This test domain allows you to validate flows that preview URLs can't test, such as login-gated features or the transition from minicart to checkout, while remaining separate from your customer-facing production domain. Note that the final cutover must always occur in the actual production account. For more information, see the Developing in an isolated QA subaccount section.
You'll build in the QA subaccount first, then recreate part of that work in your production account before requesting traffic splitting. More information in Step 9 - Setting up FastStore in your production account.
For guidance on each migration step and layers involved, see Migration overview.
Migration overview
The migration runs both storefronts in parallel. Your Store Framework storefront stays live while you develop, validate, and gradually roll out the FastStore storefront.
In the following table, see the role of each storefront during the migration:
| Stage | Store Framework (current storefront) | FastStore (new storefront) |
|---|---|---|
| Test environment | Not affected. | Set up an isolated QA subaccount for development and testing. For more details, see Step 1 - Creating your QA subaccount. |
| Edition App | Check the Edition App version and upgrade to vtex.edition-store@5.x if it's an older major. | FastStore requires vtex.edition-store@5.x. For more details, see Step 2 - Checking your Edition App versions. |
| Development | Remains live. No changes are made. | Develop the FastStore project and connect the repository to FastStore WebOps. For more details, see Step 3 - Creating your FastStore project. |
| Testing domain | Keeps serving the live domain. | Stand up a production-like test domain on the QA subaccount: Configure the subdomain in your DNS provider, add it to VTEX Account Settings, then to FastStore WebOps. For more details, see Step 4 - Setting up your testing domain. |
| VTEX IO apps | Map installed apps. | Backend apps are fully compatible: Reinstall them in the QA subaccount. Frontend components aren't compatible and must be recreated. For more details, see Step 5 - Handling VTEX IO apps. |
| Content | Site Editor content remains unchanged. | Recreate storefront content by using CMS for FastStore storefronts. For more details, see Step 6 - Recreating the storefront content. |
| Frontend third-party tools | Remain as is. | Reimplement frontend tools (analytics, consent, heatmaps, etc.) and validate them during end-to-end testing. For more details, see Step 7 - Reimplementing frontend third-party tools. |
| End-to-end validation | Keeps serving live traffic. | Before requesting the traffic split, confirm that all reimplemented tools fire correctly on the FastStore frontend, so you have a reliable baseline for comparison once traffic starts flowing to both variants. For more details, see Step 8 - Validating end-to-end flows. |
| Production account setup | Remains live. Backend apps and Intelligent Search are already in place. | Recreate the FastStore-specific setup in your production account. For more details, see Step 9 - Setting up FastStore in your production account. |
| Production domain | Keeps serving the live production domain. | Add the production domain to FastStore WebOps, so FastStore is ready for cutover, but it still doesn't receive live traffic. For more details, see Step 10 - Adding the production domain to WebOps. |
| Traffic splitting | Shares live traffic with FastStore during the transition. | Gradually receives traffic, starting at 0%, until fully validated. For more details, see Step 11 - Requesting the traffic split. |
| Completion | Retired after a successful cutover. | Becomes the live storefront. |
Developing in an isolated QA subaccount
To get a test domain during development, use an isolated QA subaccount (for example, faststoreqa.yourstore.com). Doing so isolates your tests behind a separate Master Data instance, making it safe for destructive testing and order flows that shouldn't impact your production environment. In addition, you can continue using this subaccount as a permanent QA environment after the migration.
When working with a QA subaccount, keep the following considerations in mind:
- CMS content: Content you register in the subaccount CMS is for testing only. It must be recreated a second time in the production account before go-live, since subaccount CMS content isn't copied over automatically. For more information, see step 9.
- Master Data: Fully isolated from production, so it's safe for destructive tests and for placing test orders in a separate context.
- Intelligent Search: Requires reconfiguring merchandising rules, synonyms, and relevance settings, since a subaccount is a separate environment.
- VTEX IO apps: Backend apps and integrations must be reinstalled in the subaccount before you start development.
- Edition App: FastStore requires
vtex.edition-store@5.x. Confirm your QA subaccount is set to this major before you start development, using the same procedure described in Step 2 - Checking your Edition App versions. If it's an older major, open a ticket with VTEX Support to upgrade the subaccount.
Since your development and content creation happen in the subaccount, but the final cutover occurs on your production account, you must plan a step to connect your FastStore project and recreate your CMS content in the production account before requesting the traffic split. For guidance, see step 9. Backend apps and Intelligent Search are already set up in the production account from your live storefront.
Instructions
Step 1 - Creating your QA subaccount
If you already have a QA account, skip this step.
To create the subaccount, follow these steps:
- In the VTEX Admin, go to the Account page by clicking your profile avatar, indicated by the first letter of your email.
- Go to Account Settings > Account.
- Click the Stores tab.
- Click the
+ New Storebutton. - In the Basic information section, complete the fields: Store name, Trade name, Locale, and Sales channel.
- In the Hosts section, complete the field with your store's domain, then click
Add. - Click
Create.
Learn more in Managing a multistore.
Step 2 - Checking your Edition App versions
FastStore requires vtex.edition-store@5.x, so validate which Edition App version is installed in both your production account and QA subaccount. This ensures that both environments meet FastStore's Edition App requirement.
Check the QA subaccount
Check that the Edition App of your QA subaccount is set to vtex.edition-store@5.x in the master workspace.
Using the VTEX IO CLI, log in to your account by running the vtex login {qaAccountName} command, where {qaAccountName} is the subaccount name. Then, run vtex edition get to check the installed Edition App version.
If the result is vtex.edition-store@5.x, continue to step 3.
If the result shows an older major version, open a ticket with VTEX Support requesting the installation of vtex.edition-store@5.x in the QA subaccount's master workspace. Wait for the upgrade to be completed before creating the FastStore project.
Check the production account
Check that the Edition App of your production account, where your Store Framework storefront lives, is set to vtex.edition-store@5.x in the master workspace:
Using the VTEX IO CLI, log in to your account by running the vtex login {accountName} command. Replace {accountName} with the account name. Then, run vtex edition get to check the installed Edition App version.
If the result is vtex.edition-store@5.x, no upgrade is required. If it shows an older major version, plan the upgrade as part of Step 9 - Setting up FastStore in your production account. Don't connect the FastStore project to the production account until the upgrade is complete.
Changing the Edition App is an account-wide operation that applies to the master workspace and may update the major versions of some base apps. Since your Store Framework storefront is live, align the timing and post-change validation with VTEX Support when you request the upgrade. For more details on version differences and their impact on dependencies, see Edition App.
Step 3 - Creating your FastStore project
Create the FastStore project that will receive your storefront development. To start one, follow the guides in the FastStore Getting started track.
Once you complete the track, you'll have a GitHub repository connected to your QA subaccount that you can deploy through FastStore WebOps.
Step 4 - Setting up your testing domain
Set up a production-like domain on your QA subaccount so you can validate flows that require FastStore to run on a production domain. Follow the instructions in Configuring external DNS to:
- Configure the subdomain in your DNS provider.
- Add the domain to your QA subaccount in VTEX Account Settings.
- Configure the domain and related URLs in your FastStore project.
- Add the domain to FastStore WebOps.
- Open a ticket with VTEX Support to request the migration of the production-like domain to FastStore WebOps as instructed in the external DNS guide.
When contacting VTEX Support, specify that the requests apply to the QA subaccount and that you're going to perform end-to-end tests to migrate your Store Framework storefront to FastStore.
Unlike the QA production-like domain configured in this step, your existing production domain doesn't require new external DNS records because they were already configured when your Store Framework storefront went live. Before requesting the traffic split, you only need to add the existing production domain to FastStore WebOps, as described in step 10.
Step 5 - Handling VTEX IO apps
Start by inventorying the VTEX IO apps installed in your Store Framework account, so you know which ones to reinstall or recreate in your QA subaccount.
Backend VTEX IO apps and integrations can generally be reused with FastStore. Reinstall the required apps in the QA subaccount and validate their account-specific settings and integrations before you start development.
Frontend VTEX IO components, on the other hand, aren't compatible with FastStore at all and must be recreated. Start by checking the FastStore UI catalog to see if a native component already covers your needs. If it doesn't, see Developing and customizing FastStore components to learn how to override native components or build entirely new sections to recreate your custom frontend elements.
Step 6 - Recreating the storefront content
Recreate all necessary pages, components, and content in the CMS for FastStore storefronts.
Content migration between Store Framework Site Editor and FastStore CMS isn't supported, so plan enough time to recreate and review the content manually.
Because you develop in a QA subaccount, plan for an additional step to recreate this content in the main account before cutover, since subaccount CMS content isn't carried over automatically.
Step 7 - Reimplementing frontend third-party tools
Because the FastStore frontend code is independent of the Store Framework, any third-party tools that run on the frontend must be reimplemented in your FastStore project to ensure they continue to work after the migration. This typically includes analytics, consent management, and behavior-tracking tools (for example, Google Tag Manager, Hotjar, and similar platforms).
Keep these tools maintained throughout your FastStore development, and validate them as part of the end-to-end flows described in step 8. Before requesting the traffic split, confirm that all reimplemented tools fire correctly on the FastStore frontend, so you have a reliable baseline for comparison once traffic starts flowing to both variants.
Step 8 - Validating end-to-end flows
Validate the full customer journey on FastStore: Catalog browsing, adding products to the cart, cart and checkout, login, and My Account. Most of this can be reviewed from preview URLs, but a handful of flows, such as login-gated features or the minicart-to-checkout transition, require FastStore to run on a production-like domain.
Use the production-like domain you set up on your QA subaccount in Step 4 - Setting up your testing domain to run these tests.
Keep the following in mind when performing end-to-end tests:
- Checkout and order placement: If your checkout remains unchanged, focus this validation on the storefront-to-checkout transition and related authenticated flows. Placing real orders is usually unnecessary unless you specifically need to validate order creation behavior in the chosen environment.
- Customized flows: Because both storefronts share the same production domain during the traffic split, login redirects and links into the checkout panel generally continue to work without extra configuration, even if you have login or checkout UI customizations. Still, verify these flows in your test environment before requesting the split, since Store Framework allows extensive customization that can behave differently on a case-by-case basis.
- Checkout, Order Placed, and My Account navigation: Checkout, Order Placed, and My Account use the existing VTEX IO theme and are shared by customers routed to either Store Framework or FastStore during the traffic split. Verify that their header, footer, and other navigation links point to URLs available in both storefronts. Prefer using the same URLs in both versions. When equivalent pages use different URLs, configure the redirect in the storefront where the original URL isn't available. See Managing URL redirects for Store Framework and Managing URLs with redirects and rewrite paths for FastStore.
- Third-party tools: Confirm that all frontend third-party tools you reimplemented in the previous step are firing correctly on the FastStore domain.
- Master Data: Your QA subaccount has its own Master Data, so the data used in tests is isolated from your live store.
Step 9 - Setting up FastStore in your production account
Your production account is your live Store Framework store, so its backend VTEX IO apps, integrations, and Intelligent Search configuration are already in place and shared with FastStore. You don't need to reinstall or reconfigure them. What's missing on production is the FastStore-specific setup that lived only in your QA subaccount: the connected project (code) and the FastStore CMS content.
The code isn't recreated. During FastStore onboarding, you can connect to the same project you developed for end-to-end tests. However, FastStore CMS content must be recreated, as it can't be migrated automatically.
While your Store Framework storefront keeps serving live traffic, complete the following in your production account:
- Upgrade the Edition App: Confirm your production account is set to
vtex.edition-store@5.x, as described in Step 2 - Checking your Edition App versions. Since this is an account-wide operation on a live storefront, align the timing and post-change validation with VTEX Support. - Connect the FastStore project: Connect the same GitHub repository you developed in Step 3 - Creating your FastStore project to your production account through FastStore WebOps, so it can be deployed on production.
- Recreate CMS content: Recreate all pages, components, and content in the CMS for FastStore storefronts on your production account, as described in Step 6 - Recreating the storefront content. Subaccount CMS content isn't carried over automatically.
- Verify frontend third-party tools: Since the frontend third-party tools you reimplemented in Step 7 - Reimplementing frontend third-party tools are part of your FastStore code, they come with the connected repository. Confirm they're firing correctly on the production project.
Your production account's backend apps, integrations, and Intelligent Search are already in place from your live storefront, and you don't need to recreate these settings.
Step 10 - Adding the production domain to WebOps
DNS configuration on VTEX points to the platform in general and isn't exclusive to Store Framework or FastStore. Since your production domain already works on Store Framework, you don't need to configure a new domain or subdomain for the traffic split. You only need to register your existing production domain in FastStore WebOps, as described below, and share this context with VTEX Support when you request the traffic split in step 11, so they can confirm everything is set up as expected.
Before requesting the traffic split, add your production domain to FastStore WebOps by following these steps:
-
In your VTEX Admin, go to Storefront > FastStore WebOps.
-
Navigate to the Settings tab.
-
In the Production domain card, select your production domain from the dropdown list under the Host section.
-
Click
Add.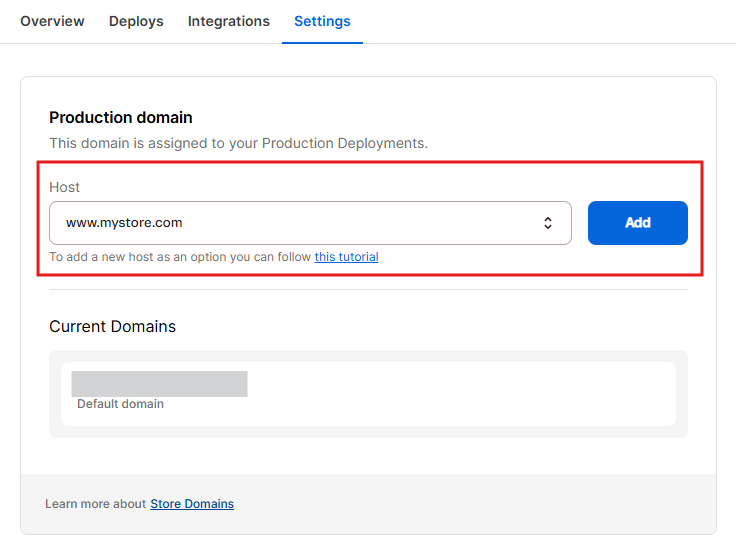
Adding the domain doesn't change your live storefront, which keeps pointing to Store Framework until you request a traffic split.
Step 11 - Requesting the traffic split
Once you've completed the previous steps, open a ticket with VTEX Support at least five days before your planned migration date to request traffic splitting between Store Framework and FastStore. If you need client-side access to the VtexStoreVersion cookie for analytics, include that request in the same ticket. For more information, see Managing storefront versions during the split.
When the split is enabled, we recommend starting with 0% of traffic routed to FastStore and 100% kept on Store Framework for final validations on the production domain. After confirming that routing, analytics, and critical flows are working as expected, gradually increase the FastStore share. This gradual rollout allows you to slowly redirect users from the old store to the new one, run A/B tests with your analytics or testing tools, monitor performance, and ensure stability before going fully live on FastStore.
Once you've validated the FastStore storefront, make it your live store and retire the Store Framework storefront.
Managing storefront versions during the split
During the traffic split, each customer is assigned either the Store Framework or the FastStore version. You can force a version for QA and debugging, and the platform stores the assigned version so the same customer stays on the same variant, allowing you to compare analytics across both storefronts.
To force a version, add the ab_test query parameter to the URL:
- Store Framework:
https://www.store.com/?ab_test=v1 - FastStore:
https://www.store.com/?ab_test=v2
VTEX stores the assigned version in the VtexStoreVersion cookie. Use that cookie in tools such as Google Tag Manager (GTM) or Google Analytics (GA) to segment metrics by storefront variant.
By default, the cookie is set as HttpOnly, which prevents client-side tools like GTM from reading it. If you need browser access for analytics, request this adjustment when you open the traffic split ticket.