Layout development guide for payment methods in VTEX Smart Checkout
Learn how to build, test, and submit the checkout interface of a new payment method using Payment Mocker.
This guide is intended for developers who integrate new payment methods into VTEX Smart Checkout. Besides integrating with the PCI Gateway, integrators must provide a user interface (UI) that aligns with the visual identity of the payment method being presented.
All layout updates made through this guide only apply to Checkout v6.
When shoppers select a payment method at checkout, they indicate their intent to use it. For this reason, the layout must clearly and briefly explain how the payment method works and its advantages. Contact details, such as a phone number or email address, can also help shoppers solve problems or answer questions during the purchase.
The following sections describe the requirements for a payment method layout, how to develop it with Payment Mocker, and how to submit it to VTEX.
You can't create a new layout for custom payment methods. These methods are developed by the merchant and work only in their own stores, such as notes payable, co-branded cards, and private label cards.
Before you begin
Before developing your layout, make sure you meet the following requirements:
| Requirement | Description |
|---|---|
| Payment provider integration | Your payment provider must be integrated with VTEX, as described in Integrating a new payment provider on VTEX. |
| Checkout version | The store must use Checkout v6, as layout updates don't apply to other versions. |
| Development environment | Node.js and npm installed on your machine, plus a Git client to clone the Payment Mocker repository. |
| Front-end knowledge | Familiarity with HTML, CSS, and LESS, since Payment Mocker compiles the layout styles from a LESS file. |
Layout requirements
User interface: Structure and code
Bootstrap framework
The Smart Checkout code is based on Bootstrap v2.3.2 standards. You can use grid and alignment classes to structure the HTML and CSS code.
Bootstrap v2.3.2 classes differ significantly from those of later Bootstrap versions. See the Bootstrap v2.3.2 documentation when structuring your layout.
CSS and LESS
The styling code can be written to be interpreted by LESS, the CSS preprocessor used by Payment Mocker. When writing that code, the following rules are required:
- Don't use global selectors that can interfere with the structure or other elements of the page.
- Don't use IDs as selectors, except for the Smart Checkout selectors already declared in Payment Mocker, as explained in Development.
- Use no more than two levels of nested selectors.
- Name all classes in English, in lowercase, with words separated by hyphens, such as
.my-payment-method.
We also recommend using only classes as selectors.
Responsiveness
Your layout must render correctly on the following screen sizes:
- Desktop and horizontal tablet: Width greater than or equal to 768 pixels. The container is 462 pixels wide, and its height can vary between 200 and 330 pixels, depending on the content.
- Vertical tablet and mobile: Width less than 768 pixels. The container takes up 100% of the width, with a margin of 30 pixels and padding of 15 pixels.
You can freely use additional breakpoints.
User interface: Design and elements
Color and images
Colors and images can follow the visual identity of the payment method, without restrictions. Images must be optimized and grouped into a single file, using the CSS sprites technique.
Typography
Following the Bootstrap pattern, Smart Checkout adopts the following fonts, in this order:
- Helvetica Neue
- Helvetica
- Arial
- Sans Serif
We don't recommend using other fonts. If you need another font, use one that's installed by default on operating systems, because you can't import fonts.
Scripts and links
Scripts and links aren't essential for completing the purchase, because they can distract shoppers or take them out of the checkout.
Using scripts and links isn't permitted.
All content available in the checkout area must be informative only. The checkout button must be the only call to action presented on the screen.
Internationalization
All texts must be written in:
- en-US: US English, which is mandatory.
- Other languages: The languages of the countries or regions where you intend to operate, if English isn't their main language. See the ISO 639-1 standard language codes.
Also adapt any image that contains text to each language.
Development
Use Payment Mocker to test how your layout renders within VTEX Smart Checkout and ensure the expected behavior.
Follow these steps to create your layout:
-
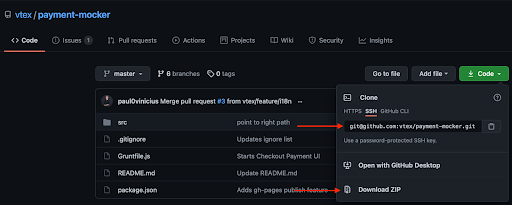
Download the Payment Mocker repository to your local machine, either by cloning it with Git or by downloading it as a ZIP file.
-
Install Node.js.
-
In the terminal, run the following commands to install Grunt and Sass:
-
Grunt:
npm i -g grunt-cli -
Sass:
npm i -g sass
On macOS and Linux, global installations may require
sudoor a Node version manager such as nvm. On Windows, run the commands in PowerShell or Command Prompt withoutsudo. -
-
Still in the terminal, go to the project folder and run
npm ito install the project dependencies. -
Run
gruntin the project folder. -
In your browser, go to
http://localhost:8080. -
Modify the following files according to the requirements described in User interface: Structure and code:
-
src/partials/payment.html: Insert the HTML structure of your layout in this file. When adding information about a new payment method, replace the
newpaymenttext in the file with the name of the payment method you created. For example, when creating the SafetyPay payment method, replacenewpaymentwithsafetypay.Use lowercase letters and separate words with hyphens when replacing
newpayment, as required by the class naming rule in CSS and LESS. For example, usepayment-safetypay-title, notpayment-SafetyPay-title. -
src/assets/css/less/style.less: Insert the classes responsible for styles, spacing, fonts, and other CSS customizations of your layout in this file. Remember to follow the guidelines described in Layout requirements.
-
src/assets/img: Insert all images used in your layout in this folder and reference them from your styles.
-
src/i18n: This folder contains four files, each one corresponding to one language:
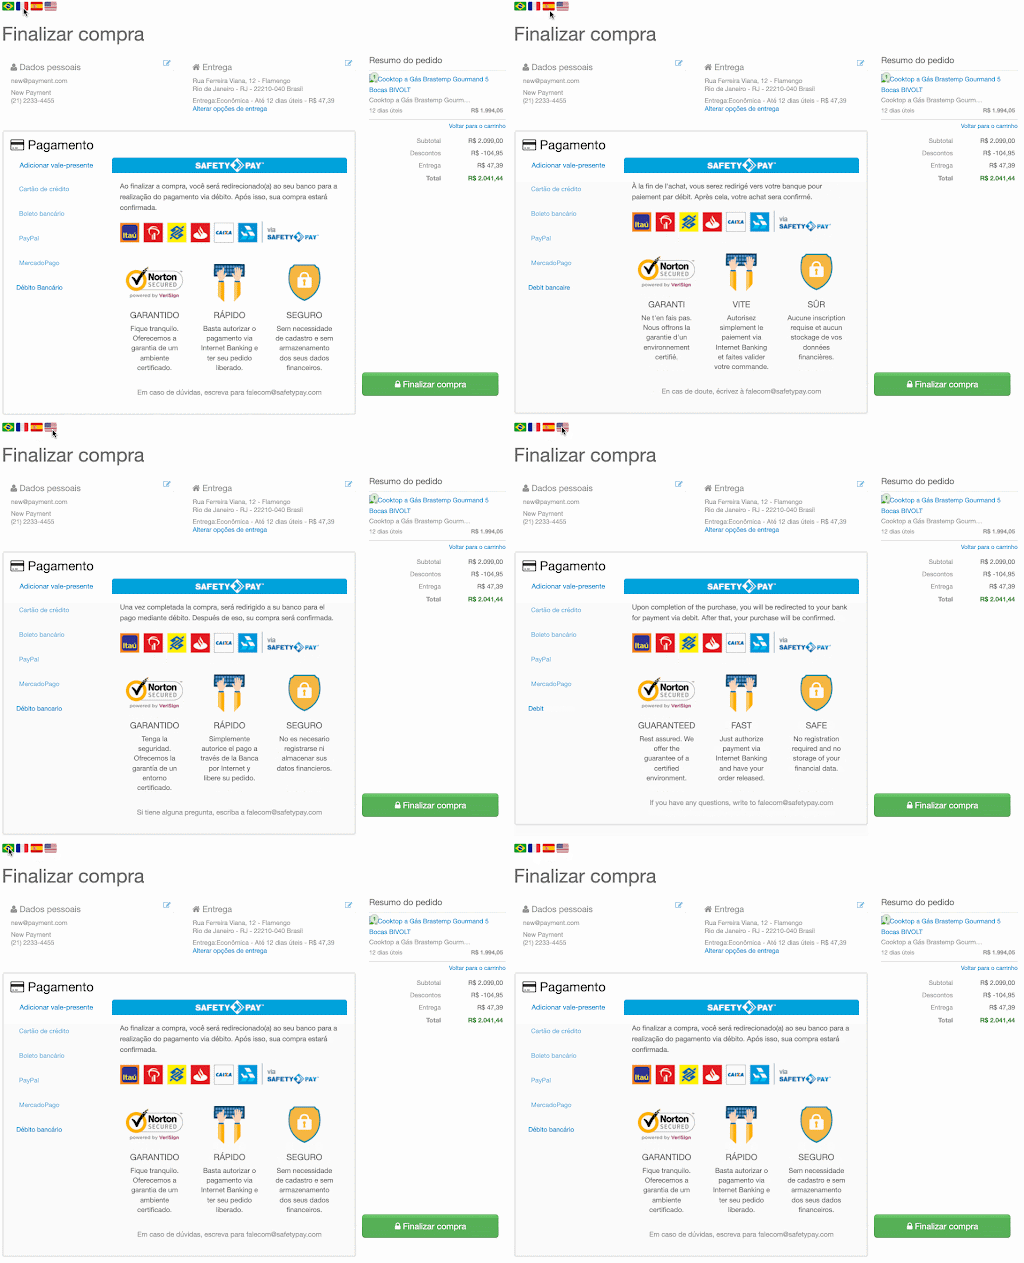
pt-BR,en-US,es, andfr. Change the values of the keys in these files and check whether the languages render correctly by clicking the flags at the top left of Payment Mocker, as shown in Layout example.
-
-
Open the src/assets/css/less/style.less file, find the
#payment-group-template-PaymentGroup .payment-group-item-textrule, and update itsbackground-imageattribute to insert the icon of your payment method.This rule overrides a selector that Smart Checkout already declares, so it's the only case where you edit an ID selector. This isn't an exception to the rule that forbids creating new ID selectors, described in CSS and LESS.
If you don't change the
background-imageattribute, the payment method is displayed without an icon. -
Open the src/i18n/{language}.json file and change the value of the
paymentData.paymentGroup.titlekey to customize the label of your payment method at checkout.If you don't change the value of the
paymentData.paymentGroup.titlekey, the payment method renders with the default label.If the name chosen for your new payment method is the same as or similar to an existing payment method on the VTEX platform, you can't register it. To check the payment methods already registered, in the VTEX Admin, go to Store Settings > Payments > Settings > Payment Conditions.
Delivery
To deliver your code, compress the Payment Mocker repository containing all modifications related to your payment method into a ZIP or RAR file, and submit it in a ticket to VTEX Support.
Before compressing the repository, delete any files or folders created during the build process, such as the node_modules folder or the yarn.lock file, if you use the Yarn package manager.
After submission, VTEX reviews the layout against the requirements described in this guide and returns any feedback through the same support ticket. Once the layout is approved, VTEX publishes it for Checkout v6. Follow the ticket for status updates and requests for adjustments.
Layout example
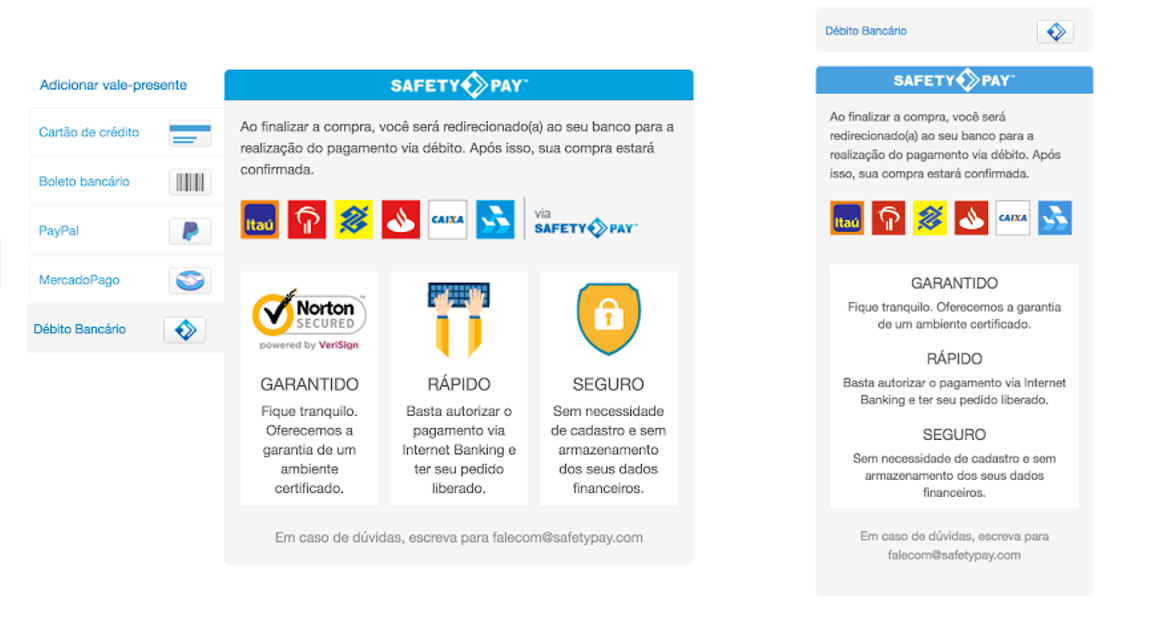
The following images show an example of a layout and language switching for payment methods in VTEX Smart Checkout.
Manual language switching is only available in Payment Mocker, for testing purposes. After the layout is deployed, Smart Checkout switches the language automatically.