Integrating your storefront with Headless CMS (legacy)
Configure webhooks and WebOps settings to connect your FastStore project with Headless CMS (legacy).
In this guide, you'll connect your FastStore project to Headless CMS (legacy) so editors can create, preview, and publish content. You'll also configure the webhooks that keep builds and previews in sync—without this integration, CMS changes won't reach your storefront.
New FastStore projects use the CMS by default. This guide applies only to stores still on Headless CMS (legacy).
What you'll accomplish
By the end of this guide, you will have:
- Configured Headless CMS (legacy) webhooks to trigger builds when content is published
- Set up preview URLs for content editors to see changes before going live
- Configured WebOps to communicate CMS updates back to your Git repository
- Established a complete content workflow where CMS changes automatically sync with your codebase
This integration enables your content team to manage store content independently while keeping everything in sync with your development workflow.
Step 1: Configuring Headless CMS (legacy)
Configure the URLs of the webhooks used by the Headless CMS app.
-
In the VTEX Admin, access Storefront > Headless CMS.
-
In the FastStore project interface, click on
Settings(⚙️). -
In Settings, click the
Buildtab. -
In Build Webhook URL, click
Add. -
Enter the following value. Replace the values between curly brackets according to your scenario._10https://app.io.vtex.com/vtex.cms-builder-sf-jamstack/v1/{account}/master/build-releases
-
Click SAVE.
When an editor clicks to publish a page using the Headless CMS interface, the CMS calls the Build Webhook URL, which changes the page's status topublished. The CMS then waits for the content to be built in the background.
- Fill in the Preview URL field with your production URL. This URL activates the button on the Headless CMS, allowing you to preview the changes made to a page. Replace the values between curly brackets according to your scenario.
Step 2: Communicating WebOps updates to Headless CMS (legacy)
If you are developing your FastStore project with CI/CD and Headless CMS (legacy), you must ensure that CI/CD is aware of every CMS update performed via the VTEX Admin. To do so, you must configure the WebOps webhooks responsible for communicating with the Headless CMS as follows.
-
Open your FastStore project in any code editor of your preference.
-
Edit the
discovery.config.jsfile in the root directory of your project. -
In the Headless CMS configuration, add the
webhookUrlsproperty corresponding to your store website as follows: -
Open a Pull Request in your project, including the previous changes.
-
Merge the Pull Request.
Now you can make changes to the Headless CMS and check if commits are being created in the project. In the following example, the
Hero title was modified to 10% off on first purchase, and we can see that it generated a commit in the repository.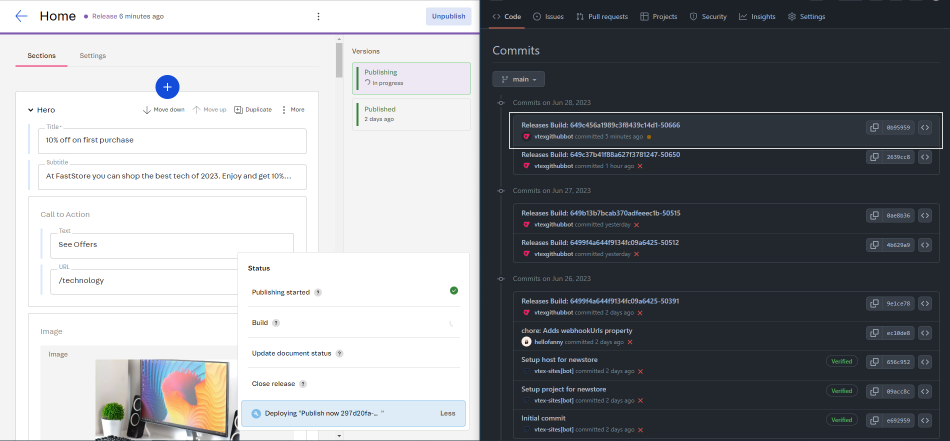
Next step
Now that Headless CMS (legacy) is integrated, set up content types and sections for your editors: Setting up the Headless CMS (legacy)