Overriding a native component
7 min read
This guide applies to stores using the CMS with FastStore versions3or4. For stores using Headless CMS (legacy), see Overriding a native component.
FastStore includes native component sections such as
ProductShelf, ProductDetails, and Breadcrumb. When a native component already meets most of your store's needs, you can override it to keep its existing data fetching and behavior while changing only the parts you need.In this guide, you'll override the native
ProductShelf component to display a Pix discount message on its product cards. You'll also make this message configurable in the CMS while keeping the native carousel unchanged.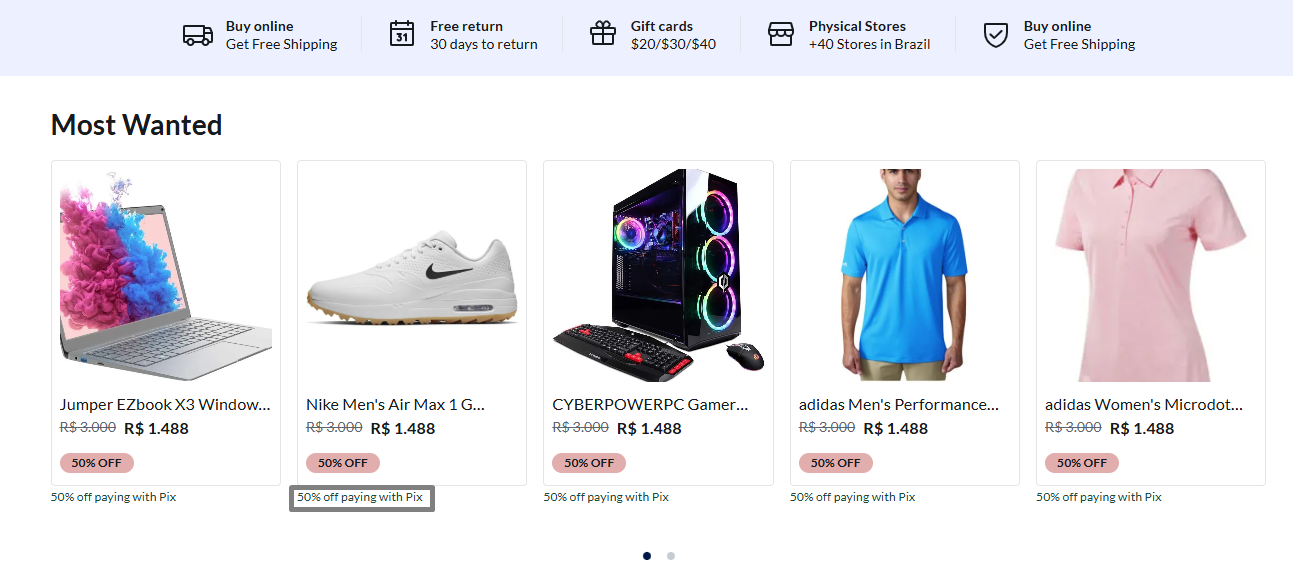
If you need to create a section that doesn't have a native FastStore counterpart, see Creating a new section in the CMS.
Before you begin
Overriding a native component touches both your store code and the CMS, so you need a working CMS setup, the Content plugin installed locally, and a clear idea of which part of the section you want to change. Make sure the following is in place before you start:
- The CMS must be installed and enabled in your VTEX account.
- The Content plugin must be installed on your machine (
vtex plugins install @vtex/cli-plugin-content) and up to date (vtex plugins update). - You know your CMS store ID. It's the
contentSource.projectvalue in your project'sdiscovery.config.js. - Identify which native section and which overridable component you want to change. See the List of native sections and overridable components.
Instructions
Step 1 - Create the overridden section
- Open your store project in a code editor.
- In
src/components/sections, create aProductShelffolder with anindex.tsxfile. - Import the native section and
getOverriddenSectionfrom@faststore/core. Since we're keeping the native carousel, we only override the product card overridable component (__experimentalProductCard), wrapping the native card rather than replacing it:
Step 2 - Declare the CMS schema
Run
vtex content init if you haven't already. It prompts for a store ID (the default shown is faststore; type your actual CMS store ID instead, matching contentSource.project in discovery.config.js) and scaffolds:
_10cms/{storeId}/_10├── components/_10│ └── cms_component__bannerExample.jsonc.example_10└── pages/_10 └── cms_content_type__landingPage.jsonc.example
These
.jsonc.example files are placeholder templates, not live schemas. generate-schema ignores them. Create your own .jsonc file without the .example suffix instead.In
cms/{storeId}/components, create cms_component__productshelf.jsonc. Declare every native field of ProductShelf, then append your custom field:Step 3 - Register the override
In
src/components/index.tsx, directly under src/, map the native section name to your component:src/components/index.tsxmust use a default export only. Named exports are not picked up.
The object key connects your code to the CMS definition and must match the
$componentKey exactly. When your component name differs from the native section name, map it explicitly:
_10import CustomProductDetails from './sections/CustomProductDetails'_10_10export default {_10 ProductDetails: CustomProductDetails,_10}
Step 4 - Sync the schema with the CMS
-
Confirm the component compiles by running
yarn dev. -
Make sure you're logged in to the correct account (
vtex whoamiconfirms). -
From the root of your FastStore project, run:_10yarn cms-sync
-
Confirm the override:_10You are about to override default definitions for the following components:_10ProductShelf_10Are you sure? (y/N)This command publishes immediately to your live store. Confirm that the store ID matches
api.storeIdorcontentSource.projectindiscovery.config.jsbefore confirming. Uploading to the wrong store overwrites that store's schema. -
Confirm your definition is present in the generated
schema.jsonundercms/{storeId}, incomponents.ProductShelf.properties.productCardConfiguration.properties, including both the native fields andshowPixDiscount.Never editschema.jsonby hand. It is generated output. If a field is missing, fix the.jsoncfile and runyarn cms-syncagain.
Step 5 - Verify in the CMS
-
In the Admin, go to Storefront > Content > All content and select the entry that uses the section, such as Home.
-
Open the Product Shelf section and confirm that both the native fields and your new Show Pix discount? field appear under Product Card Configuration.
-
Enable it and click Save. Publish or promote the change if your CMS uses separate draft and live branches.

-
With the development server still running, reload the page. CMS content changes take effect on the next request in local development. You only need to restart the server after code changes.
Uploading a schema registers the definition so it appears in the editor. It doesn't place the section on a page or guarantee that the section has products to show.