Admin (SAML 2.0)
User management is a native feature of the VTEX platform. Store administrators can not only manage the users that can log in to the admin panel, but also specify which pages they can see and the operations they are allowed to perform using roles. This granular control allows stores to adopt best practices in terms of security and compliance.
However, there is often the need to enable or enforce the use of credentials from a central authentication system used by the organization. This guide provides the basic information you need to integrate such an authentication system to the Admin panel for a Single Sign-On (SSO) experience.
If you need to use an external identity provider to login to your Admin panel, it must adhere to the SAML 2.0 protocol. We do not currently support other authentication protocols for this scope.
SAML
Security Assertion Markup Language (SAML) is a standard for exchanging authentication and authorization data between domains.
SAML 2.0 is an XML-based protocol that enables web-based cross-domain Web Browser Single Sign-On (SSO). It uses secure, digitally signed tokens and encrypted messages to pass data between trusted parties.
It is an open standard, a product of the OASIS Security Services Technical Committee, and is supported by major vendors in the industry. Learn more about SAML.
Authentication flow
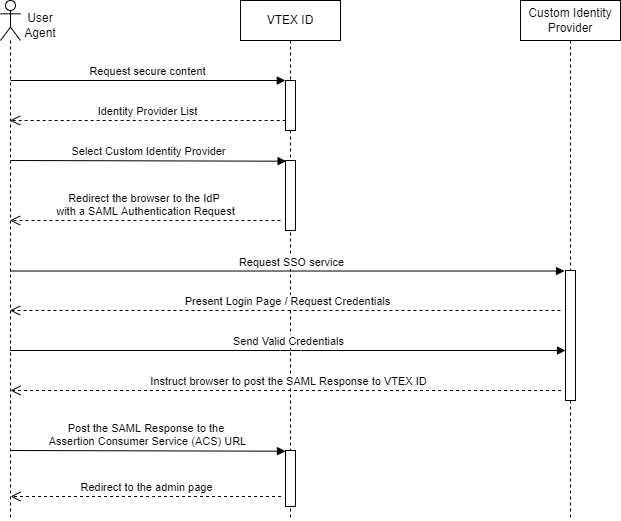
SAML roles
In the context of SAML, you should be aware of the different roles performed by the entities that exchange information during authentication.
Identity Provider (IdP)
An Identity Provider (IdP) is a system that creates, maintains, and manages identity information for principals (users, services, or systems) and provides principal authentication to other Service Providers (applications) within a federation or distributed network.
An IdP is a trusted third party that can be relied upon when users and servers are establishing a dialog that must be authenticated. The IdP sends an attribute assertion containing trusted information about the user to the Service Provider. A user password is never sent to an SP.
Service Provider (SP)
A Service Provider is an application server that communicates with an IdP to determine if a user has authenticated and obtain information about the user. The information obtained from the IdP may be used to make authorization decisions.
In the context of this guide, the external authentication system is the Identity Provider and the module for identifying users on the VTEX platform, VTEX ID, is the Service Provider.
SAML Assertions
SAML 2.0 uses assertions (packages) to pass information between the SP and the IdP. These packages contain information about a user (subject) and are written using the XML markup language. Although the standard specification defines three types of subject-related assertion statements, VTEX only supports the Authentication Assertion type. We recommend the reading of this document to get a better understanding of the SAML protocol.
An Authentication Assertion states that a user was authenticated by an external service at a particular time and is often used to enable web browser SSO.
Integration
You can implement a custom SAML login option for your Admin panel by providing some information about the communication between VTEX and your identity provider. To do that:
- Make sure that you have correctly set up your identity provider.
- Guarantee that you possess all the required information.
- Follow the step by step setup.
Identity provider configuration
If required by the identity provider, you must use the appropriate service provider metadata.xml file to configure the identity provider. It is available for download in the following URL:
_10https://vtexid.vtex.com.br/api/vtexid/pub/saml/{accountName}/sp/metadata
If you do not use the file indicated above, configure your identity provider manually with the Assertion Consumer Service (ACS), NameID and EntityDescriptor present in the SP metadata.xml.
URL:
- ACS:
_10https://vtexid.vtex.com.br/api/vtexid/pub/saml/{accountName}/idps/{accountName}-saml/sso
- NameID:
_10urn:oasis:names:tc:SAML:1.1:nameid-format:emailAddress
- EntityDescriptor:
_10https://identity-broker.vtex.com/{accountName}/idps/{accountName}-saml
The
entityIDof the EntityDescriptor is not a URL and must not be configured as one. It is an ID.\n- The{accountName}is your business identification on the VTEX platform. It is the one you use inside the URL that gives access to your admin:{accountName}.myvtex.com/admin.
The identity provider must send the authenticated user's email in the Name Identifier (saml:NameID) variable. The response will be cryptographically signed with the certificate described in the Identity Provider's Metadata file.
Required information
In the table below you can learn more about the information you need to provide when setting up SAML.
| Information | Description |
|---|---|
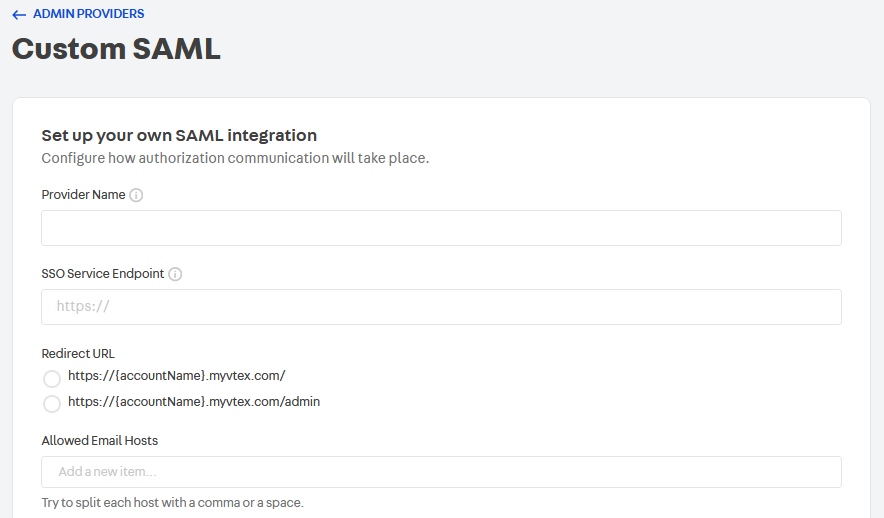
Provider Name | Name displayed to unauthenticated users in the list of login options. |
SSO Service Endpoint | URL of your SAML Identity provider. Users will be redirected to this address. This URL must be HTTPS. |
Redirect URL | You can choose to redirect users to one of two URLs: https://{accountName}.myvtex.com/ or https://{accountName}.myvtex.com/admin. |
Allowed Email Hosts | List of hosts (the portion after the @ symbol in an email address) allowed for authentication. When a SAML Authentication Assertion is received by our platform, the email provided by the user is checked against the list of Allowed Email Hosts. Only emails with hosts listed here are allowed. |
Metadata | XML file that must be uploaded to the VTEX platform. It must describe your identity provider in a way that allows our servers to redirect users to it and securely identify assertions made by it. It usually contains information like the SSO and Logout URLs as well as the certificate used by the identity provider to sign the assertions. The authentication system your organization is using should be capable of generating this file for you. Learn more about SAML 2.0 metadata. This file must also contain the SSO Service Endpoint, described above. You can see an example file below. |
Example metadata file
_27<?xml version="1.0"?>_27<md:EntityDescriptor entityID="https://idp.example.org/SAML2" validUntil="2013-03-22T23:00:00Z"_27 xmlns:md="urn:oasis:names:tc:SAML:2.0:metadata"_27 xmlns:saml="urn:oasis:names:tc:SAML:2.0:assertion"_27 xmlns:ds="http://www.w3.org/2000/09/xmldsig#">_27 <md:IDPSSODescriptor protocolSupportEnumeration="urn:oasis:names:tc:SAML:2.0:protocol" WantAuthnRequestsSigned="false">_27 <md:KeyDescriptor use="signing">_27 <ds:KeyInfo xmlns:ds="http://www.w3.org/2000/09/xmldsig#">_27 <ds:X509Data>_27 <ds:X509Certificate>...</ds:X509Certificate>_27 </ds:X509Data>_27 </ds:KeyInfo>_27 </md:KeyDescriptor>_27 <md:NameIDFormat>urn:oasis:names:tc:SAML:1.1:nameid-format:emailAddress</md:NameIDFormat>_27 <md:SingleSignOnService Binding="urn:oasis:names:tc:SAML:2.0:bindings:HTTP-Redirect" Location="https://idp.example.org/SAML2/SSO/Redirect"/>_27 <md:SingleSignOnService Binding="urn:oasis:names:tc:SAML:2.0:bindings:HTTP-POST" Location="https://idp.example.org/SAML2/SSO/POST"/>_27 </md:IDPSSODescriptor>_27 <md:Organization>_27 <md:OrganizationName xml:lang="en">Some Non-profit Organization of New York</md:OrganizationName>_27 <md:OrganizationDisplayName xml:lang="en">Some Non-profit Organization</md:OrganizationDisplayName>_27 <md:OrganizationURL xml:lang="en">https://www.example.org/</md:OrganizationURL>_27 </md:Organization>_27 <md:ContactPerson contactType="technical">_27 <md:SurName>SAML Technical Support</md:SurName>_27 <md:EmailAddress>mailto:saml-support@example.org</md:EmailAddress>_27 </md:ContactPerson>_27</md:EntityDescriptor>
Setup
Once you have setup your identity provider and have all the required information, follow these steps to set up SAML login:
- Go to the Admin panel > Account settings > Authentication.
- Click the Admin tab.
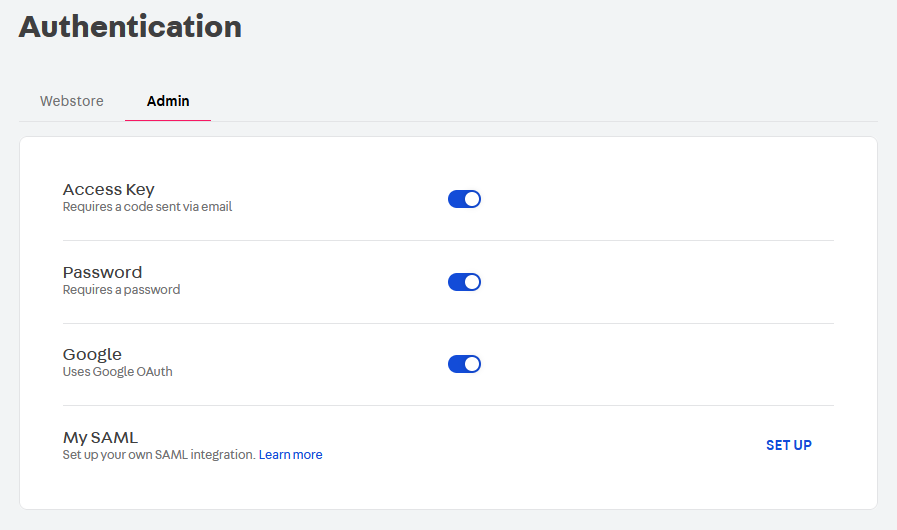
- Click
Set upin the My SAML section. - Fill in the required information as described above.
- Upload your metadata XML according to the information provided in required information.
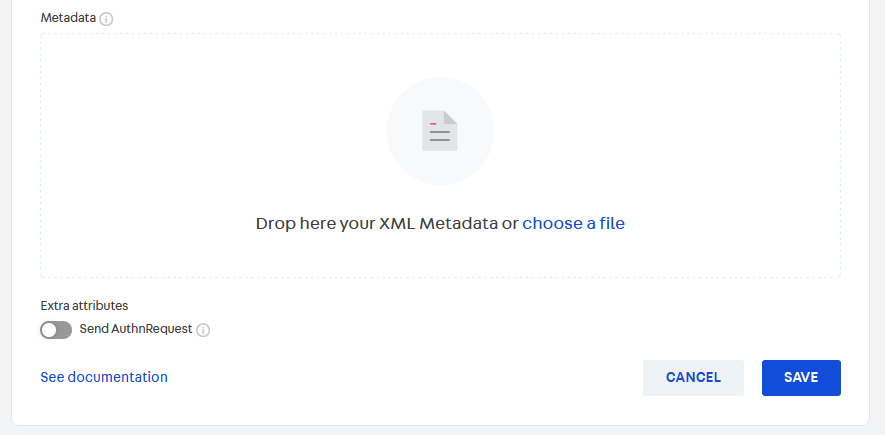
- You have the option of setting the Send AuthRequest toggle. Turning it on means that the attributes
RelayStateandSAMLRequestwill be sent on the URL when authenticating on the identity provider. - Click
Save.
With this, your SAML configuration is set up.
Edit existing SAML configuration
Once you created your SAML configuration, you may edit it by going through the same steps described above, in Setup.
Certificate renewals
When the certificate used by your Identity Provider to sign the assertions is about to expire, it's important to update the metadata.xml file in VTEX to allow for a seamless transition between the old and the new certificate.
This is done by including two <md:KeyDescriptor use="signing"> entries in your exported file, as seen in the example below, where the {OLD CERTIFICATE} and {NEW CERTIFICATE} placeholders should be replaced by valid X.509 certificates.
_34<?xml version="1.0"?>_34<md:EntityDescriptor entityID="https://idp.example.org/SAML2" validUntil="2013-03-22T23:00:00Z"_34 xmlns:md="urn:oasis:names:tc:SAML:2.0:metadata"_34 xmlns:saml="urn:oasis:names:tc:SAML:2.0:assertion"_34 xmlns:ds="http://www.w3.org/2000/09/xmldsig#">_34 <md:IDPSSODescriptor protocolSupportEnumeration="urn:oasis:names:tc:SAML:2.0:protocol" WantAuthnRequestsSigned="false">_34 <md:KeyDescriptor use="signing">_34 <ds:KeyInfo xmlns:ds="http://www.w3.org/2000/09/xmldsig#">_34 <ds:X509Data>_34 <ds:X509Certificate>{OLD CERTIFICATE}</ds:X509Certificate>_34 </ds:X509Data>_34 </ds:KeyInfo>_34 </md:KeyDescriptor>_34 <md:KeyDescriptor use="signing">_34 <ds:KeyInfo xmlns:ds="http://www.w3.org/2000/09/xmldsig#">_34 <ds:X509Data>_34 <ds:X509Certificate>{NEW CERTIFICATE}</ds:X509Certificate>_34 </ds:X509Data>_34 </ds:KeyInfo>_34 </md:KeyDescriptor>_34 <md:NameIDFormat>urn:oasis:names:tc:SAML:1.1:nameid-format:emailAddress</md:NameIDFormat>_34 <md:SingleSignOnService Binding="urn:oasis:names:tc:SAML:2.0:bindings:HTTP-Redirect" Location="https://idp.example.org/SAML2/SSO/Redirect"/>_34 <md:SingleSignOnService Binding="urn:oasis:names:tc:SAML:2.0:bindings:HTTP-POST" Location="https://idp.example.org/SAML2/SSO/POST"/>_34 </md:IDPSSODescriptor>_34 <md:Organization>_34 <md:OrganizationName xml:lang="en">Some Non-profit Organization of New York</md:OrganizationName>_34 <md:OrganizationDisplayName xml:lang="en">Some Non-profit Organization</md:OrganizationDisplayName>_34 <md:OrganizationURL xml:lang="en">https://www.example.org/</md:OrganizationURL>_34 </md:Organization>_34 <md:ContactPerson contactType="technical">_34 <md:SurName>SAML Technical Support</md:SurName>_34 <md:EmailAddress>mailto:saml-support@example.org</md:EmailAddress>_34 </md:ContactPerson>_34</md:EntityDescriptor>
As the SP, VTEX ID must know of the new certificate or it will not be able to validate the signatures. And since the SP is unable to check at what stage of renewal the IdP is, it always checks if the signature validates for each of the listed certificates.
We recommend checking if your IdP allows the configuration of a primary and secondary certificate to simplify the export process.
Once the old certificate expires, you may remove it from the metadata.xml file and re-upload it if you wish to avoid unnecessary requests in the Send Valid Credentials step of the SAML authentication flow.