Documentation
Feedback
Guides
Troubleshooting

Troubleshooting
Development
I can't install VTEX IO CLI

When installing VTEX IO CLI, it returns "Error: Cannot find module vtex".

Keywords: VTEX IO CLI | Plugins

When installing VTEX IO CLI, I get the following error message: Error: Cannot find module ‘vtex’.

This error is related to plugins detached from the VTEX IO CLI base code.

Even though plugins are decoupled from VTEX IO CLI, they rely on the CLI features. Therefore, this error indicates that these plugins fail to access VTEX IO CLI features.

Solution

To solve this problem, follow these steps:

  1. Run vtex --version to ensure you are using the latest CLI version available.
  2. If not, consider updating it.
  3. If the problem persists, follow the steps below based on your operating system:
  • MacOS:

    1. Create a symlink from {vtex-folder}/node_modules/vtex to {vtex-folder}/.

    2. Run the following command in the terminal:


    _10
    ln -s /usr/local/Cellar/vtex/2.119.2/libexec /usr/local/Cellar/vtex/2.119.2/libexec/node_modules/vtex

  • Linux:

    1. Create a symlink from {vtex-folder}/node_modules/vtex to {vtex-folder}/.

    2. Run the following command in the terminal:


    _10
    ln -s /usr/local/lib/vtex /usr/local/lib/vtex/node_modules/vtex

  • Windows:

    1. Run the yarn global bin command in your terminal.

      The expected output is a path that indicates where globally installed Yarn packages are stored on your computer. It might follow the pattern: {UserProfileDirectory}\AppData\Local\Yarn\bin, where {UserProfileDirectory} refers to your user profile directory, typically found at C:\Users\{YourUserName} on Windows systems.

      In the example below, the output is C:\Users\Barbara Celi\AppData\Local\Yarn\bin

      {"base64":"data:image/png;base64,iVBORw0KGgoAAAANSUhEUgAAAAQAAAABCAIAAAB2XpiaAAAACXBIWXMAAAsTAAALEwEAmpwYAAAAFklEQVR4nGPYvHndy5cvt23bxsnJCQA3pgcNEXD3xAAAAABJRU5ErkJggg==","img":{"src":"https://cdn.jsdelivr.net/gh/vtexdocs/dev-portal-content@main/docs/troubleshooting/development/windows-yarn-global-bin.png","width":480,"height":108,"type":"png"}}

    2. Copy the path that the terminal returned after running the yarn global bin command.

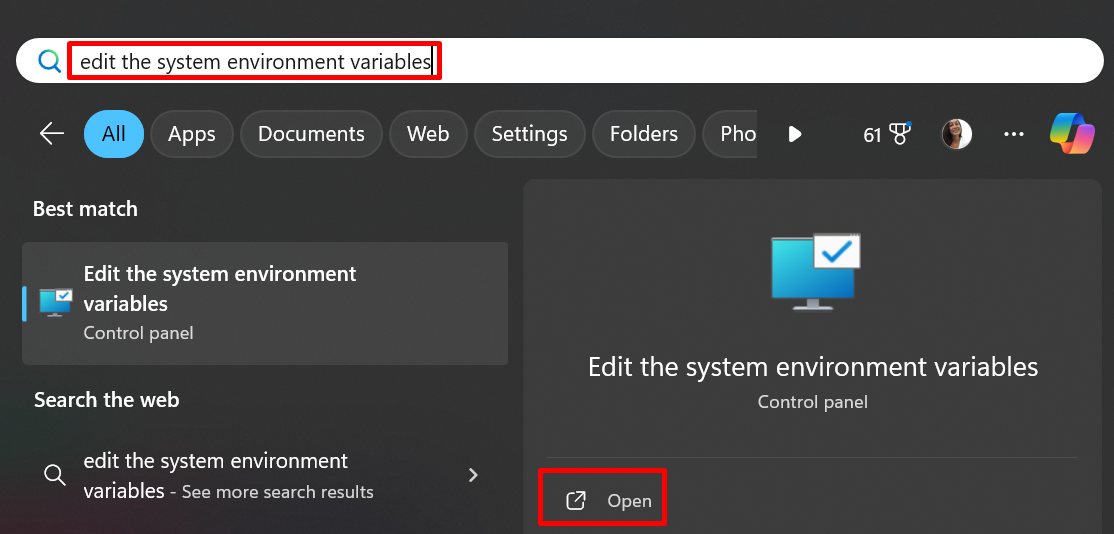
    3. In the Windows search bar, type Edit the system environment variables.

    4. Click Open.

      {"base64":"data:image/png;base64,iVBORw0KGgoAAAANSUhEUgAAAAQAAAACCAIAAADwyuo0AAAACXBIWXMAABYlAAAWJQFJUiTwAAAAI0lEQVR4nGPYsGbd7o2bvv//f/nKFQYtHV0WBgZtLW1FZRUAwQALCH++M9cAAAAASUVORK5CYII=","img":{"src":"https://cdn.jsdelivr.net/gh/vtexdocs/dev-portal-content@main/docs/troubleshooting/development/windows-search-en.png","width":1114,"height":534,"type":"png"}}

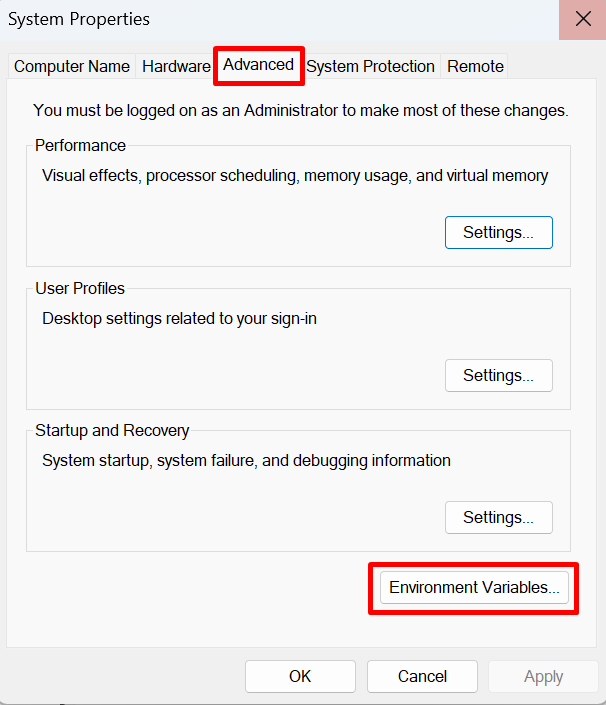
    5. In the System Properties settings, go to the Advanced section and click Environment Variables.
      {"base64":"  ","img":{"width":606,"height":705,"type":"png","mime":"image/png","wUnits":"px","hUnits":"px","length":25490,"url":"https://cdn.jsdelivr.net/gh/vtexdocs/dev-portal-content@main/docs/troubleshooting/development/environment-variables-en.png"}}

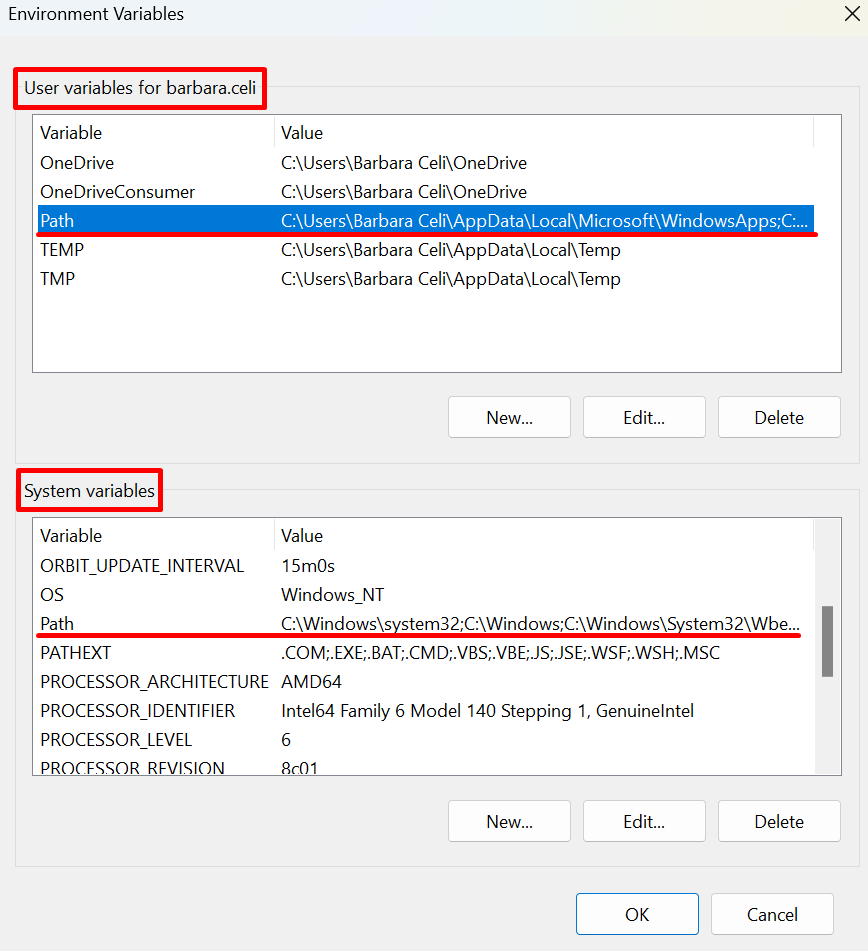
    6. In the Environment Variables settings, double-click Path.

      If you want to configure the variables only for your user, click Path within User variables for {your.user}. If the configuration is for all system users, click Path within System variables.
      {"base64":"data:image/png;base64,iVBORw0KGgoAAAANSUhEUgAAAAQAAAAECAIAAAAmkwkpAAAACXBIWXMAABYlAAAWJQFJUiTwAAAAP0lEQVR4nAE0AMv/AAwFDykuN1tia6KnqgC5uLnExcnGx8vo6esAZFhYtq+v2dLS0MzKAK2trbe2tsnIyM/Pz6XNHlUEDp5hAAAAAElFTkSuQmCC","img":{"src":"https://cdn.jsdelivr.net/gh/vtexdocs/dev-portal-content@main/docs/troubleshooting/development/system-variables-en.png","width":868,"height":951,"type":"png"}}

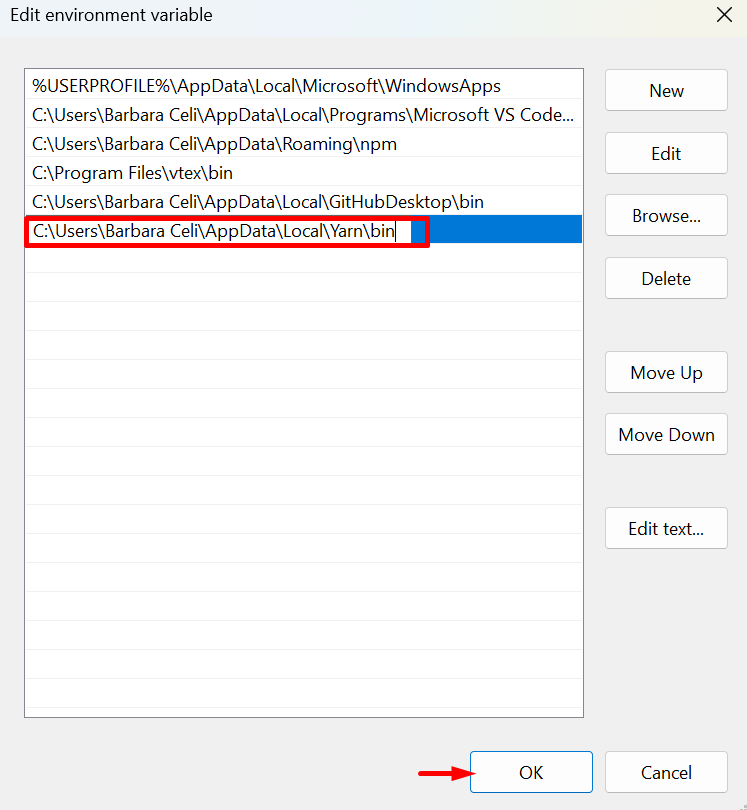
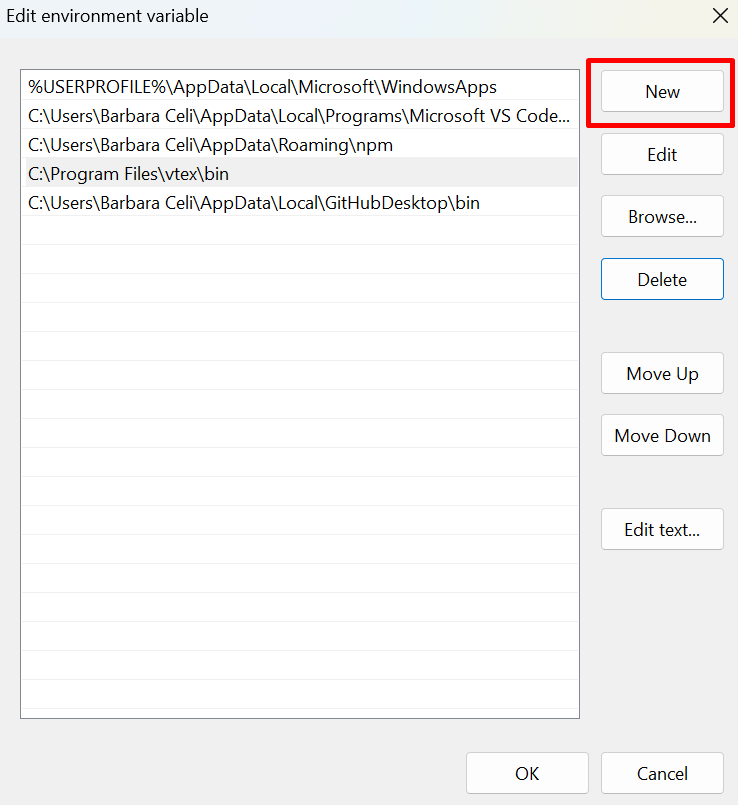
    7. In the Edit environment variable settings, click New.
      {"base64":"data:image/png;base64,iVBORw0KGgoAAAANSUhEUgAAAAQAAAAECAIAAAAmkwkpAAAACXBIWXMAABYlAAAWJQFJUiTwAAAAP0lEQVR4nAE0AMv/ABsbGzQ2NnFxcUY7OgC6urnNzczX19dycnMA4uLi////9fX1enp6AK+vr7i5ubi5uXp6ephuHS58dilpAAAAAElFTkSuQmCC","img":{"src":"https://cdn.jsdelivr.net/gh/vtexdocs/dev-portal-content@main/docs/troubleshooting/development/new-variable-en.png","width":738,"height":805,"type":"png"}}

    8. Paste the path copied in step 2.

    9. Click OK.

      {"base64":"data:image/png;base64,iVBORw0KGgoAAAANSUhEUgAAAAQAAAAECAIAAAAmkwkpAAAACXBIWXMAABYlAAAWJQFJUiTwAAAAP0lEQVR4nAE0AMv/ABUSEhwZG1VXW4CBgABoXV1qX19FS1NkZmoA4uLi////6+vrenp6AJ+fn7KyspmYmXJycwmLGFlwgcP6AAAAAElFTkSuQmCC","img":{"src":"https://cdn.jsdelivr.net/gh/vtexdocs/dev-portal-content@main/docs/troubleshooting/development/new-variable-2-en.png","width":747,"height":810,"type":"png"}}

    If the error persists, open a ticket with VTEX Support.

Contributors
3
Photo of the contributor
+ 3 contributors
Was this helpful?
Yes
No
Suggest edits (Github)
Contributors
3
Photo of the contributor
+ 3 contributors
On this page