Adding Installment Information in the Product Details Page
This guide outlines how you can display available product installment options on your Product Details Page (PDP).
For detailed instructions on API extensions, see the API extensions guide.
Context
You want to display installment details (number, amount, payment system) on the PDP. This feature allows customers to view installment details directly on the product page, supporting their decision-making.
Implementation
Creating GraphQL files
First, you must configure the necessary GraphQL files to retrieve and structure the installment data.
- In your store repository, go to the
srcfolder. If you don’t have it, create agraphqlfolder. - Inside
graphql, create thevtexfolder. - In the
vtexfolder, create two other subfolders,resolversandtypeDefs.
For further information on code implementation, see thevtexfolder available in the playground.store repository.
_10src _10┗ 📂 graphql _10 ┗ 📂vtex _10 ┣ 📂 resolvers _10 ┗ 📂 typeDefs
Defining the types
Now that the file structure is in place, let's define the data structure for our installment information using GraphQL.
In the
typeDefs folder, create a product.graphql file to define the schema. Add the following schema definitions:Installments: Specifies the structure of each installment option. Each installment has properties for:installmentPaymentSystemName: Name of the payment system used (e.g., Credit Card).installmentValue: Amount of each installment.installmentInterest: Interest rate applied per installment.installmentNumber: Total number of installments offered.StoreProduct: Type that is being extended to include a new field calledavailableInstallments. This field is a list of installment objects, representing all the available installment options for the product.
Creating resolvers
Now that we've defined the structure of our installment information (GraphQL types), let's create the rationale for retrieving and formatting this information using a resolver function. Resolvers essentially act as gateways between your frontend and backend, processing data requests.
In the
resolvers folder, create a product.ts file to handle the installment information rationale. Add the following code.productResolver: Defines a resolver for theStoreProducttype.availableInstallments: Retrieves the installment information from thecommertialOfferproperty of the first seller (sellers[0]).installments.length: Checks if there are any installments (installments.length). If not, an empty array is returned.- The code iterates through each installment and maps it to a new object with the desired properties (
installmentPaymentSystemName,installmentValue, etc.).
Consolidating resolvers
In the
resolvers folder, create an index.ts file to consolidate the resolvers.- The
index.tsfile exports resolvers by default, acting as a central hub for all your resolver functions. resolvers:Combines the imported resolver with any other resolvers you might have in your project (represented by the ellipsis...).
Using fragments
Now that we've defined the
availableInstallments field using GraphQL types and resolvers, we need to specify where this data will be used in your storefront queries. This is achieved through GraphQL fragments.-
In the
srcfolder of your store code, create afragmentsfolder. -
In the
fragmentsfolder, create the following files:ClientProduct.ts: Defines the client-side fragment.ServerProduct.ts: Defines the server-side fragment.
-
In the
ClientProduct.tsfile, defines the GraphQL fragment for retrieving installment data.
gql: Imported from @faststore/core/api to construct the GraphQL fragment.ClientProduct: Fragment to indicate it extends the product query.- The fragment defines the specific fields we want to retrieve from the
availableInstallmentsdata structure.
Adding server-side product fragment for installment details
Add a product fragment focusing on installment details to ensure consistency in data retrieval on the client and server sides. In the
ServerProduct.ts file, add the following:For further details on code implementation, see thefragmentsfolder available in the playground.store repository.
Formatting installment values
For a more user-friendly display, you can format the installment values to include currency symbols and proper locale formatting.
- In the
srcfolder of your store code, create autilsfolder. - Inside
utils, create thepriceFormatter.tsfile and add the following:
FaststoreConfig: Imported to access the current store's locale and currency settings.priceFormatter: This function takes a numeric value and formats it according to the store's locale and currency.
For further details on code implementation, see theutilsfolder available in the playground.store repository.
Creating a new component with installments
Now that we've established the rationale for retrieving installment data, let's create a new component to display this information alongside the buy button on the PDP.
-
In the
src/componentsfolder, create two new folders:BuyButtonWithDetails: Keeps the component for our enhanced buy button with installment details.sections/CustomProductDetails: Keeps the rationale for overriding the default PDP buy button component.
-
Inside the
BuyButtonWithDetailsfolder, create two new files:BuyButtonWithDetails.tsxbuy-button-with-details.module.scss
-
Inside
BuyButtonWithDetails.tsx, add the following code.
priceFormatter: Format installment values.styles: Stylesheet for the BuyButtonWithDeatils imported from the.scssfile.usePDP: Hook to retrieve the PDP context containing product and extension data.- We conditionally display the first installment option if it's interest-free (you can modify this to show all installments).
- The component renders a section containing the installment information and the buy button.
Creating a stylesheet for the component
Inside
buy-button-with-details.module.scss, add the code below. The stylesheet styles the component using SCSS. It defines styles for the installment information container and the buy button itself.Creating a custom section
By including the
CustomProductDetails section in the PDP, you replace the default buy button component with your enhanced BuyButtonWithDetails component, which displays both the buy button and the installment information.In the
CustomProductDetails folder , create the CustomProductDetails.tsx and add the following code.For further details on code implementation, see theutilsfolder available in the playground.store repository.
Creating GraphQL files
First, you must configure the necessary GraphQL files to retrieve and structure the installment data.
- In your store repository, go to the
srcfolder. If you don’t have it, create agraphqlfolder. - Inside
graphql, create thevtexfolder. - In the
vtexfolder, create two other subfolders,resolversandtypeDefs.
For further information on code implementation, see thevtexfolder available in the playground.store repository.
Defining the types
Now that the file structure is in place, let's define the data structure for our installment information using GraphQL.
In the
typeDefs folder, create a product.graphql file to define the schema. Add the following schema definitions:Installments: Specifies the structure of each installment option. Each installment has properties for:installmentPaymentSystemName: Name of the payment system used (e.g., Credit Card).installmentValue: Amount of each installment.installmentInterest: Interest rate applied per installment.installmentNumber: Total number of installments offered.StoreProduct: Type that is being extended to include a new field calledavailableInstallments. This field is a list of installment objects, representing all the available installment options for the product.
Creating resolvers
Now that we've defined the structure of our installment information (GraphQL types), let's create the rationale for retrieving and formatting this information using a resolver function. Resolvers essentially act as gateways between your frontend and backend, processing data requests.
In the
resolvers folder, create a product.ts file to handle the installment information rationale. Add the following code.productResolver: Defines a resolver for theStoreProducttype.availableInstallments: Retrieves the installment information from thecommertialOfferproperty of the first seller (sellers[0]).installments.length: Checks if there are any installments (installments.length). If not, an empty array is returned.- The code iterates through each installment and maps it to a new object with the desired properties (
installmentPaymentSystemName,installmentValue, etc.).
Consolidating resolvers
In the
resolvers folder, create an index.ts file to consolidate the resolvers.- The
index.tsfile exports resolvers by default, acting as a central hub for all your resolver functions. resolvers:Combines the imported resolver with any other resolvers you might have in your project (represented by the ellipsis...).
Using fragments
Now that we've defined the
availableInstallments field using GraphQL types and resolvers, we need to specify where this data will be used in your storefront queries. This is achieved through GraphQL fragments.-
In the
srcfolder of your store code, create afragmentsfolder. -
In the
fragmentsfolder, create the following files:ClientProduct.ts: Defines the client-side fragment.ServerProduct.ts: Defines the server-side fragment.
-
In the
ClientProduct.tsfile, defines the GraphQL fragment for retrieving installment data.
gql: Imported from @faststore/core/api to construct the GraphQL fragment.ClientProduct: Fragment to indicate it extends the product query.- The fragment defines the specific fields we want to retrieve from the
availableInstallmentsdata structure.
Adding server-side product fragment for installment details
Add a product fragment focusing on installment details to ensure consistency in data retrieval on the client and server sides. In the
ServerProduct.ts file, add the following:For further details on code implementation, see thefragmentsfolder available in the playground.store repository.
Formatting installment values
For a more user-friendly display, you can format the installment values to include currency symbols and proper locale formatting.
- In the
srcfolder of your store code, create autilsfolder. - Inside
utils, create thepriceFormatter.tsfile and add the following:
FaststoreConfig: Imported to access the current store's locale and currency settings.priceFormatter: This function takes a numeric value and formats it according to the store's locale and currency.
For further details on code implementation, see theutilsfolder available in the playground.store repository.
Creating a new component with installments
Now that we've established the rationale for retrieving installment data, let's create a new component to display this information alongside the buy button on the PDP.
-
In the
src/componentsfolder, create two new folders:BuyButtonWithDetails: Keeps the component for our enhanced buy button with installment details.sections/CustomProductDetails: Keeps the rationale for overriding the default PDP buy button component.
-
Inside the
BuyButtonWithDetailsfolder, create two new files:BuyButtonWithDetails.tsxbuy-button-with-details.module.scss
-
Inside
BuyButtonWithDetails.tsx, add the following code.
priceFormatter: Format installment values.styles: Stylesheet for the BuyButtonWithDeatils imported from the.scssfile.usePDP: Hook to retrieve the PDP context containing product and extension data.- We conditionally display the first installment option if it's interest-free (you can modify this to show all installments).
- The component renders a section containing the installment information and the buy button.
Creating a stylesheet for the component
Inside
buy-button-with-details.module.scss, add the code below. The stylesheet styles the component using SCSS. It defines styles for the installment information container and the buy button itself.Creating a custom section
By including the
CustomProductDetails section in the PDP, you replace the default buy button component with your enhanced BuyButtonWithDetails component, which displays both the buy button and the installment information.In the
CustomProductDetails folder , create the CustomProductDetails.tsx and add the following code.For further details on code implementation, see theutilsfolder available in the playground.store repository.
_10src _10┗ 📂 graphql _10 ┗ 📂vtex _10 ┣ 📂 resolvers _10 ┗ 📂 typeDefs
Results
Once you have set your development mode, you can view changes locally by accessing a PDP, such as
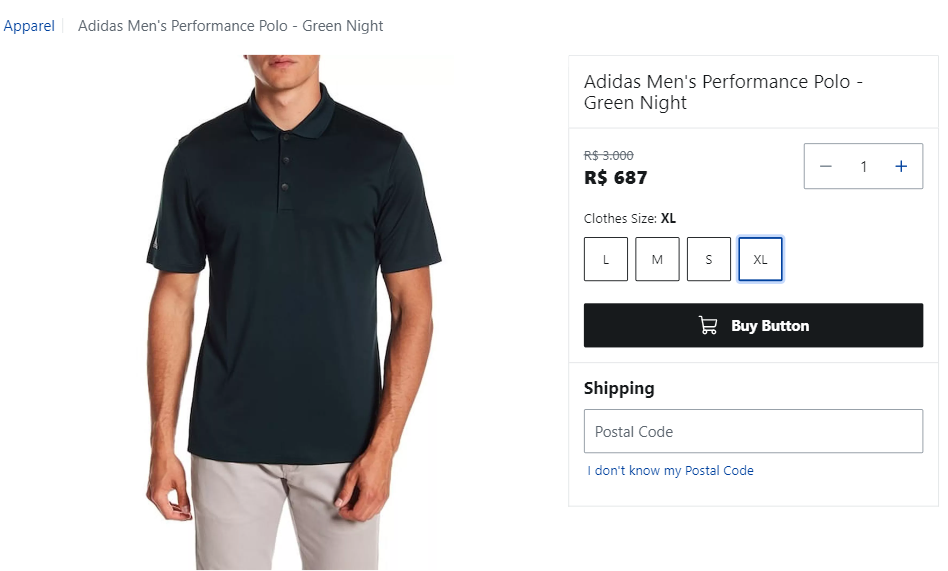
https://localhost:3000/adidas-mens-performance-polo-green-night-99984111/p, and you will see the installment option for the product.Before
The PDP before adding the installment:
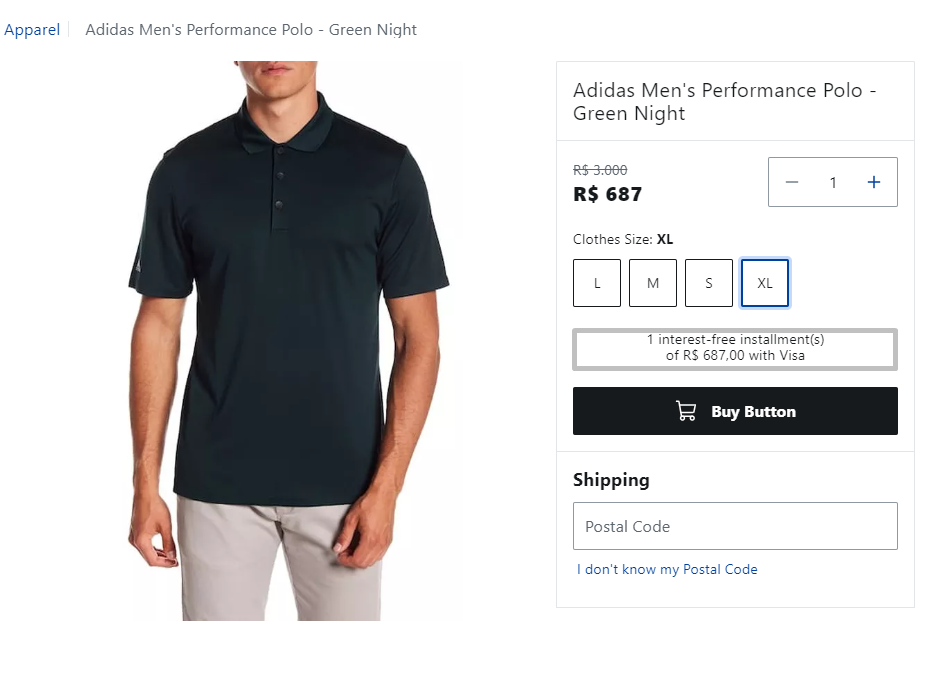
After
After applying the installment option, the information will become available above the
Buy Button: