Extending API schemas
This guide will teach you how to extend VTEX and third-party APIs to suit your store's needs. By extending these APIs, you'll gain the ability to efficiently access and modify essential data, ensuring seamless customization to meet your specific needs.
Before you begin
Ensure consistency with API extension best practices
When extending the FastStore API schema, avoid overfetching data on your storefront. Refer to the Best practices for fetching data on your storefront for more information.
Ensure your development server is active
Ensure that your development server is up and running while developing to observe changes promptly. Use the command
yarn dev in the terminal to run the development server and monitor changes effectively.Extending VTEX API Schemas
FastStore streamlines the data utilization from VTEX APIs not directly exposed by the FastStore API.
Since FastStore uses GraphQL, you need to include type definitions and resolvers to fetch the desired data.
To define new type definitions and resolvers for FastStore using GraphQL, follow the instructions below.
Instructions
Step 1 - Preparing the folders and files
To declare a new type definition and resolver, create the following directory structure:
-
In your store repository, go to the
srcfolder and create thegraphqlsubfolder. You can do this by running the following command in your terminal:_10mkdir graphql -
Inside the new
graphqlfolder, create thevtexsubfolder._10mkdir vtex -
In the
vtexfolder, createresolversandtypeDefssubfolders._10mkdir resolvers typeDefsThesrc/graphql/vtex/resolversandsrc/graphql/vtex/typeDefspaths are mandatory, but you can organize the files inside those directories as you wish. -
Create an
index.tsfile inside theresolversfolder.
Once you have created the necessary folders, you will have a folder structure for the VTEX API Schema Extensions in the
src/graphql/vtex folder similar to the following:
_11 starter.store/_11 └─ src/_11 └─ graphql/_11 └─ vtex/_11 ├─ resolvers/_11 └─ index.ts_11 └─ <resolverName>.ts_11 └─ …_11 ├─ typeDefs/_11 └─<typeName>.graphql_11 └─ …
Note that in the code example above, the type definitions and resolvers files were created at<resolverName>.tsand<typeName>.graphql.
Step 2 - Creating type definitions (typeDefs)
Your new type definitions set the data structure for your new fields, extended from the existing FastStore API GraphQL queries and types.
-
Create a new
<typeName>.graphqlfile inside thevtex/typeDefsfolder. For example, if we extend the StoreProduct type from the FastStore API, the name of the file should beproduct.graphql.The organization inside thevtex/typeDefsfolder is flexible. You can create multiple typeDefs files or group them all together in one file. During the build process and when running the local server file, all.graphqlfiles under this directory will be considered. -
To extend
StoreProduct, let's add acustomDatarequired field inproduct.graphql, which should return a string value. This field can store custom information related to a product in your store. For example, you might use this field to store additional product details that are not in the native FastStore API schema.The typeDefs files must have a.graphqlextension. Also,index.tsis necessary for resolvers but not required for typeDefs.
Refer to the next step to create the resolvers to provide the actual data to the
customData field.Step 3 - Creating resolvers
Now, you'll create a resolver to define how the new
customData field should be resolved, specifically what data or logic should be associated with it when queried.-
Create a new
<resolver>.tsfile inside thevtex/resolversfolder. Let's continue using the StoreProduct type example. That means the name of the file will beproduct.ts.The organization inside this folder is flexible. You can create multiple resolver files or group them all together in one file. -
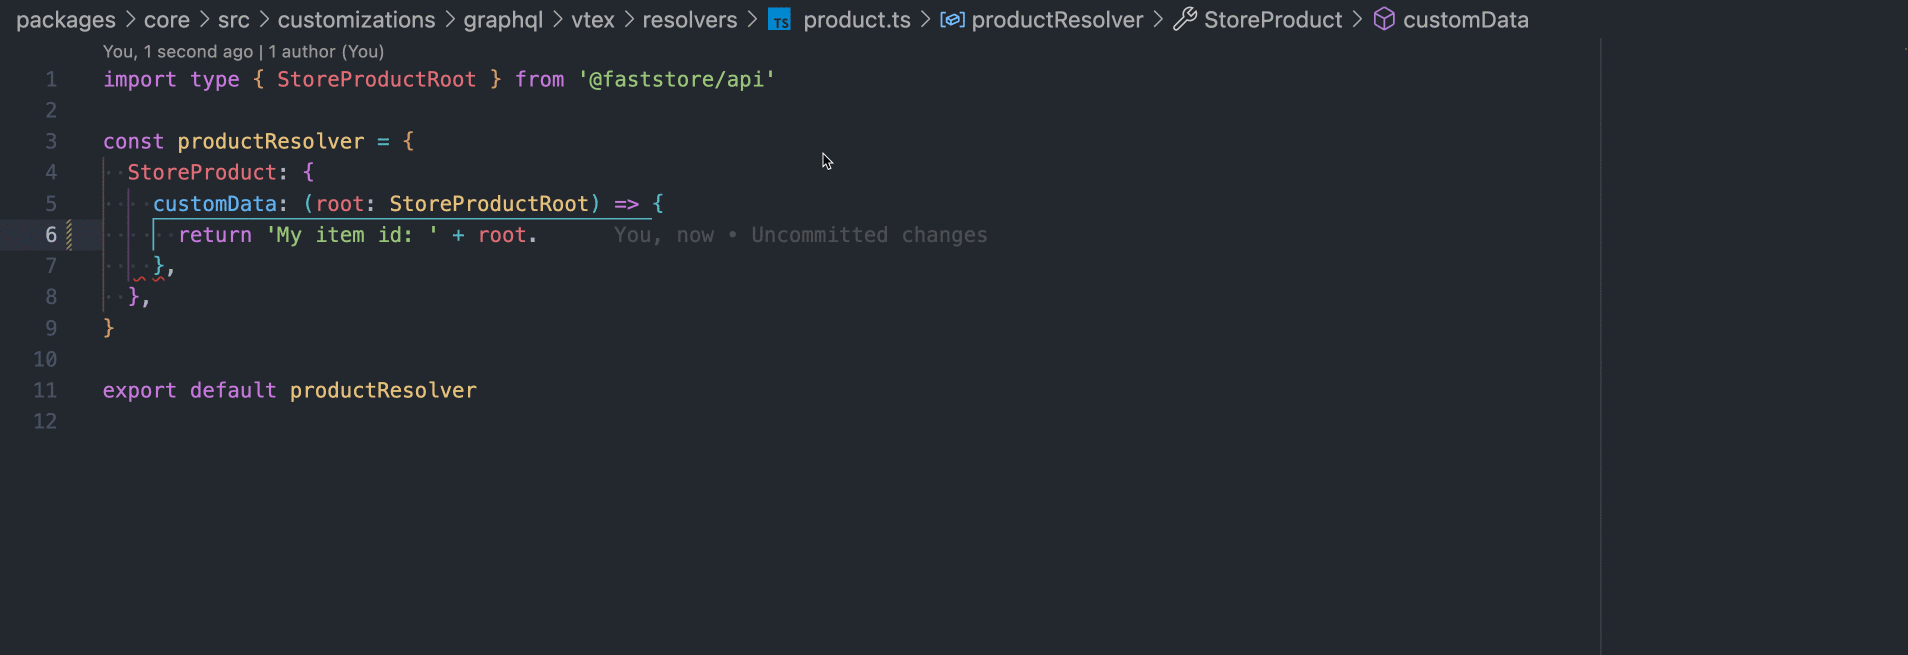
Define the resolver in the
product.tsfile. This resolver specifies how to fetch the data for thecustomDatafield based on the root object, which represents theStoreProduct.
Note that you can leverage the use of TypeScript by typing the root param as StoreProductRoot:
-
Open the
index.tsfile inside thevtex/resolversfolder and import the resolver,StoreProductResolver, you created in the previous step. -
Create a
resolversobject that includes the imported resolvers.
Once you have defined these files in the
vtex folder, the new fields are available to use.If the changes you made are still not available, refer to the troubleshooting section GraphQL changes not visible during development.
Extending FastStore API with third-party API schemas
As stores grow, so does the possibility of consuming new data that is not provided by default in the FastStore API or other VTEX APIs.
This means your FastStore website may need to consume new data from third-party APIs.
Instructions
Step 1 - Preparing the folders and files
If you already have the directory structure created in the Extending VTEX API schemas, add thethirdPartyfolder insidesrc/graphql.
-
In your store repository, go to the
srcfolder and create thegraphqlsubfolder. You can do this by running the following command in your terminal:_10mkdir graphql -
Inside the new
graphqlfolder, create thethirdPartysubfolder._10mkdir thirdParty -
In
thirdParty, createresolversandtypeDefssubfolders._10mkdir resolvers typeDefsThesrc/graphql/vtex/resolversandsrc/graphql/vtex/typeDefspaths are mandatory, but you can organize the files inside those directories as you wish. -
Create a
index.tsfile inside theresolversfolder.Once you have created the essentials folders, you will have a folder structure similiar to the the following:_11starter.store/_11└── src/_11└── graphql/_11├── thirdParty/_11│ ├── resolvers/_11│ └── index.ts_11│ └── <resolverName>.ts_11│ └── …_11│ ├── typeDefs/_11│ └── <typeName>.graphql_11│ └── …This directory structure distinguishes between data originating from VTEX and data from third-party APIs.
Step 2 - Creating type definitions and resolvers
- Create a new
<typeName>.graphqlinside thethirdPartyfolder. As we are creating new queries, the name of the file that defines the type definitions can beextra.graphql. - Create a new
<resolver>.tsfile inside thegraphql/thirdParty/resolvers folder.
Step 3 - Creating query or mutation schemas
When developing a third-party extension, it's essential to create a Query or Mutation schema. This schema is crucial for generating new query entry points to access data.
Below, you'll find a code example for implementing a third-party extension.
-
Create the
extra.graphqlfile inside thegraphql/thirdParty/typeDefsfolder. Theextra.graphqldefines the type definitions in a GraphQL schema file. -
Create the
extra.tsfile inside thegraphql/thirdParty/resolversfolder. This file defines the resolvers that handle the logic for the defined queries or mutations. -
In the
graphql/thirdParty/resolversfolder, create theindex.tsfile to combine all the resolvers into a single object. -
With the schema and resolvers in place, query the data using GraphQL queries. Here's an example query to access the extra data:_10query {_10extraData {_10data_10}_10namedExtraData(name: "Hello") {_10data_10}_10}
Once you have defined these files in the
thirdParty folder, you can query the specified data.If the changes you made are still not available, refer to the troubleshooting section GraphQL changes not visible during development.