This page is about version 1.2.1 of the app, which is not the most recent version. The latest stable version is 1.32.1.
Product Price app is responsible for exporting blocks related to the product's price, such as list price, selling price and savings.
Configuration
Step 1 - Adding the Product Price app to your theme's dependencies
In your theme's manifest.json, add the Product Price app as a dependency:
_10"dependencies": {_10 "vtex.product-price": "1.x"_10}
Now, you can use all the blocks exported by the product-price app. Check out the full list below:
| Block name | Description |
|---|---|
product-list-price | Renders the product list price. If it is equal to the product selling price, this block will not be rendered. |
product-selling-price | Renders the product selling price. |
product-spot-price | Renders the product spot price. If it is equal to the product selling price, this block will not be rendered. For more information about how to set this up in your store, check this document. |
product-installments | Renders the product installments. If more than one option is available, the one with the biggest number of installments will be displayed. |
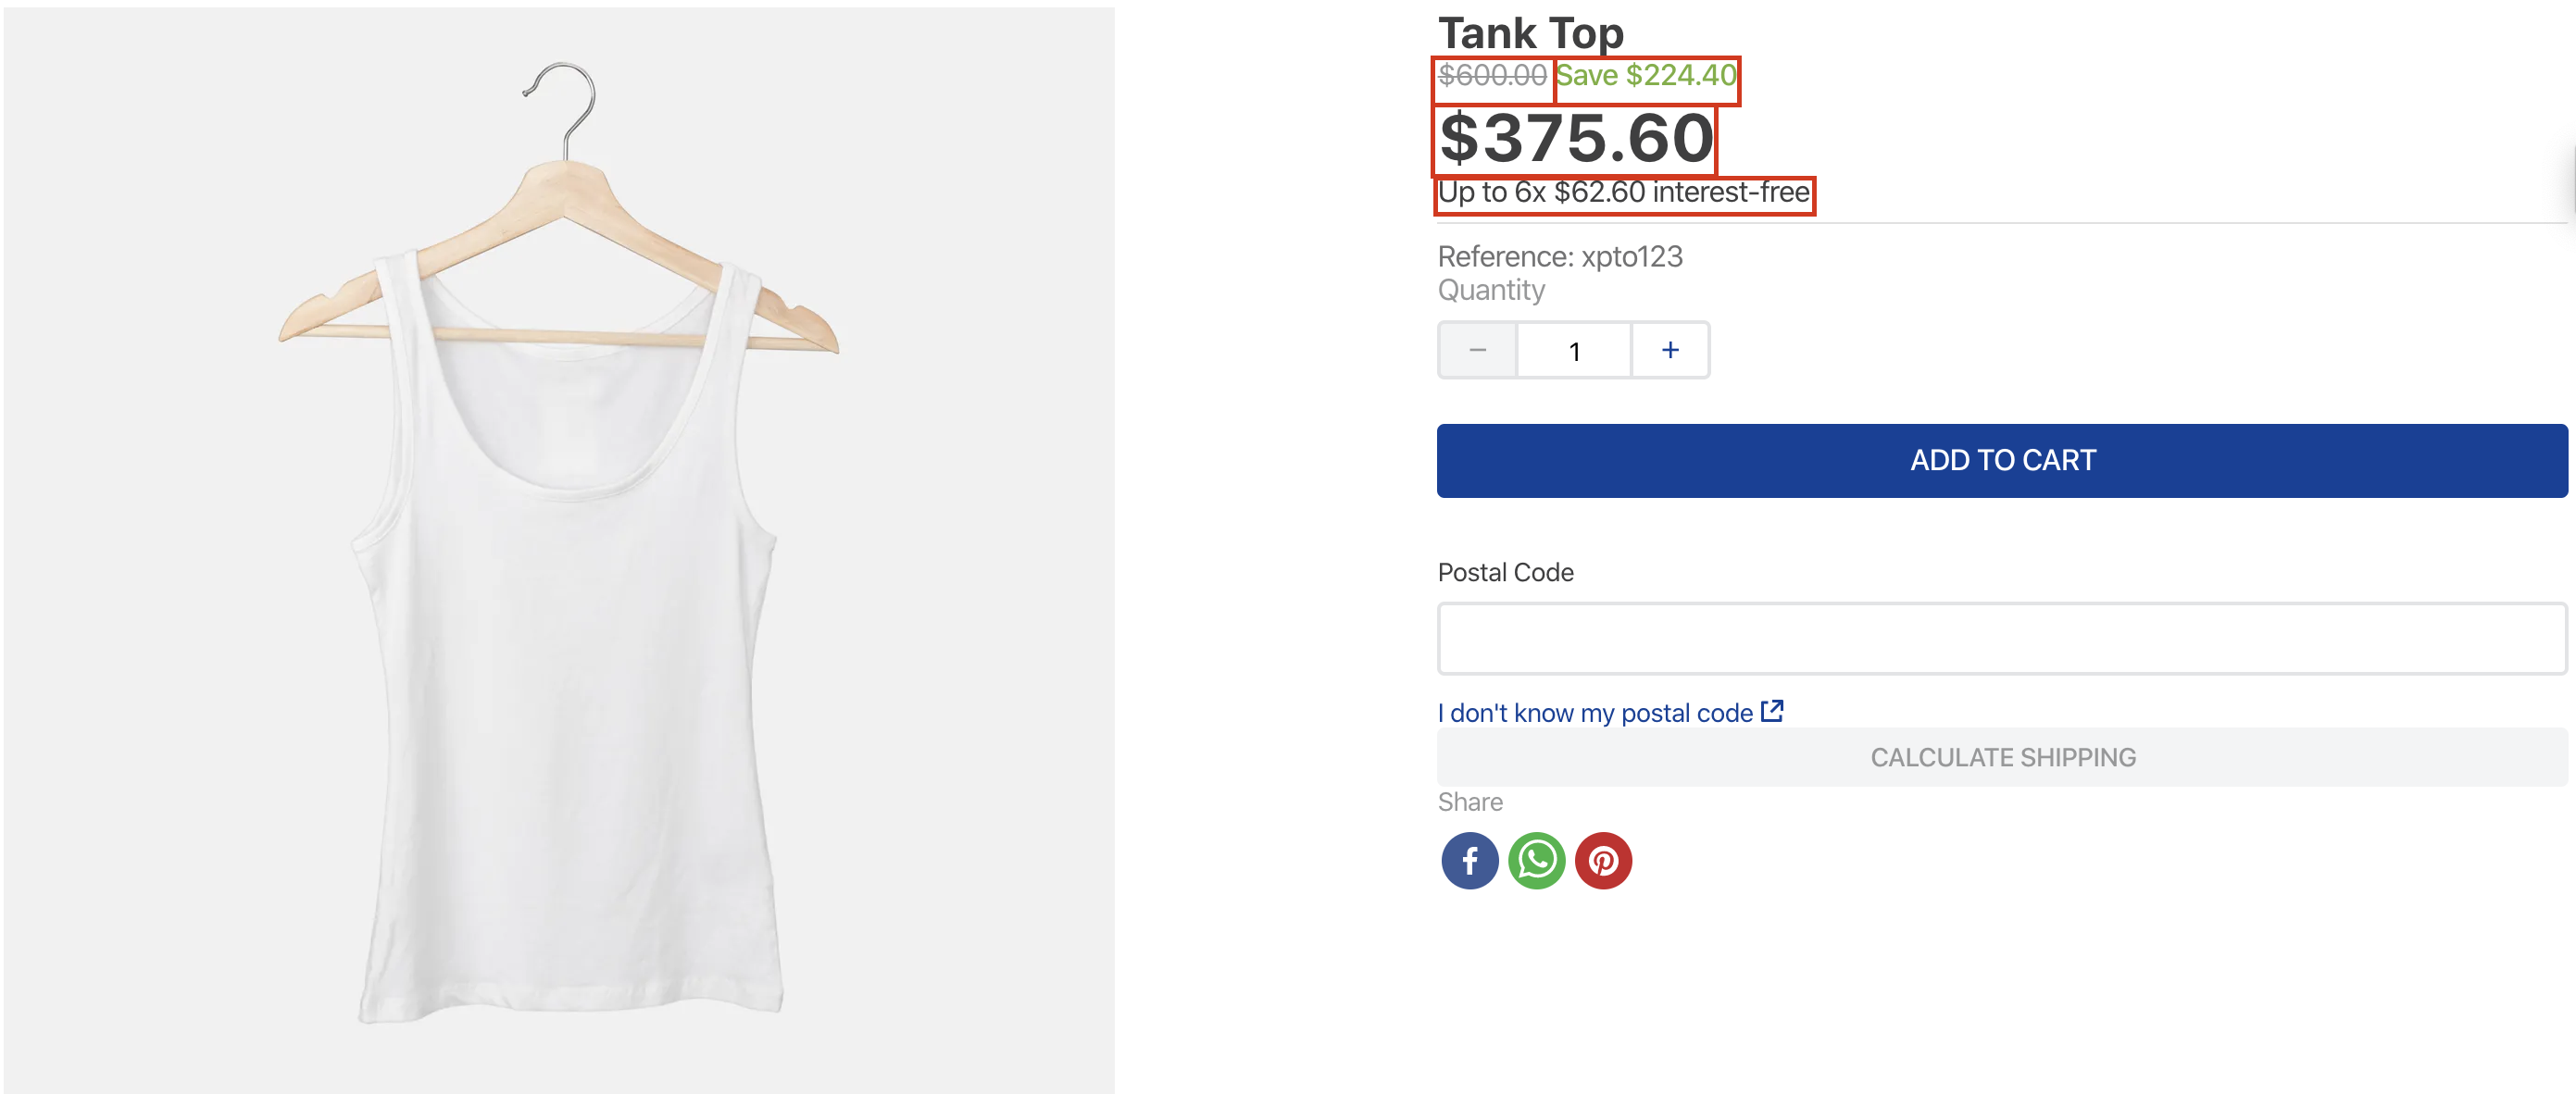
product-price-savings | Renders the product price savings, if there is any. It can show the percentage of the discount or the value of the absolute saving. |
product-list-price-range | Renders the product list price range. It follows the same logic applied to the ListPrice: if its value is equal to the product selling price, this block is not rendered. |
product-selling-price-range | The product selling price range. |
All blocks listed above use product price data fetched from the store catalog. In order to understand further, please access the Pricing Module overview.
Step 2 - Adding the Product Price's blocks to your theme's templates
To add the Product Price's blocks in your theme, you just need to declare them as children of the product-summary-shelf, exported by the Product Summary app, or declare them in the theme's Product template (store.product).
Notice the following: these blocks necessarily need a Product context in order to work properly. Therefore, when declaring them as children of the product-summary-shelf, be sure that they are in a store template in which this context is available.
For example:
_12"shelf#home": {_12 "blocks": ["product-summary.shelf"]_12},_12_12"product-summary.shelf": {_12 "children": [_12 "product-list-price",_12 "product-selling-price",_12 "product-price-savings",_12 "product-installments"_12 ]_12},
Every block in this app has some props in common:
| Prop name | Type | Description | Default value |
|---|---|---|---|
markers | [string] | IDs of your choosing to identify the block's exported messages and customize them using the admin's Site Editor. Learn how to use them below | [] |
blockClass | string | Block ID of your choosing to be used in CSS customization | undefined |
For example:
_10"product-price-savings#summary": {_10 "props": {_10 "markers": [_10 "discount"_10 ],_10 "blockClass": "summary"_10 }_10},
Step 3 - Editing the values on Site Editor
Every Product Price's block uses the ICU Message Format.
This makes it possible to fully edit the messages exported by each Product Price's block through the admin's Site Editor.

Notice that you not only can edit the message text used by the block but also choose which data will be rendered according to the options stated in the field description.
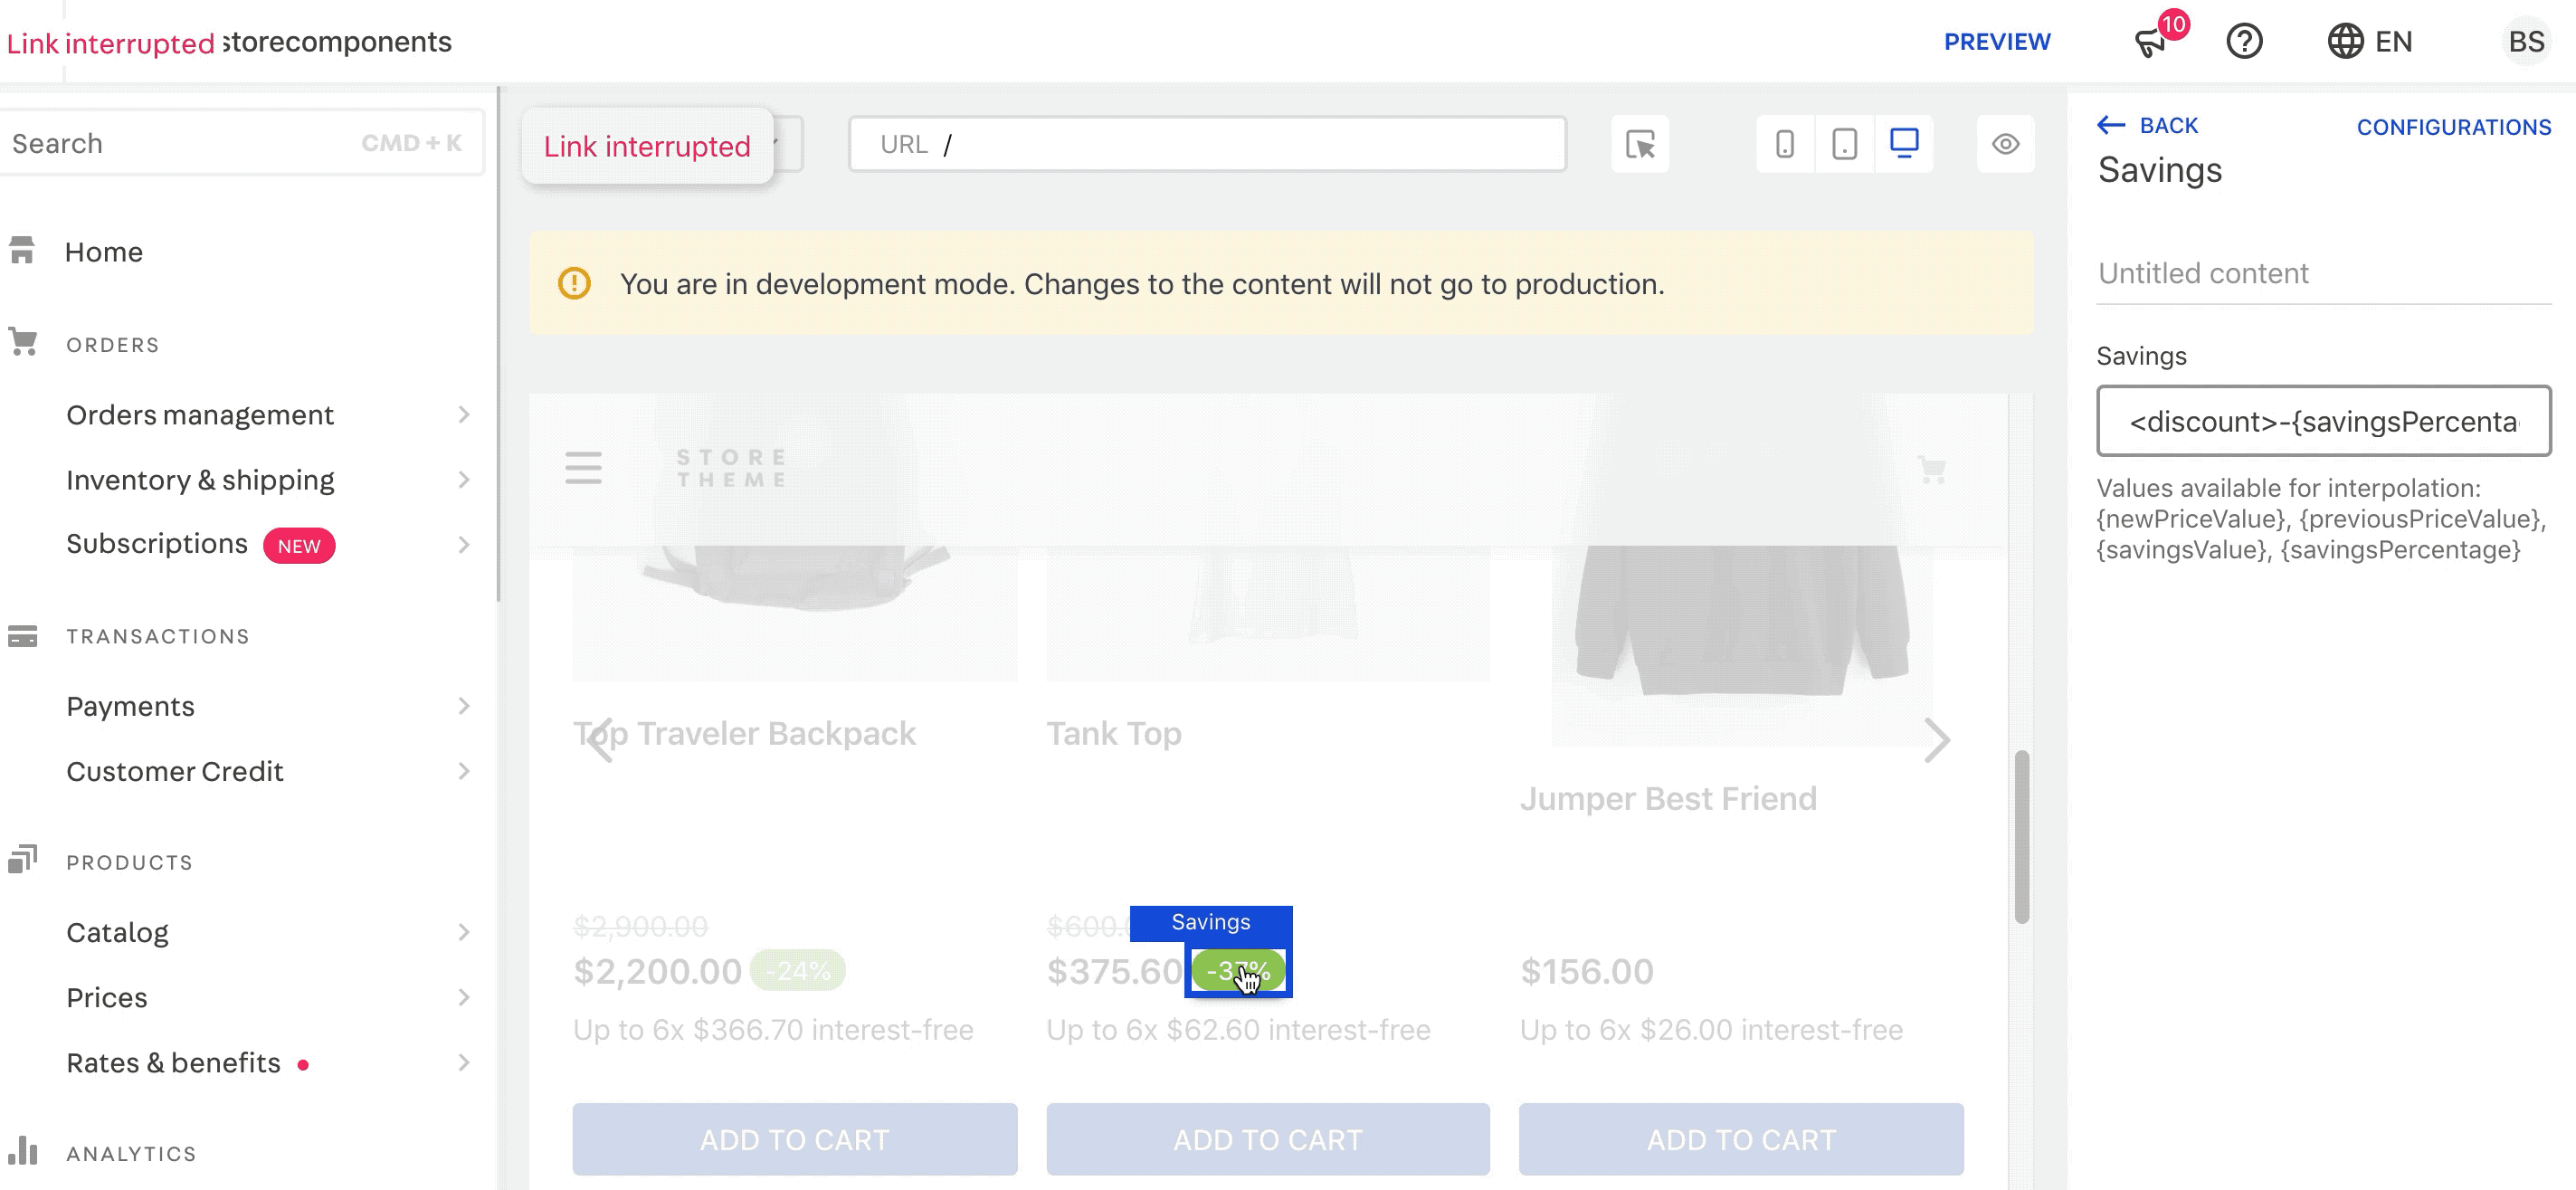
In the example above, the block was firstly displaying a Save $224.40 message. As a final result, it now renders a You are saving: $224.40 (37%) thanks to the changes performed through the admin's Site Editor.

Using the markers prop
- Using your terminal and the VTEX IO Toolbelt, login to the desired VTEX account from a development workspace;
- Access the theme directory and open it using the code editor of your choosing;
- Using your code editor, add the
markersprop to the block whose text messages you want to customize and define unique value for it. For example:
_10"product-price-savings#summary": {_10 "props": {_10 "markers": [_10 "discount"_10 ],_10 }_10},
- Save your changes and link the theme app;
- Using the developer workspace you were previously developing, access the account's admin;
- Then, open the Site Editor section in the CMS module;
- Click on the block in which the
markersprop was added to edit it; - Use the
markersprop value as a tag, wrapping the desired block message that will be customized by you. For example:<discount>-{savingsPercentage}</discount>
{workspaceName}--{accountName}.myvtex.com);
10. Then, inspect the HTML element that corresponds to the text message just configured through the admin's Site Editor;

span with its own unique selector: <span class="vtex-product-price-1-x-savings-discount">.
11. Once all changes are verified, it is time now to use a Production workspace. Repeat the steps above using a workspace in production mode. Then, promote it to Master.
12. Done! You are now able to use the new HTML element identifier to customize the text message as desired. To know the next steps, access the Customing your store using CSS Handles recipe.
Customization
To apply CSS customization in this and other blocks, follow the instructions given in the recipe on Using CSS Handles for store customization.
| CSS Handles |
|---|
installmentValue |
installmentsNumber |
installmentsTotalValue |
installments |
interestRate |
listPrice' |
listPriceRangeMaxValue |
listPriceRangeMinValue |
listPriceRangeUniqueValue |
listPriceRange |
listPriceValue |
newPriceValue |
previousPriceValue |
savingsPercentage |
savingsValue |
savings |
sellingPrice--hasListPrice |
sellingPriceRangeMaxValue |
sellingPriceRangeMinValue |
sellingPriceRangeUniqueValue |
sellingPriceRange |
sellingPriceValue |
sellingPrice |
spotPriceValue |
spotPrice |