Installation can be performed in two ways: via command line or manually, without using the terminal. Choose the option that best suits your profile or needs.
IMPORTANT: It is essential to ask the Insider team to disable the internal use of the re-initialize command on SPA-type websites (such as those developed in VTEX IO).
Step 1: App Installation
Option 1 — Through the VTEX App Store (without using the command line)
This is the installation method that does not require the use of the command line. Access the VTEX App Store link to install the application.
Video demonstrating app installation via the VTEX App Store

Option 2 — Via Terminal (with command line)
This alternative is equivalent to installation via the VTEX App Store, but performed via terminal, usually executed by the developer responsible for the store's front-end. To do this, follow the commands below:
Steps for installation via terminal
- Log in to your store environment:
_10vtex login {{vendor}}
- Install the app:
_10vtex install codeby.userinsider@1.x
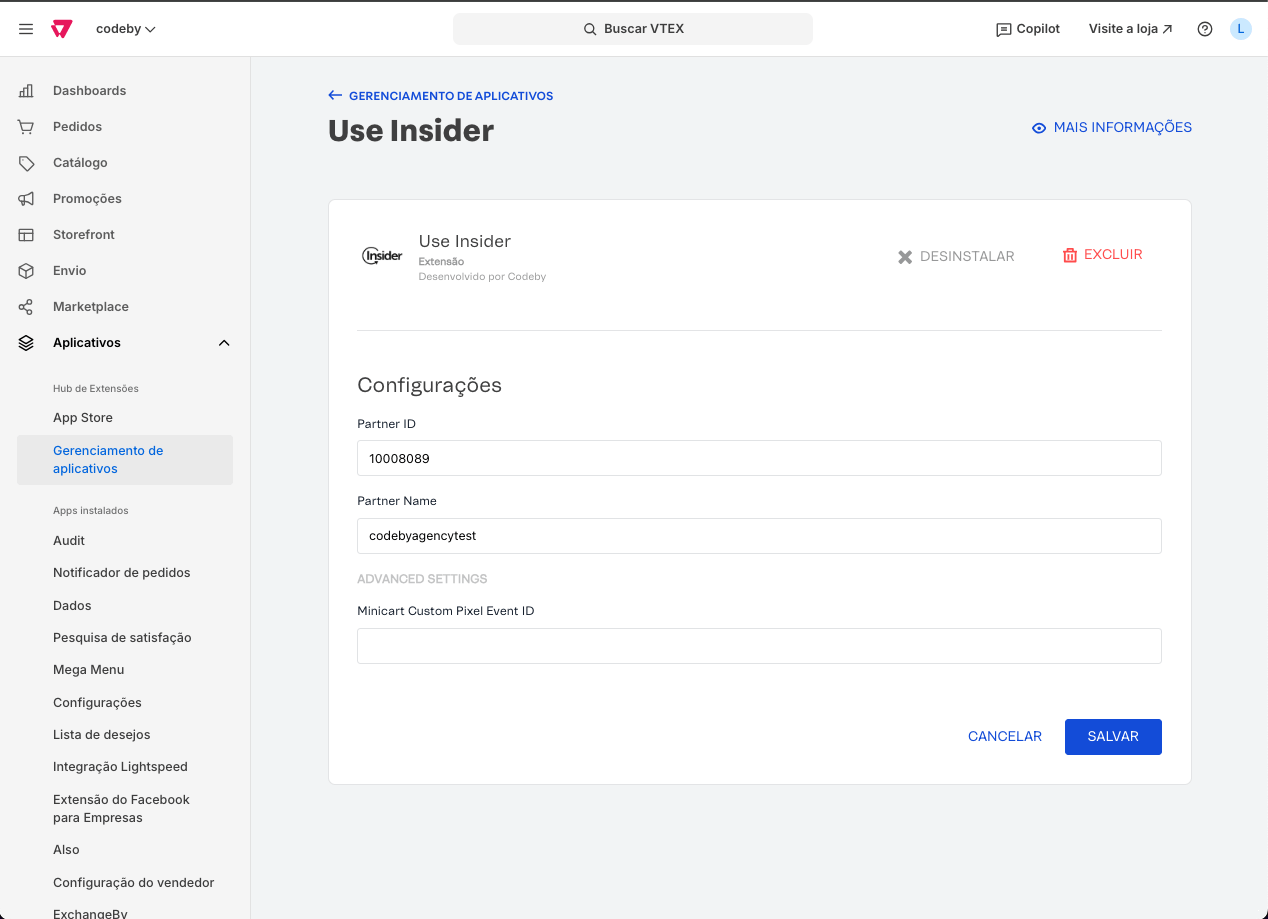
Step 2: App Configuration in Admin
For the app to work properly, you need to configure the following data in your store's Admin:
- Partner ID
- Partner Name
For the AddToCart function to work, you need to configure the following data in your store's Admin:
- Minicart Custom Pixel Event ID
Access the settings screen as shown in the video below and fill in the required fields.
Example – How to navigate to the app configuration page in Admin:

Example – Settings screen in Admin with the required fields completed:
Step 3: Configuration in Checkout (front-end implementation)
This step must be performed by the developer responsible for the store's front-end.
_22(function (window) {_22 const partnerId = 'YOUR-PARTNER-ID'_22 const partnerName = 'YOUR-PARTNER-NAME'_22_22 const domainName = window.location.origin_22 const insiderUrl =_22 domainName +_22 '/insider/checkout-script?partnerId=' +_22 partnerId +_22 '&partnerName=' +_22 partnerName_22_22 const xmlHttp = new XMLHttpRequest()_22 xmlHttp.open('GET', insiderUrl, false)_22 xmlHttp.send(null)_22_22 const importScript = document.createElement('script')_22 importScript.type = 'text/javascript'_22 importScript.id = 'insider-checkout'_22 importScript.text = xmlHttp.responseText_22 document.head.appendChild(importScript)_22})(window)
If your store uses Custom Checkout UI, add the above code to the JavaScript file located in
/admin/vtex-checkout-ui-customin your store's Admin. Alternatively, if you use thecheckout-ui-custombuilder in your project(via manifest.json), insert the code into thecheckout6-custom.jsfile inside thecheckout-ui-customfolder of your Git repository.
If your store does not use Checkout UI Custom, insert the code into the JavaScript file available at
/admin/portal/#/sites/default/code/files/checkout6-custom.jsin your store's Admin.
How it works in technical terms in VTEX and Insider
From now on, only technical terms will be presented to the programmer responsible for the store's front end, with the aim of explaining how the APP works and the features it offers to complement specific cases for each store.
All information that the APP sends to Insider is transmitted in the format of a JSON object stored in the global window, called insider_object. This transmission occurs through a request called hit, which can be viewed in DevTools, in the Network tab of the browser.
This APP uses VTEX Pixel events, therefore, all events with the standard VTEX Pixel nomenclature, in the format
vtex:eventName, will be used by the APP.
Page navigation event
Pixel event: vtex:pageInfo
This event is triggered every time the page changes, i.e., when the user navigates to a category, product, etc. When it occurs, an init-manager:re-initialize event is sent to reinitialize the Insider APP, which forwards the insider_object data to Insider.
Example of the information object generated:
_10{_10 "page": {_10 "type":_10 "Home" | "Category" | "Search" | "Product" | "Confirmation" | "Content"_10 }_10}
Search/Category/Department/Collection/Brands page events
Pixel events: vtex:departmentView/vtex:categoryView/vtex:internalSiteSearchView
These events are triggered whenever the user visits department, category, search, collection, or brand pages, sending the data to insider_object.
Example of the generated information object:
_28{_28 "listing": {_28 "items": [_28 {_28 "id": "20",_28 "name": "Acer Aspire 5 Slim Laptop - Windows 10",_28 "currency": "BRL",_28 "product_image_url": "[https://codeby.vtexassets.com/arquivos/ids/160993/acer-aspire-5-slim-laptop-a515-43-r19l-silver.jpg?v=1777206750](https://codeby.vtexassets.com/arquivos/ids/160993/acer-aspire-5-slim-laptop-a515-43-r19l-silver.jpg?v=1777206750)",_28 "url": "[https://cabeinsider--codeby.myvtex.com/acer-aspire-5-slim-laptop-a515-43-r19l-silver/p](https://cabeinsider--codeby.myvtex.com/acer-aspire-5-slim-laptop-a515-43-r19l-silver/p)",_28 "taxonomy": ["Computer & Software"],_28 "unit_price": 3000,_28 "unit_sale_price": 339.15,_28 "stock": 10000_28 },_28 {_28 "id": "18",_28 "name": "Acer Aspire TC-885-UA92 Desktop - Windows 10",_28 "currency": "BRL",_28 "product_image_url": "[https://codeby.vtexassets.com/arquivos/ids/160992/acer-aspire-atc-885-ua92-desktop.jpg?v=1774652597](https://codeby.vtexassets.com/arquivos/ids/160992/acer-aspire-atc-885-ua92-desktop.jpg?v=1774652597)",_28 "url": "[https://cabeinsider--codeby.myvtex.com/acer-aspire-atc-885-ua92-desktop/p](https://cabeinsider--codeby.myvtex.com/acer-aspire-atc-885-ua92-desktop/p)",_28 "taxonomy": ["Computer & Software"],_28 "unit_price": 3000,_28 "unit_sale_price": 1287,_28 "stock": 10000_28 }_28 ]_28 }_28}
User data event
Pixel event: vtex:userData
This event is triggered when the user logs in, sending the user data to the insider_object.
Example of the information object generated:
_19{_19 "user": {_19 "uuid": "201d5ca5-d7ad-4de9-96a4-67e08355c415",_19 "gender": null,_19 "birthday": null,_19 "name": "matheus",_19 "surname": "cabe",_19 "username": "matheus",_19 "email": "matheus.pessoa@keyrus.com.br",_19 "phone_number": null,_19 "email_optin": false,_19 "sms_optin": false,_19 "language": "pt-BR",_19 "has_transacted": false,_19 "transaction_count": 0,_19 "gdpr_optin": true,_19 "return": true_19 }_19}
Product page event
Pixel event: vtex:productView
This event is triggered every time the user accesses a product page, sending the product data to the insider_object.
Example of the information object generated:
_24{_24 "product": {_24 "id": "32",_24 "groupcode": "20",_24 "name": "Acer Aspire 5 Slim Laptop - Windows 10",_24 "url": "[https://cabeinsider--codeby.myvtex.com/acer-aspire-5-slim-laptop-a515-43-r19l-silver/p?skuId=32](https://cabeinsider--codeby.myvtex.com/acer-aspire-5-slim-laptop-a515-43-r19l-silver/p?skuId=32)",_24 "product_image_url": "[https://codeby.vtexassets.com/arquivos/ids/160993/acer-aspire-5-slim-laptop-a515-43-r19l-silver.jpg?v=637580597517300000](https://codeby.vtexassets.com/arquivos/ids/160993/acer-aspire-5-slim-laptop-a515-43-r19l-silver.jpg?v=637580597517300000)",_24 "taxonomy": ["Computer & Software"],_24 "unit_price": 3000,_24 "unit_sale_price": 339.15,_24 "stock": 1000000,_24 "currency": "BRL",_24 "custom": {_24 "brand": "Brand",_24 "brandId": 9280,_24 "productReference": "880019",_24 "linkText": "acer-aspire-5-slim-laptop-a515-43-r19l-silver",_24 "categoryId": "9286",_24 "taxonomy": ["Computer & Software"],_24 "unit_price": 3000,_24 "unit_sale_price": 339.15_24 }_24 }_24}
Add to cart event
Pixel event: vtex:addToCart
This event is triggered whenever the user adds a product to the cart, sending the information of the added item to the insider_object.
Example of the generated information object:
_34{_34 "basket": {_34 "line_items": [_34 {_34 "product": {_34 "id": "32",_34 "name": "Acer Aspire 5 Slim Laptop - Windows 10",_34 "taxonomy": ["Computer & Software"],_34 "unit_price": 339.15,_34 "unit_sale_price": 339.15,_34 "currency": "BRL",_34 "url": "[https://cabeinsider--codeby.myvtex.com/acer-aspire-5-slim-laptop-a515-43-r19l-silver/p](https://cabeinsider--codeby.myvtex.com/acer-aspire-5-slim-laptop-a515-43-r19l-silver/p)",_34 "product_image_url": "[https://codeby.vteximg.com.br/arquivos/ids/160993/acer-aspire-5-slim-laptop-a515-43-r19l-silver.jpg?v=637580597517300000](https://codeby.vteximg.com.br/arquivos/ids/160993/acer-aspire-5-slim-laptop-a515-43-r19l-silver.jpg?v=637580597517300000)",_34 "stock": 1000000,_34 "groupcode": "20",_34 "custom": {_34 "brand": "Brand",_34 "brandId": 9280,_34 "categoryId": "9286",_34 "linkText": "acer-aspire-5-slim-laptop-a515-43-r19l-silver",_34 "productReference": "880019",_34 "taxonomy": ["Computer & Software"],_34 "unit_price": 339.15,_34 "unit_sale_price": 339.15_34 }_34 },_34 "quantity": 1,_34 "subtotal": 339.15_34 }_34 ],_34 "currency": "BRL",_34 "total": 339.15_34 }_34}
Purchase completion event
Pixel event: vtex:orderPlaced
This event is triggered every time the user completes a purchase. It sends the completed order data to the insider_object.
Example of information it generates:
_42{_42 "transaction": {_42 "order_id": "1351550508867",_42 "currency": "BRL",_42 "total": 374.24,_42 "payment_type": "bankInvoice",_42 "shipping_cost": 35.09,_42 "delivery": {_42 "country": "BRA",_42 "city": "São Paulo",_42 "district": "SP"_42 },_42 "line_items": [_42 {_42 "product": {_42 "id": "32",_42 "name": "Acer Aspire 5 Slim Laptop - Windows 10",_42 "taxonomy": ["Computer & Software"],_42 "unit_price": 339.15,_42 "unit_sale_price": 339.15,_42 "currency": "BRL",_42 "url": "https://cabeinsider--codeby.myvtex.com/acer-aspire-5-slim-laptop-a515-43-r19l-silver/p",_42 "product_image_url": "https://codeby.vteximg.com.br/arquivos/ids/160993/acer-aspire-5-slim-laptop-a515-43-r19l-silver.jpg?v=637580597517300000",_42 "stock": 1000000,_42 "groupcode": "20",_42 "custom": {_42 "brand": "Brand",_42 "brandId": 9280,_42 "categoryId": "9286",_42 "linkText": "acer-aspire-5-slim-laptop-a515-43-r19l-silver",_42 "productReference": "880019",_42 "taxonomy": ["Computer & Software"],_42 "unit_price": 339.15,_42 "unit_sale_price": 339.15_42 }_42 },_42 "quantity": 1,_42 "subtotal": 339.15_42 }_42 ]_42 }_42}
Custom VTEX Pixel events
In some cases, the store may need to create custom components to meet specific business rules. In these situations, VTEX Pixel's standard events may no longer be triggered automatically. To work around this, you need to use the vtex.pixel-manager app to manually trigger Pixel events and ensure that data is sent correctly to the Insider APP.
To find out which events the Insider app uses, see the section above with the complete list of supported events.
How to trigger custom events with vtex.pixel-manager
Below is a guide on how to use the vtex.pixel-manager app to manually trigger Pixel events, ensuring that data is sent to the Insider app even in custom components.
Step 1: Add the vtex.pixel-manager app dependency
In your project's manifest.json file, add the following dependency:
_10{_10 "dependencies": {_10 "vtex.pixel-manager": "1.x"_10 }_10}
Step 2: Import the functionality of the vtex.pixel-manager APP
Import the usePixel function from vtex.pixel-manager into your React component:
_10import { usePixel } from 'vtex.pixel-manager'
Step 3: Use the push function from the vtex.pixel-manager APP
Example within your React component:
_29const { push } = usePixel()_29_29push({_29 // The name given to the event in the “minicart.v2” block of your theme (customPixelEventId)_29 id: 'add-to-cart-button',_29 event: 'addToCart',_29 items: [_29 {_29 brand: 'brand',_29 category: 'category-1/category-2/category-3',_29 detailUrl: '/acer-aspire-5-slim-laptop-a515-43-r19l-silver/p',_29 ean: '4909603621958',_29 imageUrl:_29 'https://codeby.vtexassets.com/arquivos/ids/160992/acer-aspire-atc-885-ua92-desktop.jpg',_29 name: 'Acer Aspire 5 Slim Laptop - Windows 10',_29 price: 3000,_29 priceIsInt: true,_29 productId: '20',_29 productRefId: 'MP2018.130',_29 quantity: 1,_29 referenceId: 'MP2018.130',_29 seller: '1',_29 sellerName: 'sellerName',_29 sellingPrice: 2500,_29 skuId: '1367',_29 variant: 'Acer Aspire 5 Slim Laptop - Windows 11',_29 },_29 ],_29})
IMPORTANT: Each event has its own object format to be sent within the push function. You will need to navigate through VTEX APPs GitHub to analyze which event and its object format to be sent.
How to add custom attributes to insider_object
The data mentioned above that the app collects is the default data. However, now you have the ability to insert custom attributes into the insider_object.
The app exports the following JavaScript function into the window object:
_10window.insertCustomAttrInsider('subObject', 'customObject')
The first argument is the subObject. The subObject supported is the same as as what Insider supports, as mentioned in the Insider documentation
Supported subObject are:
_101. page_102. user_103. listing_104. product_105. basket_106. transaction
The second argument is the object of your custom properties. You can insert any object with any property and values here
So, if you want to add a custom attribute like whatsapp_optin to the user subObject and a custom attribute, you can do the following:
_10const customFields = {_10 whatsapp_option: true,_10 custom: {_10 some_property: 'value',_10 },_10}_10window.insertCustomAttrInsider('user', customFields)
After doing that, your insider_object will look like this:
_26{_26 "page": {_26 "type": "Home"_26 },_26 "user": {_26 "uuid": "fh23fe1d-f01e-4cee-85f0-c4dc25c09e57",_26 "gender": null,_26 "birthday": null,_26 "name": null,_26 "surname": null,_26 "username": null,_26 "email": "user.email@codeby.com.br",_26 "phone_number": null,_26 "email_optin": false,_26 "sms_optin": false,_26 "language": "pt-BR",_26 "has_transacted": false,_26 "transaction_count": 0,_26 "gdpr_optin": true,_26 "return": true,_26 "custom": {_26 "some_property": "value"_26 },_26 "whatsapp_optin": true_26 }_26}
AddToCart function
A new function has been added to the app and is available on the global window object as AddToCart. This function enables you to add a product directly to the cart programmatically.
_10window.AddToCart(SKU, Quantity, Seller)
Parameters:
SKU (string): The Stock Keeping Unit of the product. The SKU represents the physical unit and product variation, containing the unique characteristics that define the specific type of product.
Quantity (integer): The number of units of the product to be added to the cart.
Seller (string): The seller. In VTEX, products can be supplied by multiple sellers, making it important to specify the seller from which the product is sourced.
_10// Example: Add 2 units of the product with SKU '123' from seller '1'_10window.AddToCart('123', 2, '1')
This function is available only within the VTEX IO environment. For example, checkout pages are not built on VTEX IO, so the AddToCart function is not available there.
In the admin panel, there is a field called “Minicart Custom Pixel Event ID,” where you can enter the value
customPixelEventIdfound in the “minicart.v2” block of your theme. Enter the link to the panel in Admin and GitHub for the default vtex theme where this value is set. If it is different in your theme, enter this value in the Insider panel in Admin.
Video showing how to get the customPixelEventId and where to place it in the Insider panel
