The specified version of the app (0.x.0) does not exist. This page is about the latest stable version, which is 1.3.1.
Additional information about this app can be found on ActiveCampaign's website here.
The ActiveCampaign app connects your store with your ActiveCampaign account to provide the following syncing functionality from VTEX to your ActiveCampaign account:
- Site Tracking
- Purchase Data Sync
- Abandoned Cart Sync
- Customer Data Sync
- Order Data Sync
- Data of "I want to receive the newsletter" checkbox from VTEX checkout to facilitate GDPR compliance (requires configuration of field in ActiveCampaign platform)
Configuration
⚠️ BEFORE installing this app:
-
Ensure you already have an ActiveCampaign account and can access it during set up.
-
Ensure the VTEX environment you intend to install the app on is set up with a website host under "Store" on https://{AccountName}.myvtex.com/admin/license-manager/#/account-details NOTE: If you visit this page and see a blank screen, you will need to ask for Owner (Admin Super) access to the VTEX account, or access to the "License Manager" screens in VTEX, to verify the host is set up.
-
Ensure that you have access to "Master Data" in VTEX admin
-
(Optional, but HIGHLY RECOMMENDED) ALL contacts that are synced to ActiveCampaign from VTEX are tagged as VTEX-customer , however, in order to facilitate opt-in marketing for ActiveCampaign, you must first set up a field within the ActiveCampaign platform called "Accepts Marketing". This field is used to sync the "I want to receive the newsletter" checkbox data from VTEX checkout.
Instructions for this set up is as follows:
In ActiveCampaign admin, click Settings> Manage Fields
- Click
Add Field
Fill in the following fields:
-
Field Name- Accepts Marketing -
Group- General Details -
Field Type- Dropdown -
Options: True -
Options: False
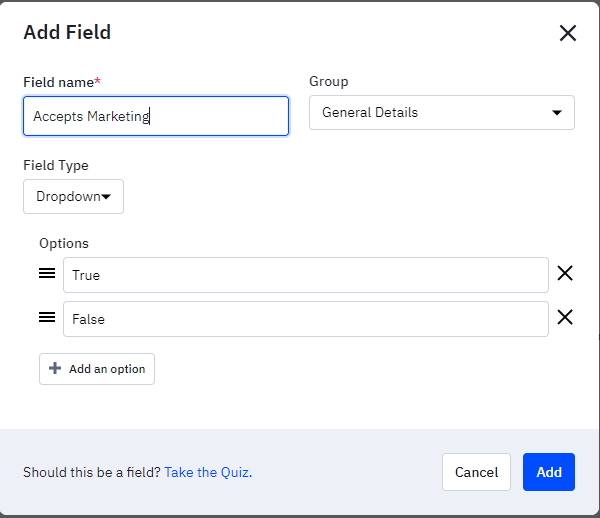
- Click
Add.
If you click to edit this field, it should look like this:
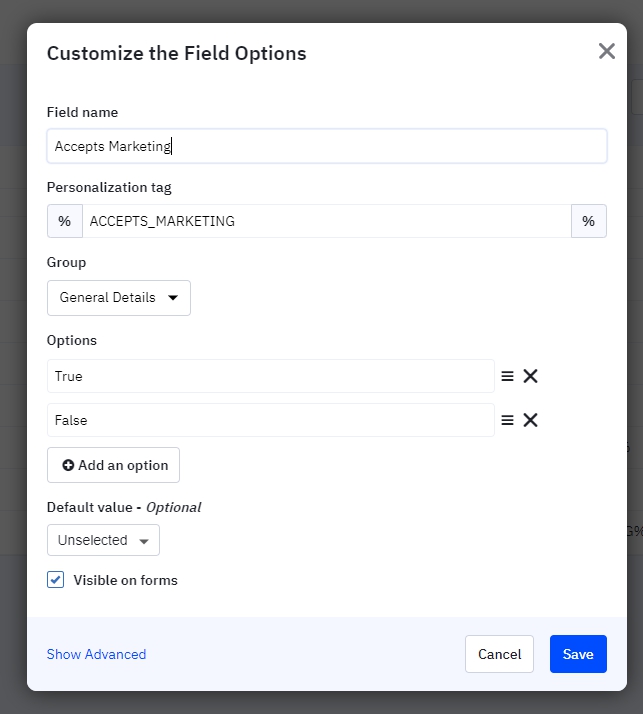
After this field is populated with data within VTEX, it can be used to create automations to add customers to lists if you wish to do so. Please see ActiveCampaign's documentation for further information about how to do this.
(REQUIRED) Connecting your ActiveCampaign and VTEX accounts
-
Install the
activecampaignpartnerus.activecampaignapp in the desired VTEX environment by accessing the Apps > App Store in VTEX admin. Select the ActiveCampaign app and then clickInstall. -
In the VTEX account's admin, access Apps > My Apps and then select the ActiveCampaign box;
-
Once in the app's settings page, define the app's settings:
Account Name- (Account from your ActiveCampaign account in Settings > Account – For example, If your account is xyz123.activehosted.com, you would only enter xyz123 as the Account Name in VTEX.Account API Token- (Key from your ActiveCampaign account in Settings > Developer )Tracking setAccountID- (Tracking Code Account ID from your ActiveCampaign account in Settings > Tracking )ConnectionID- DO NOT enter data in this field. This field should be blank.
-
Click
SAVE -
Next, find the ActiveCampaign Menu.
- On the "older" VTEX admin, it is In the VTEX admin sidebar, under "PRODUCTS"
- On the "newer" VTEX admin, it is on the "apps" menu slideout under "INSTALLED APPS"
- Click on ActiveCampaign > Connection ID Configuration
- Click
CONFIGURE - Wait for the fields to populate.
- Click the drop down for
EXTERNAL IDand select the correct ID for your store from the list. - Click the drop down for
LINK URLand select the correct URL for your store from the list. - Click
CONTINUE CONFIGURATION.
⚠️ You will see the message "Account has been updated." Then, the page will refresh and display the app Settings page, where your ConnectionID that was left blank earlier has now been populated.
-
Click
SAVE -
Click on ActiveCampaign > Purchase Data Configuration
Tracking setAccountID- Enter the 3-letter ISO currency code for your store (such as USD for United States Dollars)- (Optional)
Send Purchase Data- Click the checkbox next to "Send Purchase Data?" if you wish to have orders that are placed in your store to sync to ActiveCampaign
If you choose this option, the customer data, including "accepts_marketing" field and order data will be sent to ActiveCampaign when the customer reaches the Order Confirmation page if the payment has been captured at that time. If ActiveCampaign does not receive the order data at this time, the order will be sent to ActiveCampaign when it has been invoiced in VTEX.
NOTE: Fulfillment orders do not sync into ActiveCampaign.
- Click
SAVE
⚠️ You will see the message "Account has been updated."
- Click on ActiveCampaign > Connections
- This information should match your Connected Integrations in your ActiveCampaign account
- To confirm this, go to your ActiveCampaign platform under Settings > Integrations. You should see the message "Your integration is successfully connected" on this page.
(OPTIONAL) Abandoned Cart Sync Configuration
⚠️ This will sync customers with their abandoned cart data to ActiveCampaign, which will allow you to send emails to remind your customers about their abandoned cart. To allow this, you will need to configure an Abandoned Cart Trigger in VTEX.
Configuring VTEX Abandoned Cart Triggers
- In the VTEX admin, access Master Data. After logging in to Master Data:
- Click
Advanced Settings - Click
Data Structure - Click
Trigger - Click
Add New
- You will now fill in the information as follows:
Name- Active Campaign TriggerData Entity- Cliente- Now, on the Rules tab:
Trigger Rule- O valor de um atributo for alteradoField- Última sessão- Click
Add Filterthen select / enter:- Checkout
- Diferente
- Finalizado
- Click
Add Filterthen select / enter:- Checkout
- Não está nulo
- Click
Add Filterthen select / enter:- Carrinho
- Não está nulo
- Click
Add Filterthen select / enter:- Último Carrinho
- Não está nulo
- Click the
Scheduletab.
- The
Scheduletab is where you will set when you would like the Abandoned Cart information to be sent to ActiveCampaign.- The options are:
Run ASAP- this sends the data to ActiveCampaign within about 45 minutes (see note below) after the customer abandons their cart. If you use this setting, depending on your settings in ActiveCampaign, the customer may receive an abandoned cart email even if they have placed an order.Schedule on specific date- this setting allows you enter a specific date to send the data to ActiveCampaign - this would not be recommended for abandoned cart emailsSchedule on dynamic date- this setting allows you to set a time length that will pass before VTEX sends the data to ActiveCampaign (this can be based on the customer's last session (Data de Última sessão). NOTE: Most clients choose this one and set it to 2 hours after the last session.
- The options are:
⚠️ NOTE: Per VTEX documentation here, "A page's session expires in 30 minutes. Only after that time, the system schedules the abandoned cart trigger. In other words, the time to be considered is the session's time + the trigger schedule."
- After making your schedule selection, click the
If Positivetab. - On the
If Positivetab, select/enter the following in these fields only:Action- Send an HTTP request- Under
Request Data:URL- (enter the URL below, replacing www.yourwebsiteurl.com with your website's URL) https:// www.yourwebsiteurl.com /api/io/activeCampaign/abandonedCartMethod- POST- Headers:
Name- Content-Type - Headers:
Value- application/json Content as JSON- (replace the content that is there with the below content)
_21{_21 "rclastcart": "{!rclastcart}",_21 "rclastcartvalue": "{!rclastcartvalue}",_21 "rclastsession": "{!rclastsession}",_21 "rclastsessiondate": "{!rclastsessiondate}",_21 "email": "{!email}",_21 "userId": "{!userId}",_21 "firstName": "{!firstName}",_21 "lastName": "{!lastName}",_21 "localeDefault": "{!localeDefault}",_21 "id": "{!id}",_21 "accountId": "{!accountId}",_21 "accountName": "{!accountName}",_21 "dataEntityId": "{!dataEntityId}",_21 "createdBy": "{!createdBy}",_21 "createdIn": "{!createdIn}",_21 "updatedBy": "{!updatedBy}",_21 "updatedIn": "{!updatedIn}",_21 "lastInteractionBy": "{!lastInteractionBy}",_21 "lastInteractionIn": "{!lastInteractionIn}"_21}
- Under
Response Action:Data Entity- Cliente- Parameters:
Name- Anexo
- Click the
If Negativetab.- No changes are needed here
- Click
SAVE
(OPTIONAL) Customer Sync
⚠️ This sync will sync all existing customer data from VTEX into ActiveCampaign including the "accepts_marketing" field. Before proceeding with this sync, ensure that you have your automations such as Welcome Series emails, turned off in ActiveCampaign.
-
Click on ActiveCampaign > Customers Sync
-
After the page loads, click
SYNC CUSTOMERS -
After confirming your automations are disabled in ActiveCampaign, click
CONTINUE SYNC
a. A message "Customer Sync has started" will appear on the page.
(OPTIONAL) Order Sync
⚠️ This sync will sync all historical order data from VTEX into ActiveCampaign. Before proceeding with this sync, ensure that you have your automations turned off in ActiveCampaign.
-
Click on ActiveCampaign > Orders Sync
-
After confirming your automations are disabled in ActiveCampaign, click
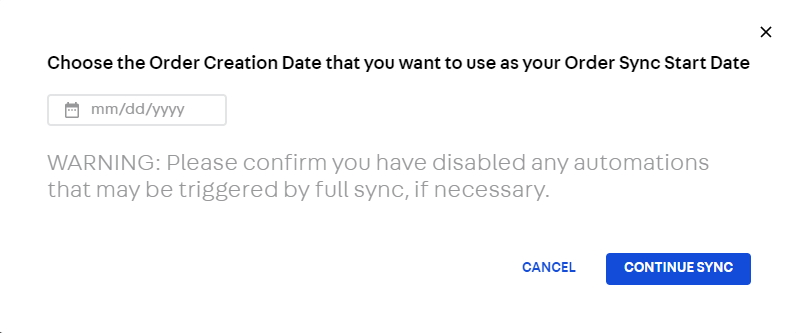
SYNC ALL ORDERS -
A dialog box will appear where you can select the date on the calendar you want to use as your sync beginning date – For example, you may want to only sync the last 6 months of data instead of all historical orders placed.
a. Select the date you want to use as your beginning sync date.
b. Click CONTINUE SYNC
- A message "Order Sync has started" will appear on the page.
a. Orders placed starting on your beginning date through the current date will sync.
b. Order data will sync into ActiveCampaign at a rate of about 1000 - 1500 per hour.
In addition to syncing all orders, you have the option to choose to sync individual orders manually. To do this:
-
Enter
order IDthat you want to sync into the search box at the top of the page and hit Enter -
Click
checkboxnext to the order you want to sync -
After confirming your automations are disabled in ActiveCampaign , click
SYNC SELECTED ORDERS
A message will appear that says "Order Sync has Started" will appear.