Contributing with new CSS Handles
CSS Handles are CSS classes mapped to HTML elements, allowing for flexible customization of store components. The more CSS Handles available, the greater the potential for design customization.
This guide walks you through adding a new CSS Handle, using the customization of a filter on the Search Results page as an example.
Before you begin
Before you begin, we recommend installing the React Chrome extension to inspect the React component tree of any store page.
Instructions
Step 1 - Identifying the React component
-
Open the store page you are working on.
-
Right-click on the HTML element you want to customize, then select Inspect. You should see the HTML structure like the following example:
_10<div tabindex="0" role="link" class="ph5 ph3-ns pv5 pv1-ns lh-copy pointer hover-bg-muted-5 c-muted-1">Hats</div> -
In Chrome Dev Tools, go to the
Componentstab and find the React component that wraps this element. For example,CategoryItem.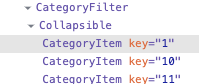
Step 2 - Forking the app's repository
-
Fork the repository of the app that contains the block wrapping the HTML element you are targeting.
-
Clone the forked repository to your local files.
_10git clone {repoUrl} -
Open the project in your preferred code editor and locate the React component identified earlier (e.g.,
CategoryItem.jsx).
Step 3 - Adding a new CSS Handle
Now, depending on how the component imports its CSS, there are two ways to add a CSS Handle:
- Using the
import {useCssHandles} from 'vtex.css-handles'function. - Using the
import styles from './styles.css'function.
Using the import {useCssHandles} from 'vtex.css-handles' function
-
Locate the variable passed to the
useCssHandleshook (e.g.,CSS_HANDLES). -
Add the new CSS Handle to the array:
_10const CSS_HANDLES = [_10'container',_10'element',_10+ 'headline',_10]Note that the
useCssHandleshook will create an object where each key corresponds to the CSS Handle you defined, and the value is a unique, automatically generated CSS class name. So,handles.container,handles.element, andhandles.headlinewill contain these generated class names. For a component calledfoobar, the generated class names might look like this:vtex-foobar-1-x-container,vtex-foobar-1-x-element,vtex-foobar-1-x-headline. -
Apply the new CSS Handle to the desired HTML element using the
handlesvariable: -
Save your changes.
Using the import styles from './styles.css' function
-
Identify and open the CSS file imported in the component (e.g.,
searchResult.css): -
Add a new class to the CSS file with the name of the new CSS Handle:
-
Go back to the React component file and add the new CSS Handle to the desired HTML element. Remember to use the name of the function variable (in our example,
styles) when adding it: -
Save your changes.
Step 4 - Checking your changes
- Using the terminal and the VTEX IO CLI, log in to a VTEX account and use a Development workspace to link the app you are working on.
- Access the account's website through the development workspace (
{workspaceName}--{accountName}.myvtex.com) and inspect the modified HTML element to verify if the new CSS class is being applied correctly.
Following our example, we would have something like:
_10<div class="vtex-foobar-1-x-headline ph0 mr2">
(Optional) Step 5 - Adding modifiers
To customize elements based on user interactions, you can apply modifiers to CSS Handles.
Handle modifiers work as identifiers. They are responsible for overriding the HTML element style according to the behavior assumed by them on the interface, according to user interaction.
Let's suppose you have a handle called handles.slide for each slide of a slider and want to customize the currently visible slide via CSS. For this purpose, you should add a modifier to handles.slide, allowing customization according to the user's navigation.
-
Import the
applyModifiersmethod:import {useCssHandles, applyModifiers} from 'vtex.css-handles' -
Instead of directly passing the handle, apply the
applyModifiersmethod:_10-<div class={{`$\{handles.slide\}`}}">...</div>_10+<div class={{`$\{applyModifiers(handles.slide, isCurrentSlide ? 'active' : undefined\}`}}">...</div>This results in:
_10<div class="vtex-foobar-1-x-slide vtex-foobar-1-x-slide--active">...</div>_10<div class="vtex-foobar-1-x-slide">...</div>_10<div class="vtex-foobar-1-x-slide">...</div>
Step 6 - Committing your changes
After verifying that the new CSS class is correctly rendered, follow these steps to commit and submit your updates:
-
Use Git and GitHub to create a new branch for your changes.
-
Open the
CHANGELOG.mdfile and add a new entry under the[Unreleased]section to briefly describe your changes. For example:_10## [Unreleased]_10### Added_10- New CSS Handle `headline`. -
In the
docsfolder, update the documentation to include the new CSS Handle. Modify the Customization section and the CSS Handles table as in the example below:_10| CSS Handles |_10| ----------- |_10| `container` |_10| `element` |_10+| `headline` | -
Commit your updates with a clear, descriptive message.
-
Push your branch to your forked repository.
-
Open a Pull Request for the team. In the Pull Request description, include a link to the development workspace where your changes can be tested. For example:
https://john--storecomponents.myvtex.com.
After your Pull Request is reviewed and approved, your changes will be merged, making the new CSS Handle available to other users and contributing to the app's improvement.