Facebook Business Extension
The Facebook Business Extension and Conversions API app is the one-stop shop for merchants to easily connect their stores to Facebook services through the FBE platform. FBE stands for Facebook Business Extension and supports integration with facebook features such as Catalog, Facebook Pixel, Conversions Api, and call-to-action buttons for Facebook and Instagram pages.
Table of Contents
- Table of Contents
- Compatibility
- Getting Started
- Facebook Features
- Ads Plugin
- Conversions API Integration
- Disconnecting from FBE
Compatibility
This app is fully compatible with IO stores, and partially compatible with Legacy (or headless) stores.
| Features | Legacy | IO |
|---|---|---|
| Facebook Pixel | ❌ | ✅ |
| Conversions API | ✅ | ✅ |
| Catalog Sync | ✅ | ✅ |
| Call-To-Action Buttons | ✅ | ✅ |
This means legacy stores need to do a few extra steps to optimize their Pixel/Conversions API setup, which is explained in the later topics of this documentation.
This app is fully compatible with the Facebook Pixel App. FBE detects if you've selected the same pixel and replaces the Facebook Pixel App with its own Pixel App, that is tailored to work properly with Conversions API.
This app is fully compatible with the Facebook Connector. When you configure FBE, if you already have the catalog sync configured, the Facebook Connector won't be impacted and will keep working as usual. Otherwise, FBE automatically configures the Facebook Connector to enable Catalog synchronization with Facebook.
This app is available in all countries, as long as the used currency is supported by Facebook Ads. You can check an updated list of all supported currencies in this link: Accepted Currencies for Facebook Ads
Getting Started
To configure the Facebook Business Extension and Conversions API app in the VTEX Admin, check out the documentation Integration with Facebook Business Extension.
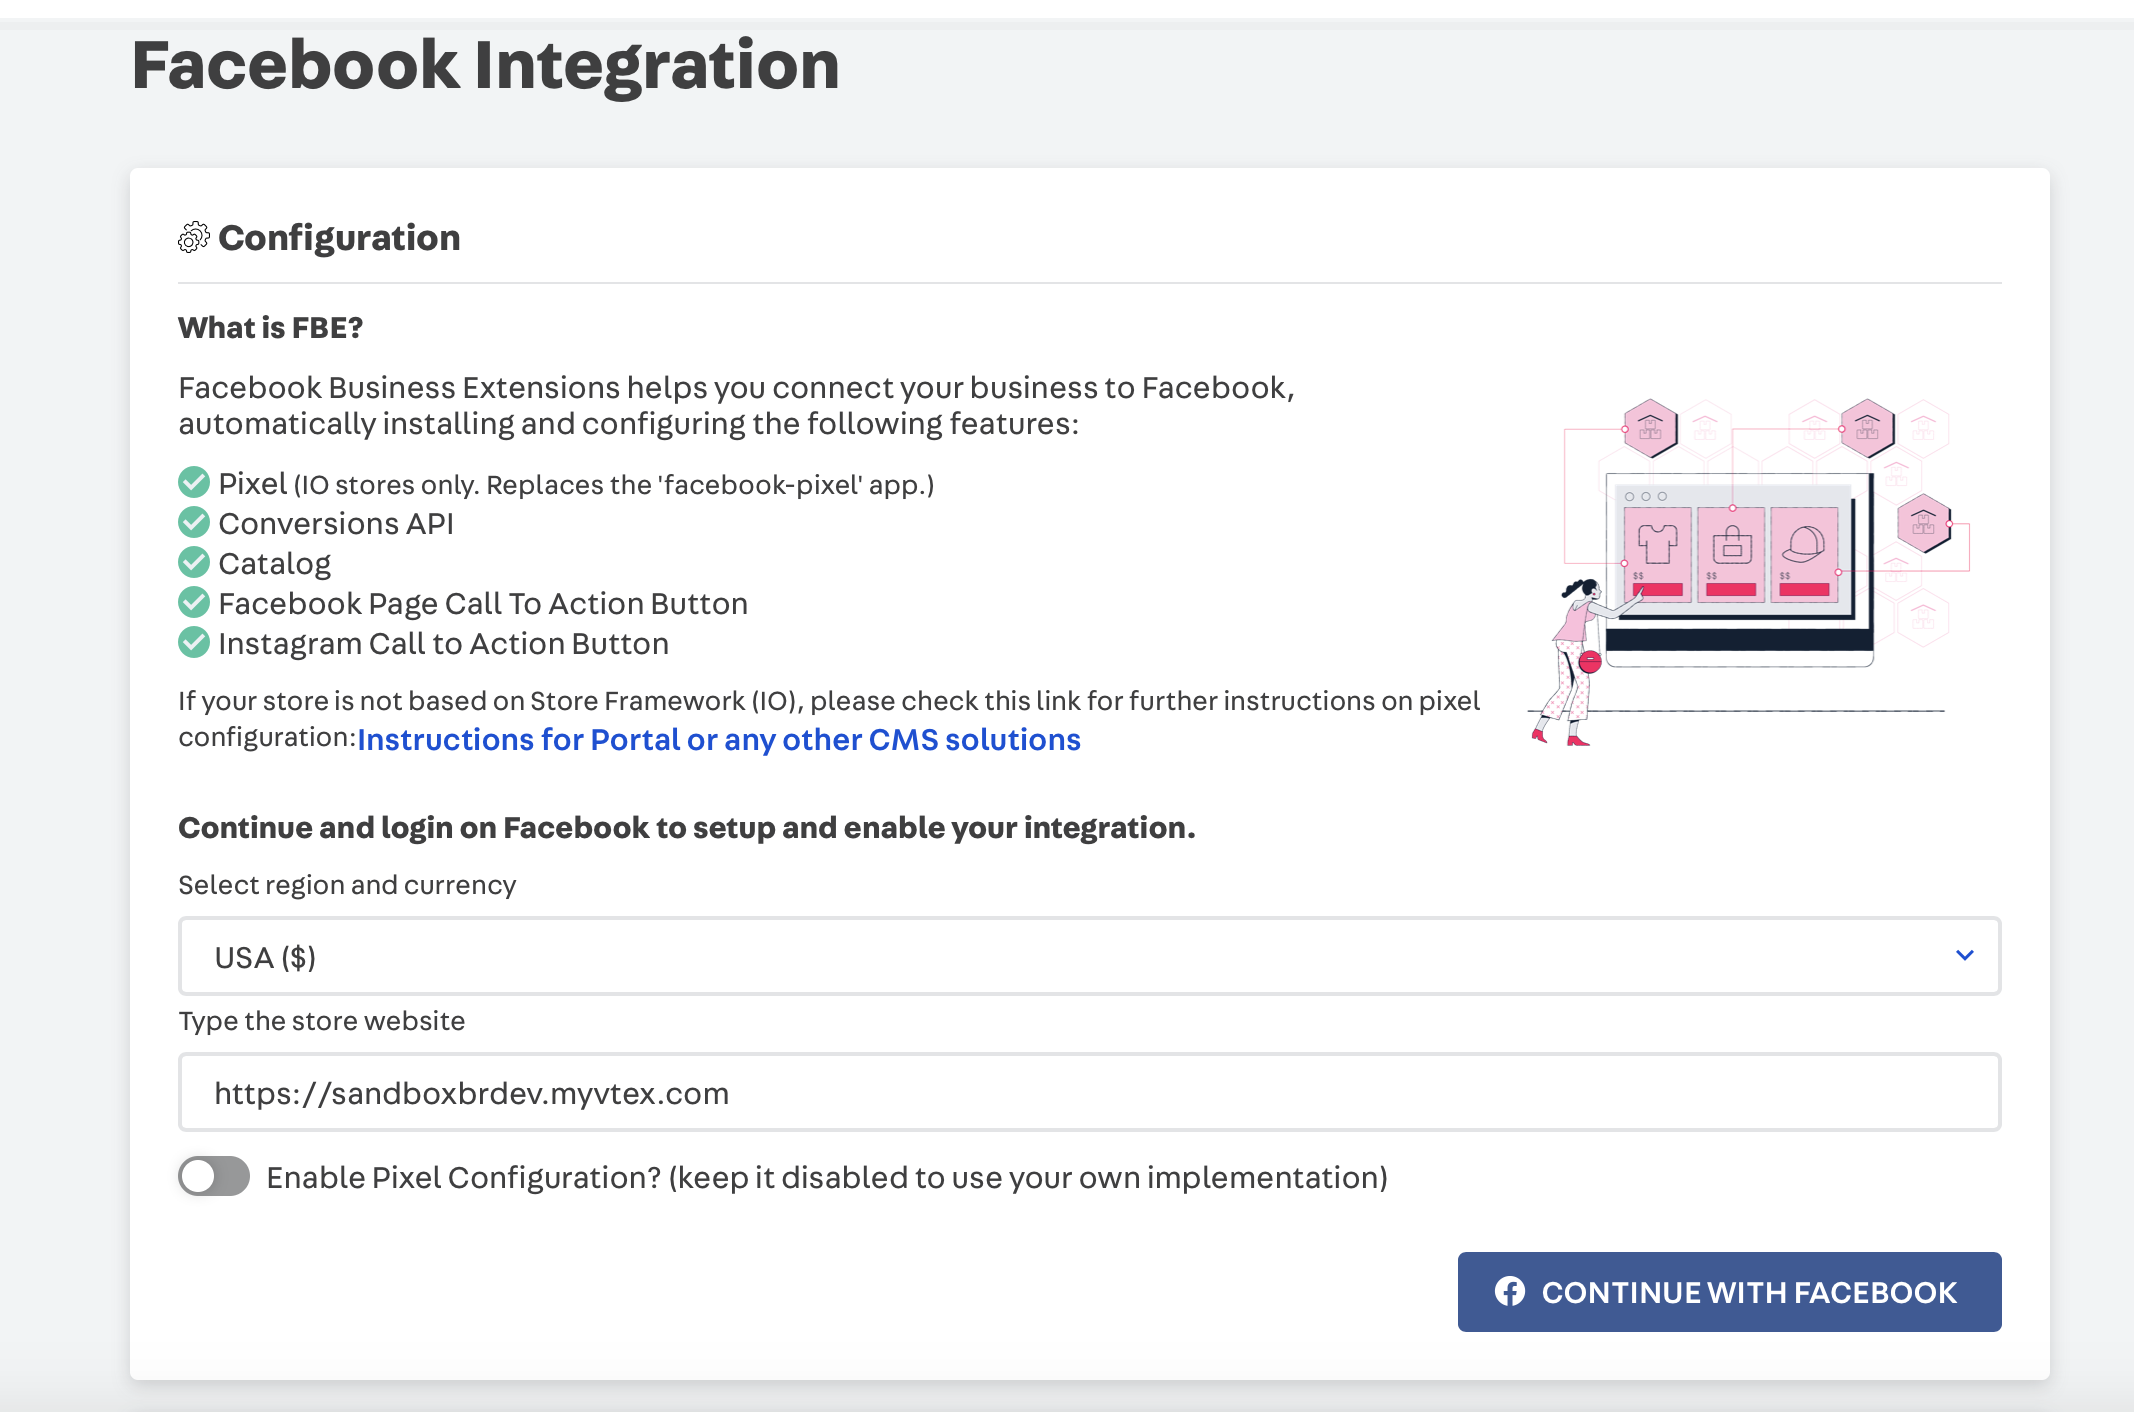
After installing the Facebook Business Extension and Conversions API app, you can connect to your Facebook account through the Admin menu, under Marketplace -> Facebook.
Region, currency settings and the store URL will be automatically filled in but you can double check these settings and change if needed.
Store URL, region, and currency settings are saved in order to correctly fire store events such as AddToCart and Purchase, and to enable call-to-action buttons on your store's social media pages (Facebook, Instagram, etc)
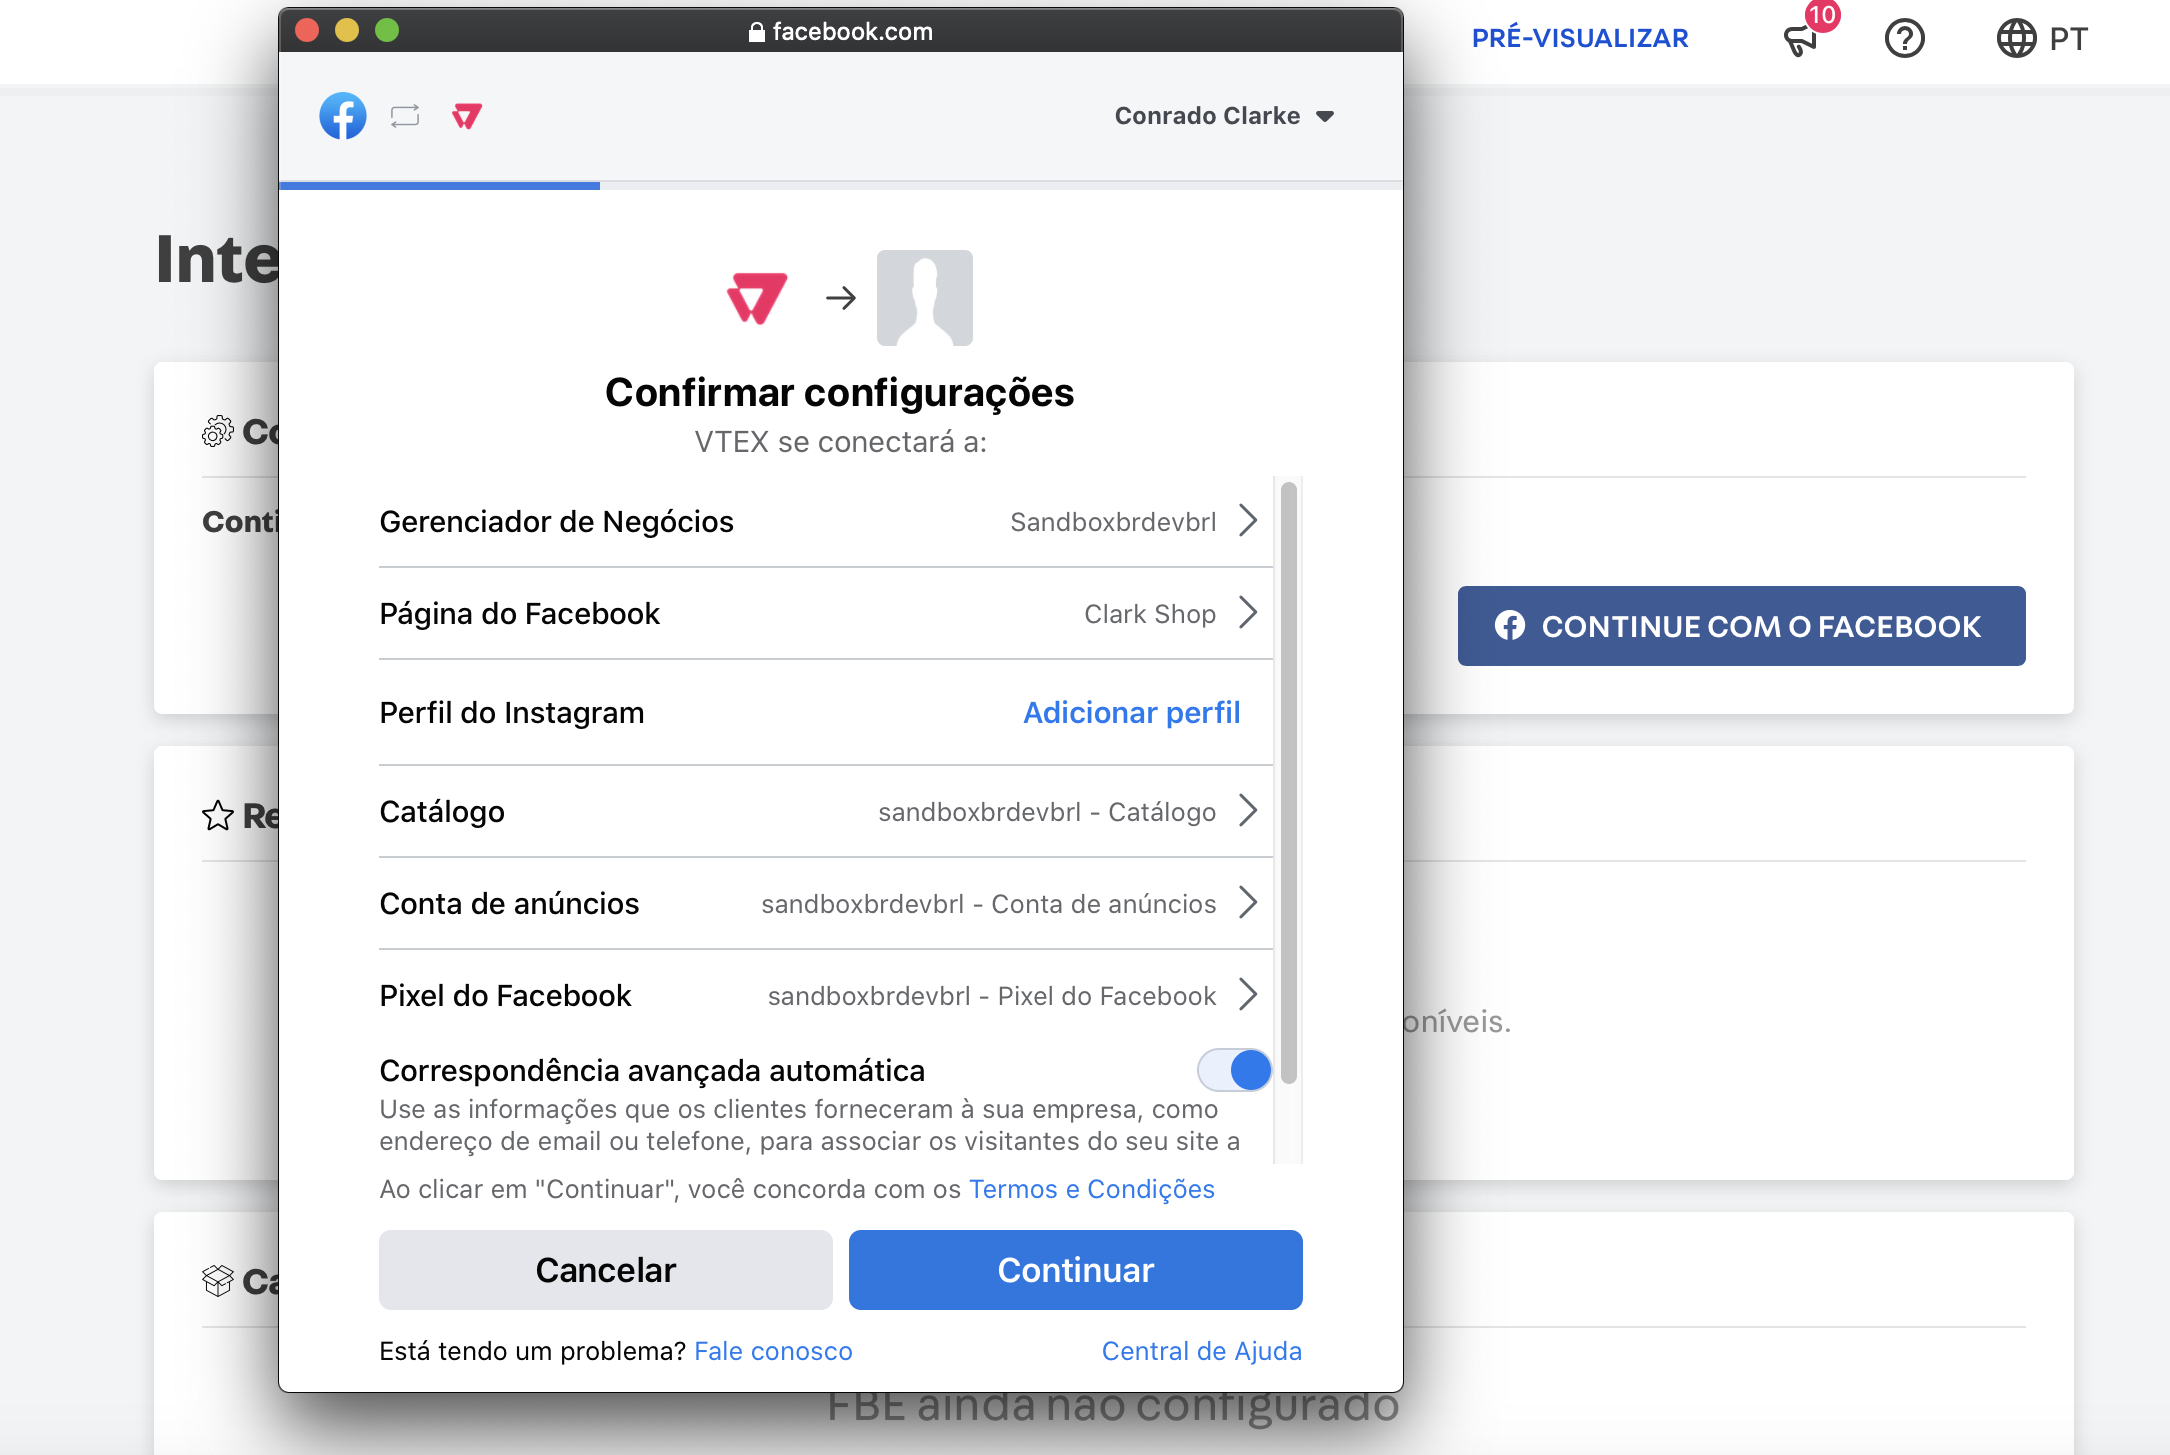
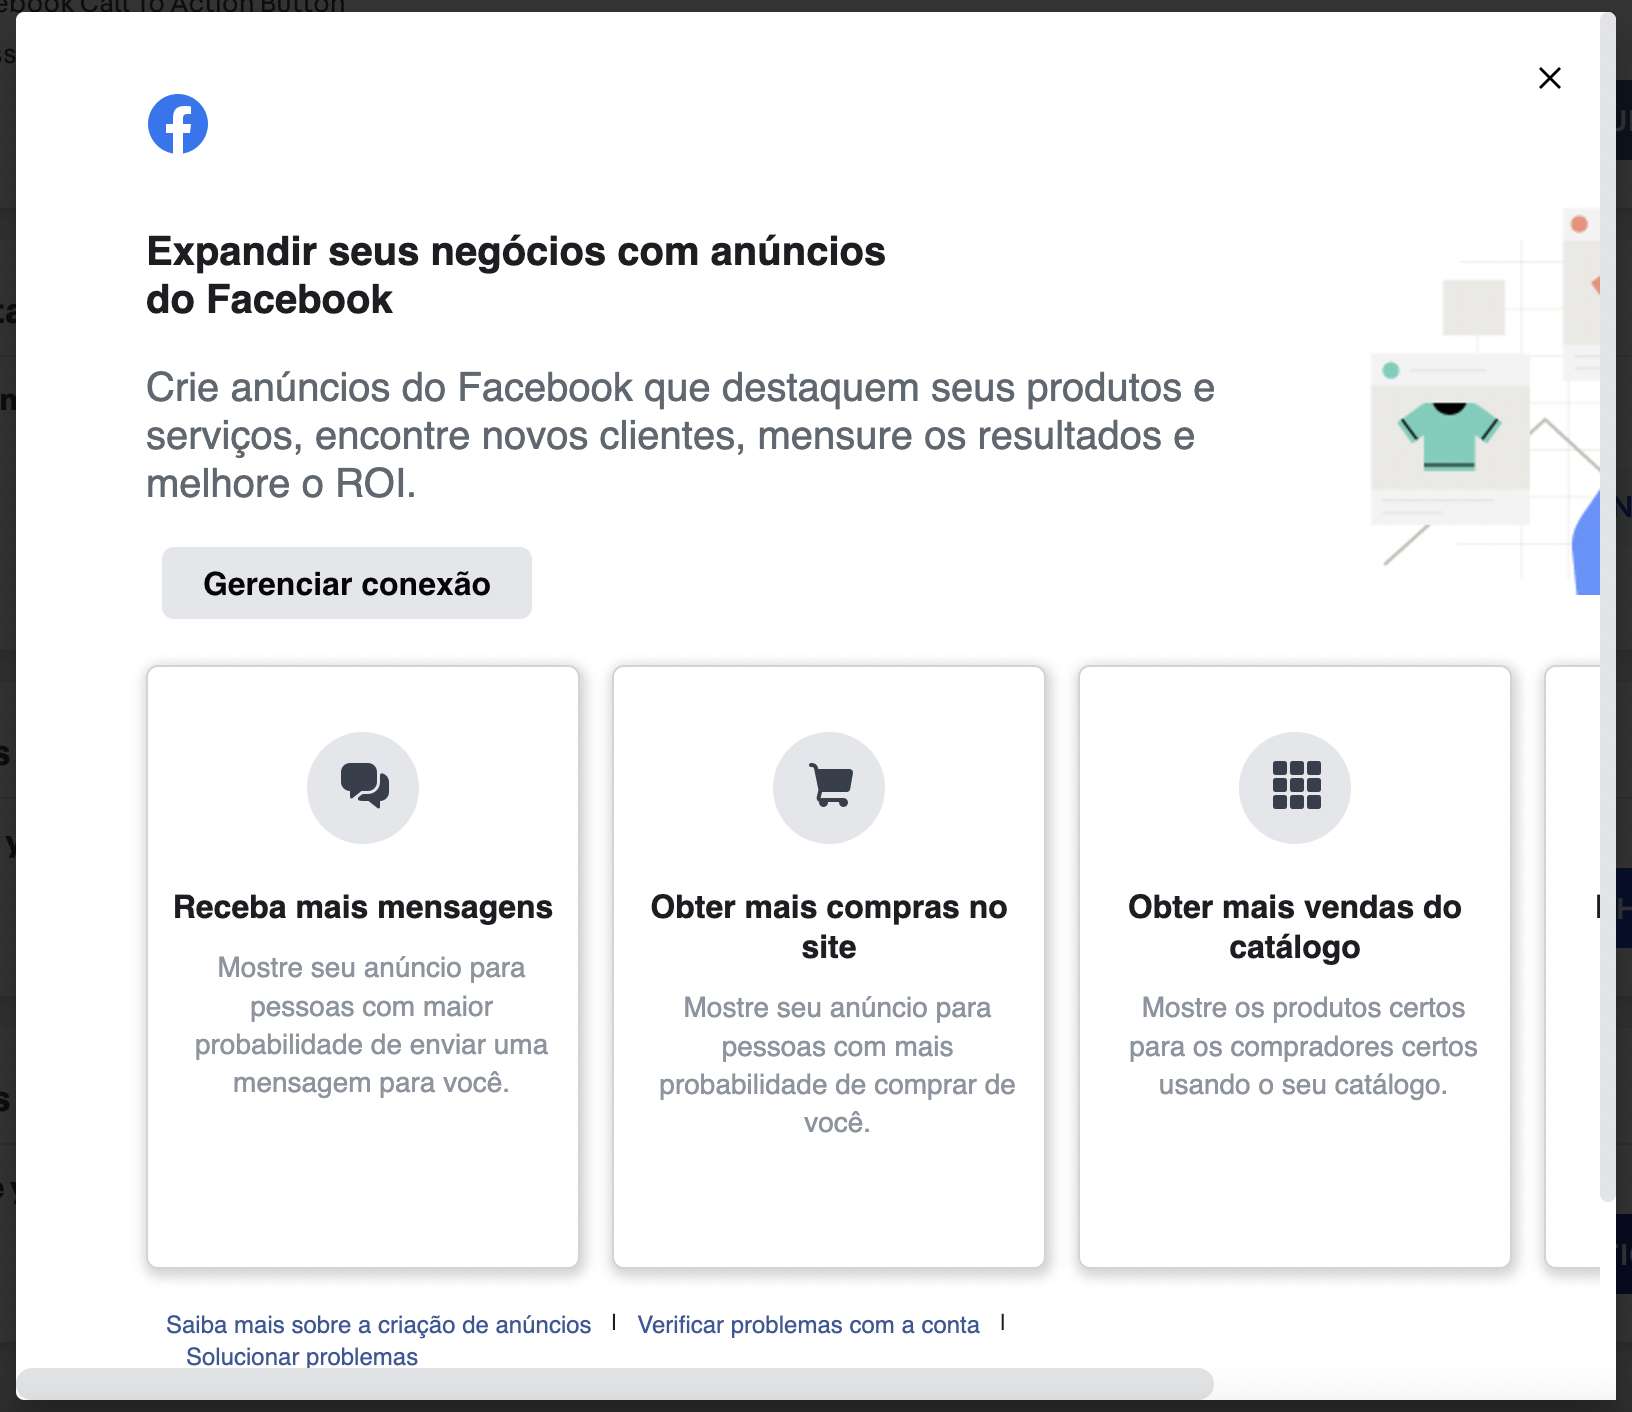
Upon clicking the Connect with Facebook button, a popup is shown and the user can log in to their business account and select their Facebook assets such as the business page, the Facebook pixel, and the catalog to sync with VTEX products:
After confirming, you can check your integration status and the installed features, such as call-to-action buttons and catalog configuration:
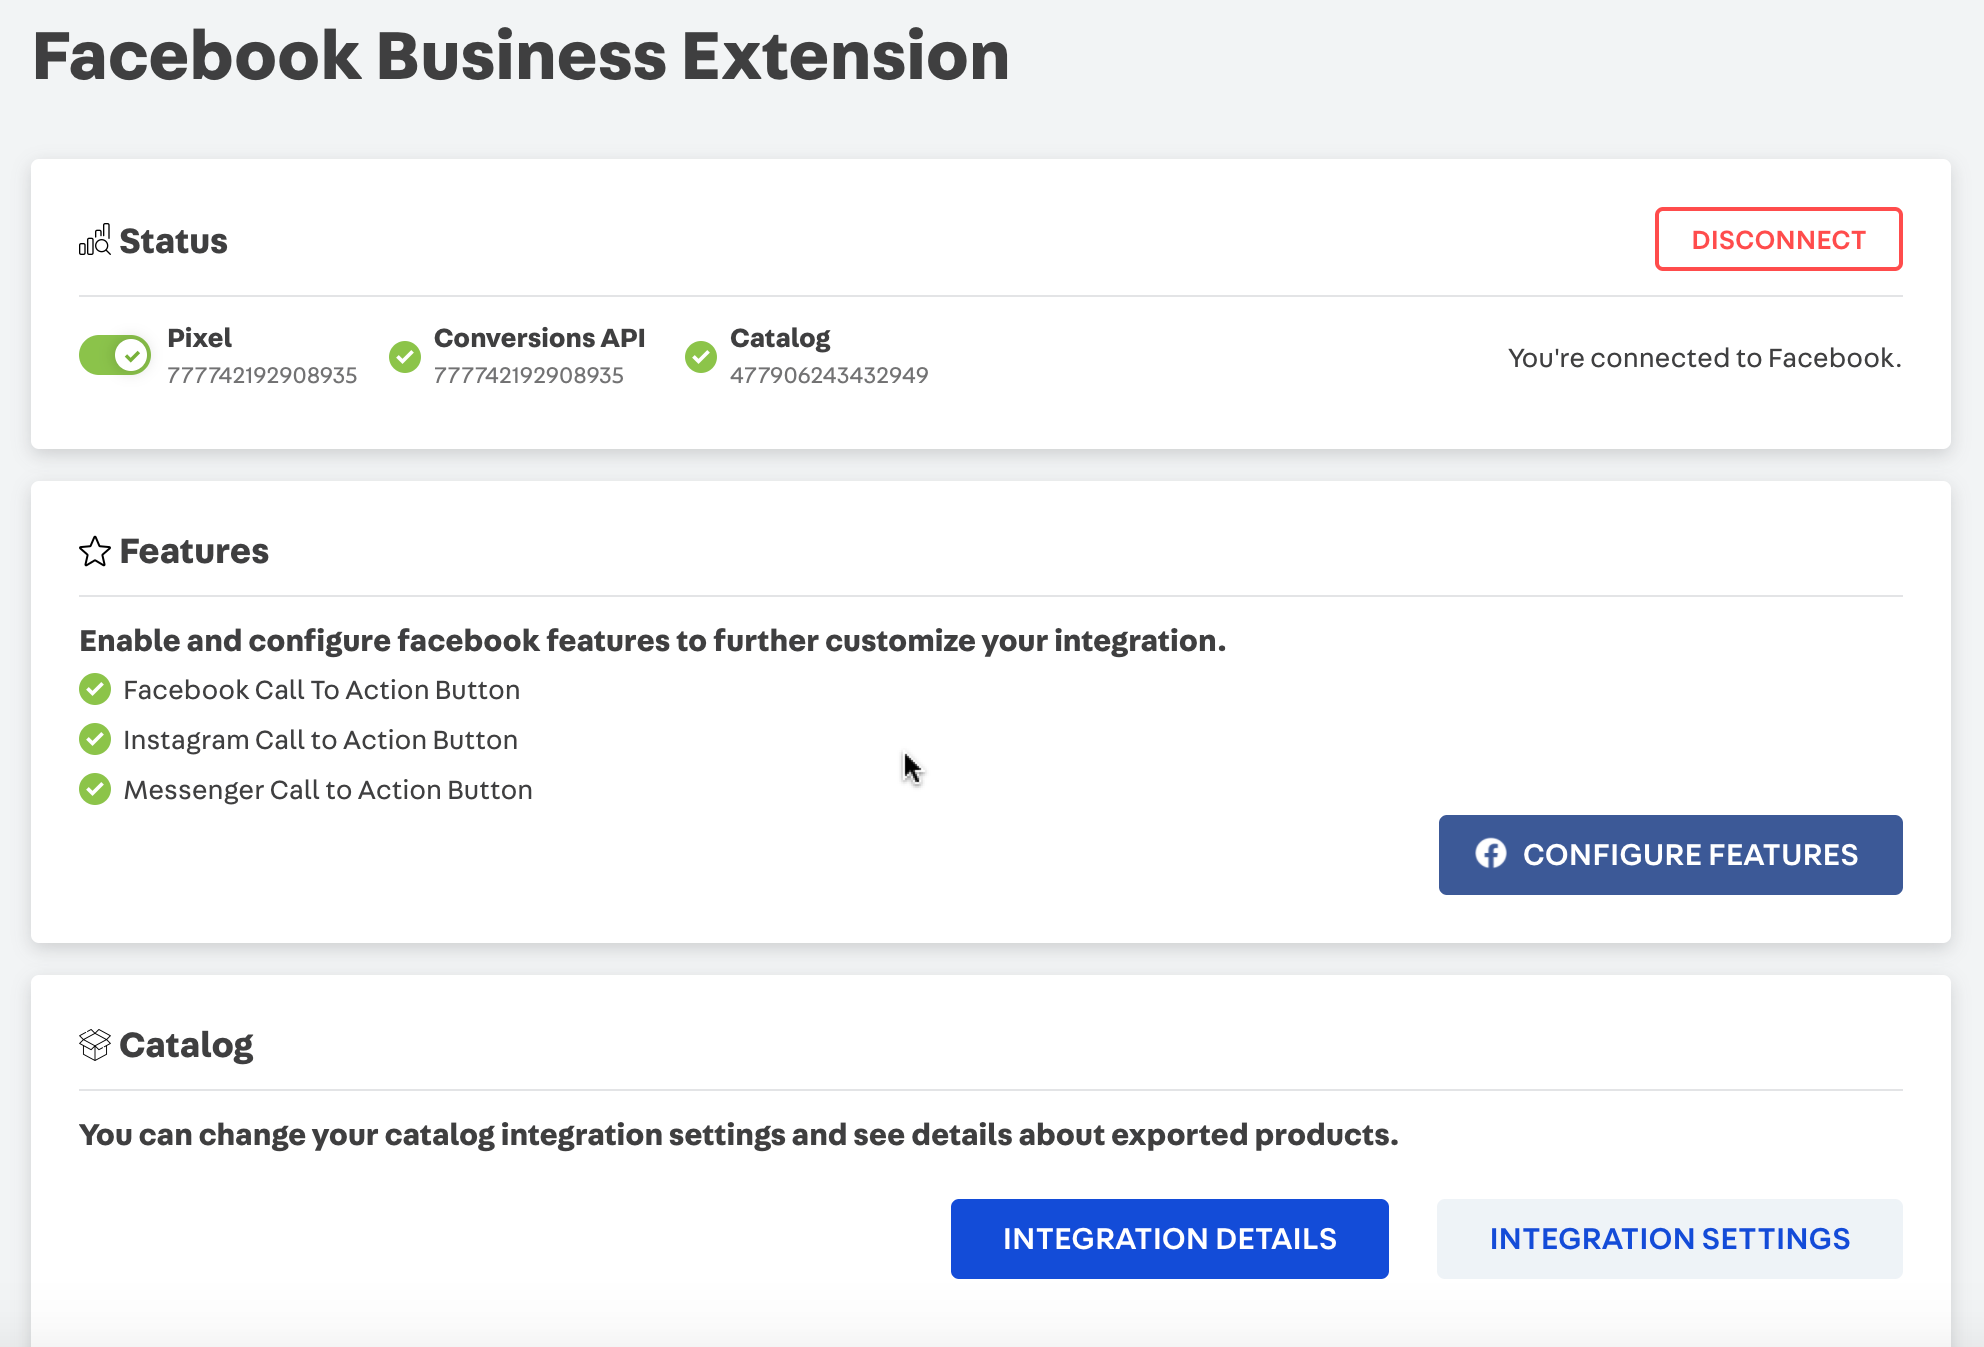
The numbers along the statuses are the ids for your selected assets.
If you need to, you can change the integration settings by clicking on Integration Settings:
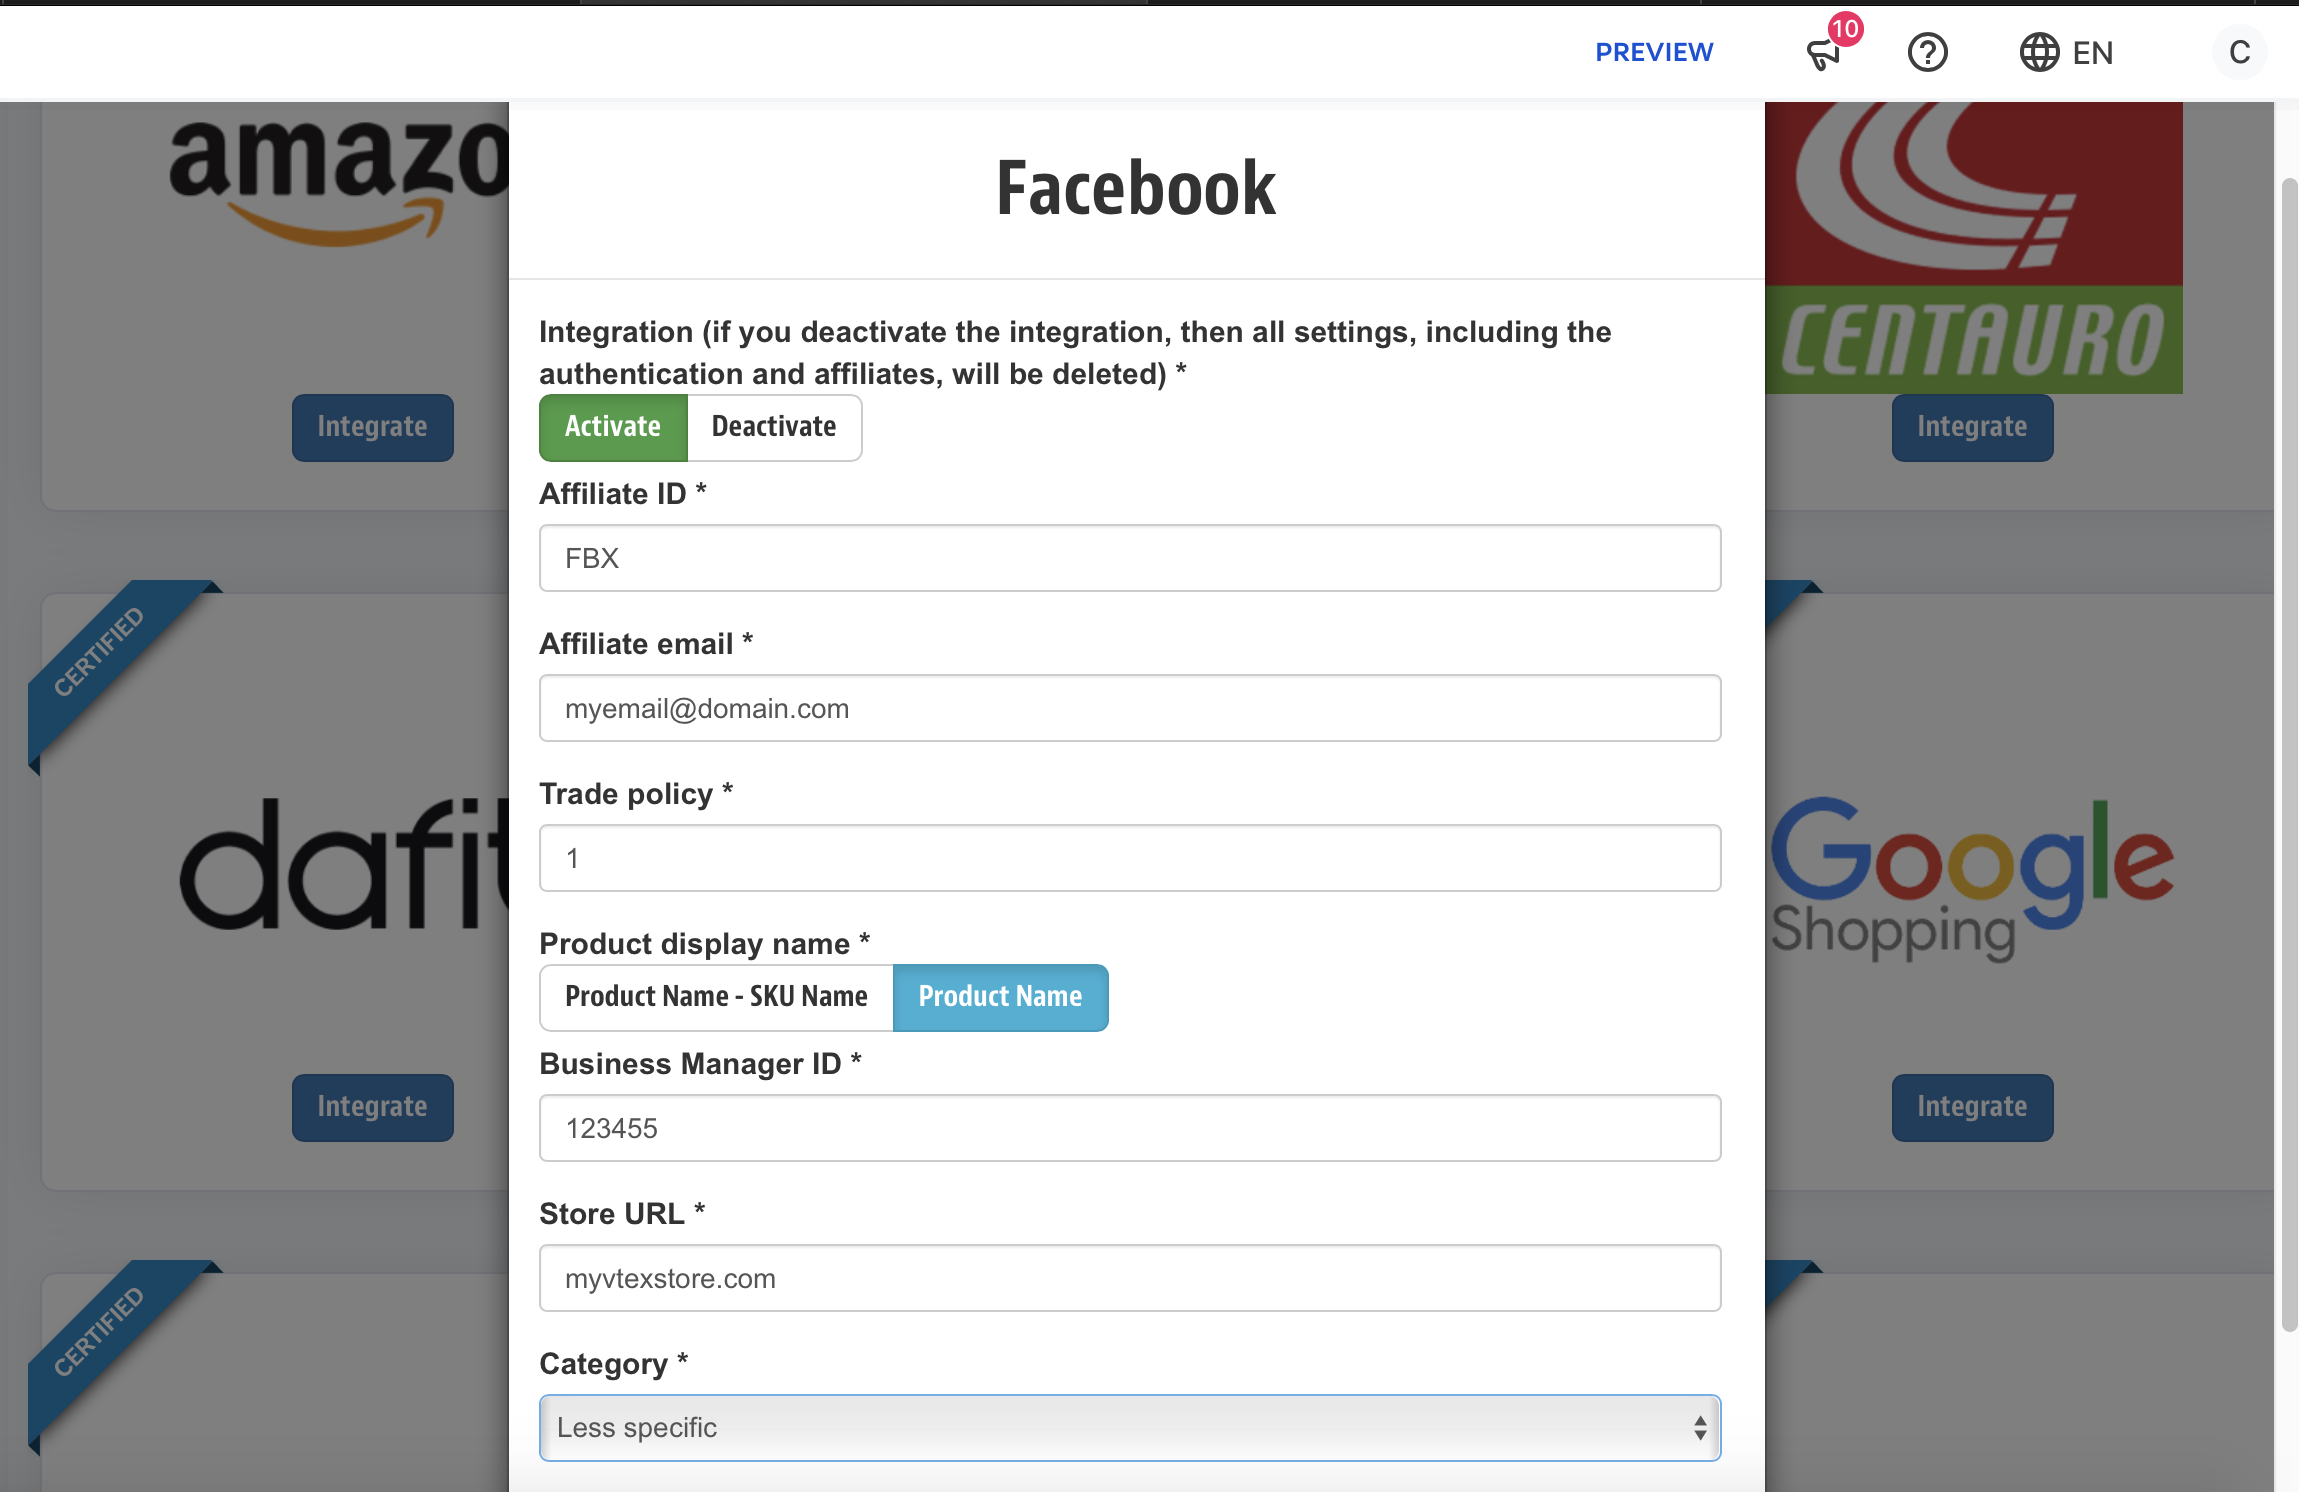
When you connect through FBE, the business manager ID and catalog ID are filled automatically since these fields are already provided by the app, so no extra steps are required here, unless you need to change the Product Display Name, Category Mapping, or the Trade Policy.
Facebook Features
On the features card, it's possible to configure other Facebook features. Upon clicking on the "Configure Feature" button, a popup on Facebook will guide you through those extra settings:
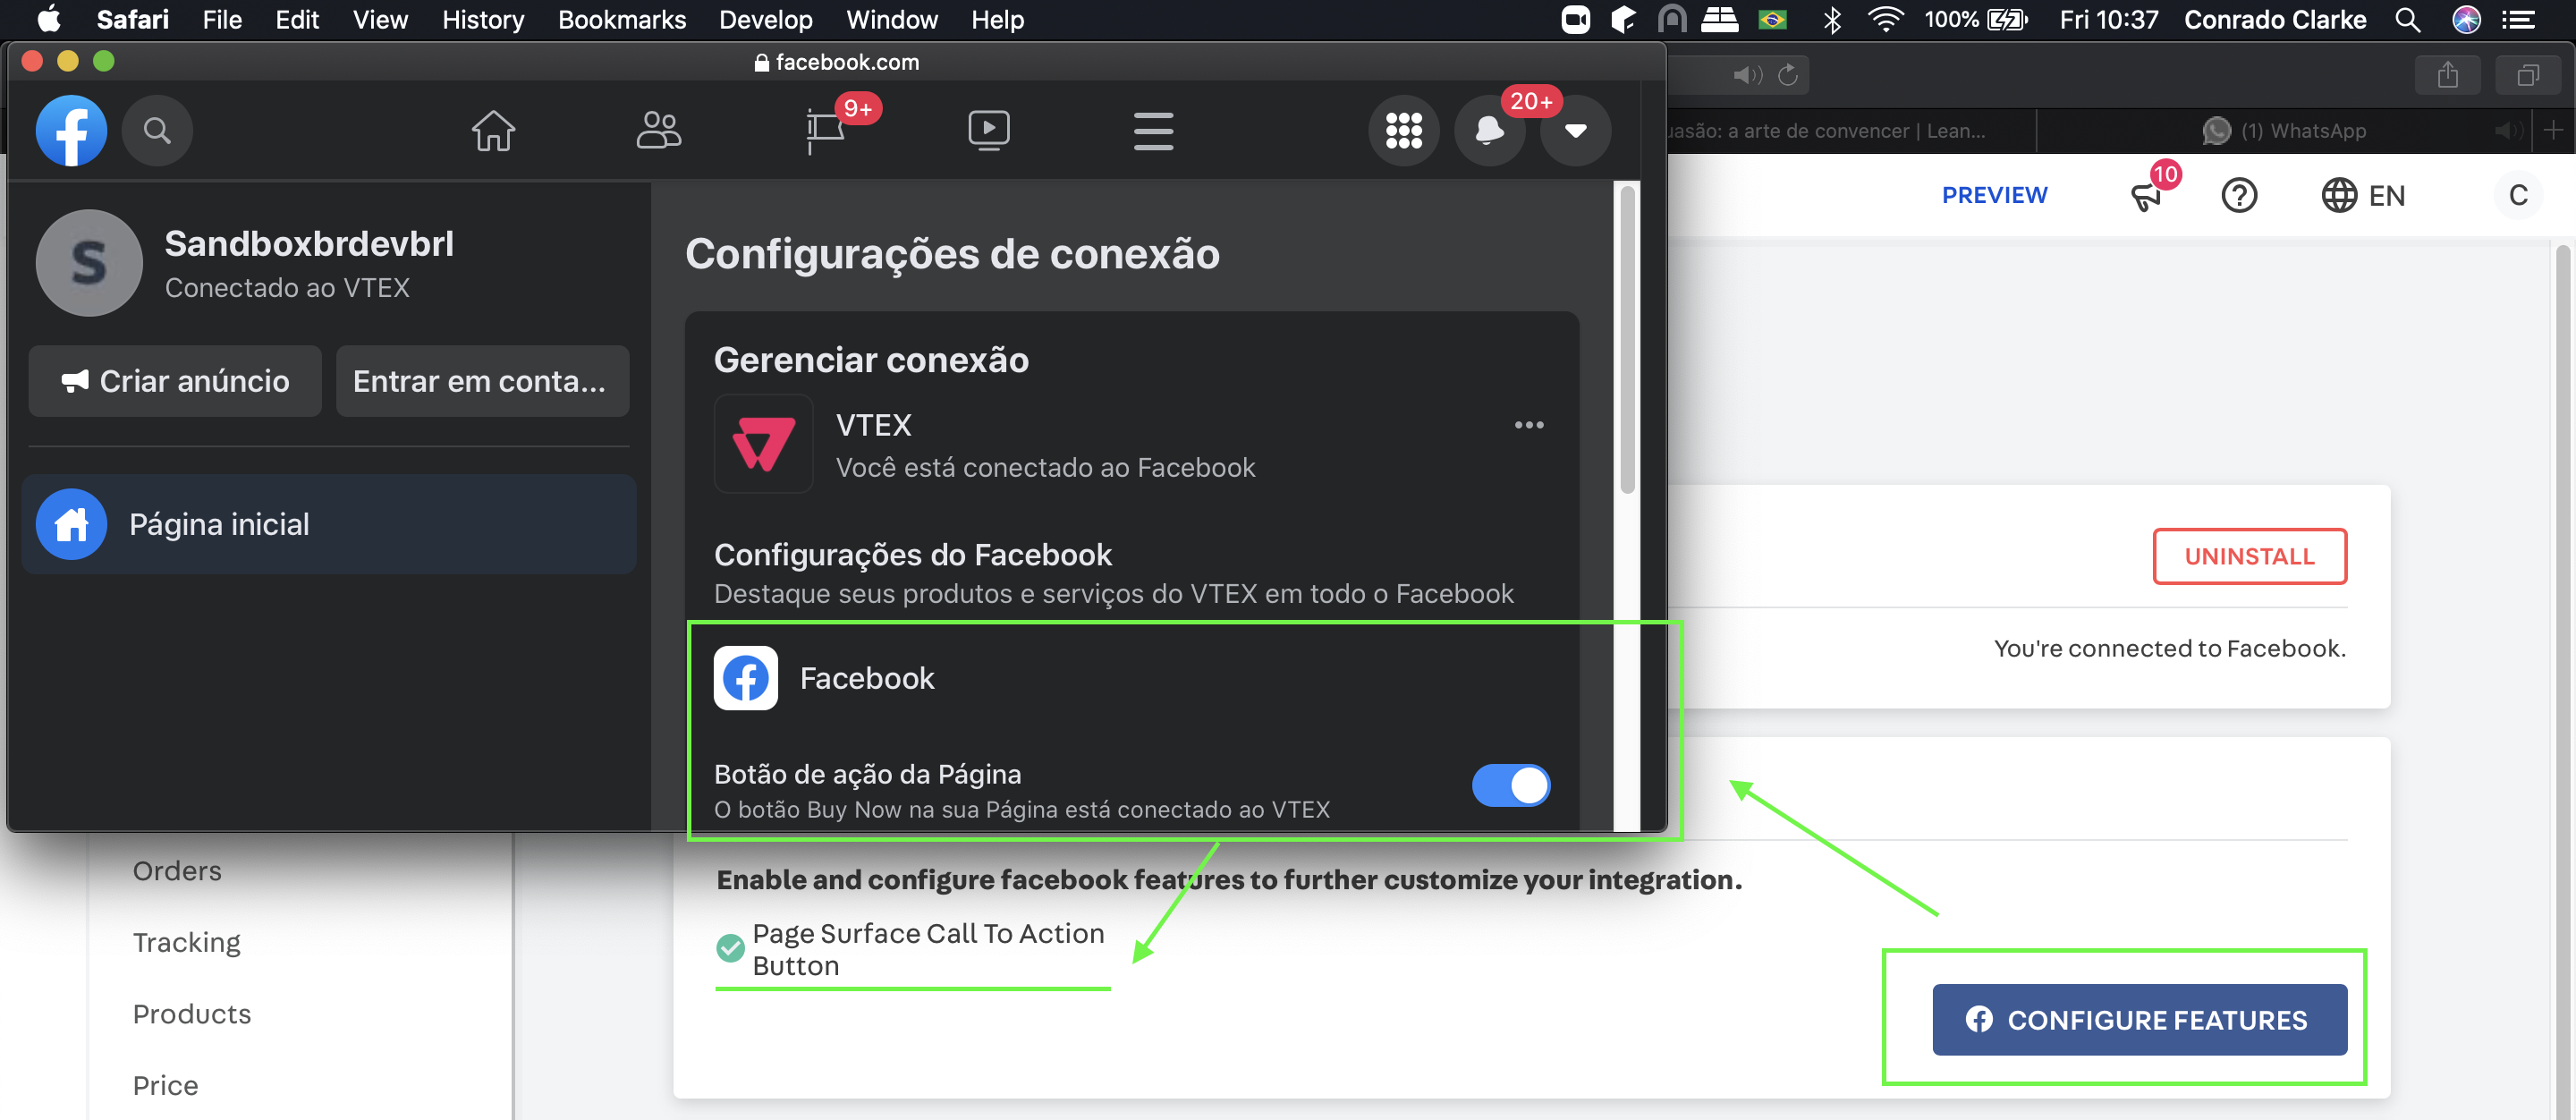
These features are all provided by a custom Facebook UI and include, but are not limited to:
- Page Surface Call to Action Button: Adds a
Buy Nowbutton to your Facebook Page, which redirects to your store. - Instagram Call to Action Button: Adds a
Buy Nowbutton to your Instagram Page, which redirects to your store. - Messenger Call to Action: Adds a
Buy Nowbutton inside Messenger when a user is messaging the business.
Facebook Pixel for Legacy CMS Portal (Frontend)
A Pixel is a snippet of code placed on the website that allows you to measure the effectiveness of your advertising by understanding the actions people take on the website.
This app is fully compatible with the Facebook Pixel App. FBE detects if you've selected the same pixel and replaces the Facebook Pixel App with its own Pixel App, that is tailored to work properly with Conversions API.
Stores using our Legacy CMS Portal need to manually add the pixel's code to their frontend. Once you've added the Pixel base code to your site, you can set up events to measure actions that interest you, such as making a purchase.
Pixel code example:
_10 !function(f,b,e,v,n,t,s)_10 {if(f.fbq)return;n=f.fbq=function(){n.callMethod?_10 n.callMethod.apply(n,arguments):n.queue.push(arguments)};_10 if(!f._fbq)f._fbq=n;n.push=n;n.loaded=!0;n.version='2.0';_10 n.queue=[];t=b.createElement(e);t.async=!0;_10 t.src=v;s=b.getElementsByTagName(e)[0];_10 s.parentNode.insertBefore(t,s)}(window, document,'script',_10 'https://connect.facebook.net/en_US/fbevents.js');_10 fbq('init', '{your-pixel-id-goes-here}');_10 fbq('track', 'PageView');
After inserting the pixel’s code in the front, is required that you also use the Conversions API. The Conversions API works with the Pixel to help improve the performance and measurement of your ad campaigns.
Ads Plugin
On the ads plugin cards, it's possible to manage your facebook ads.
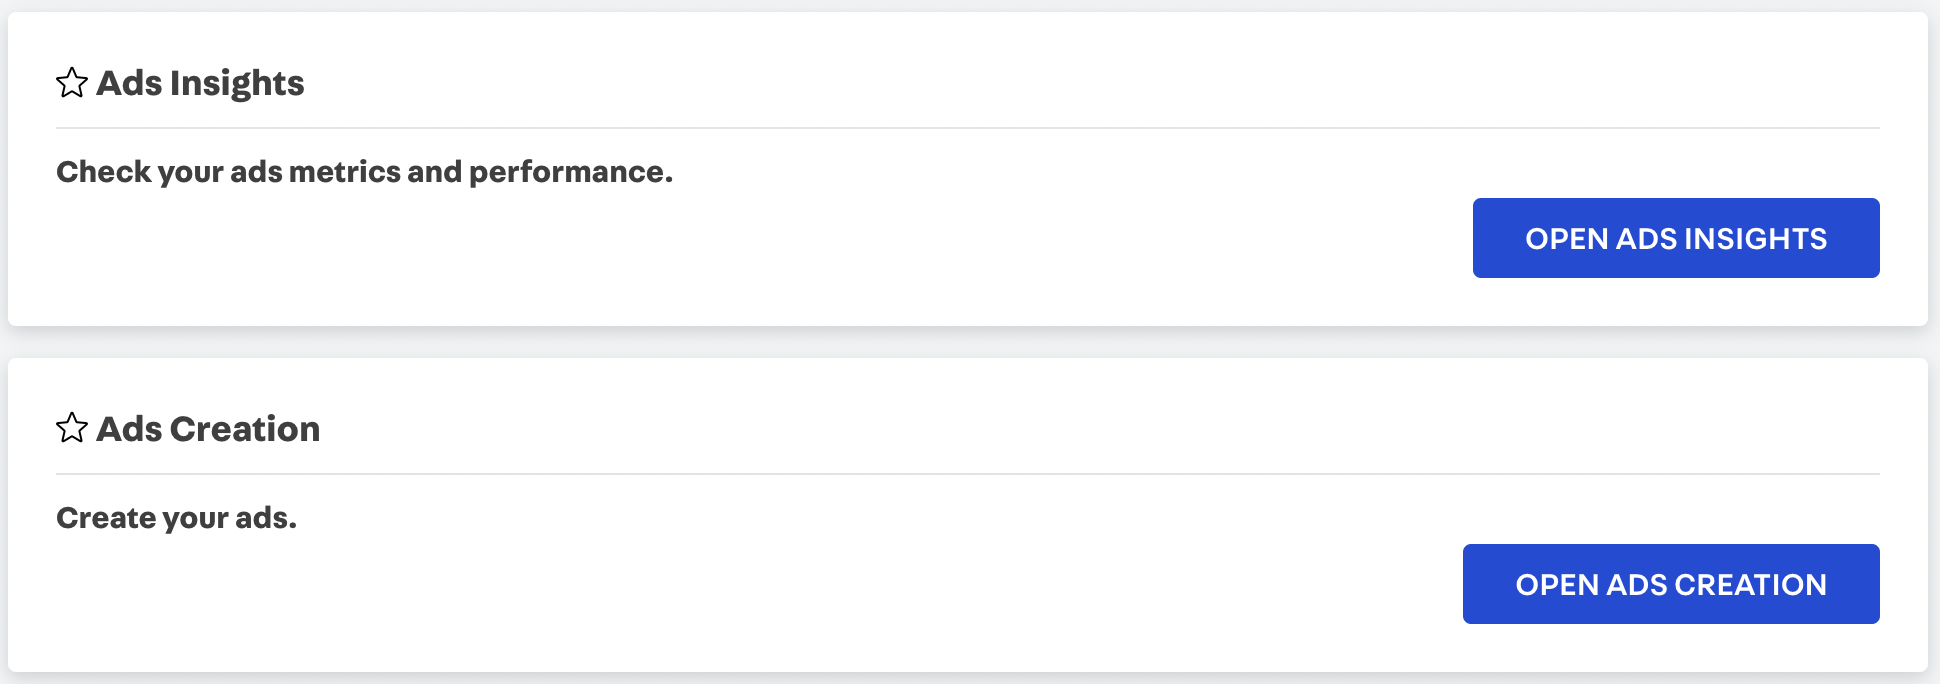
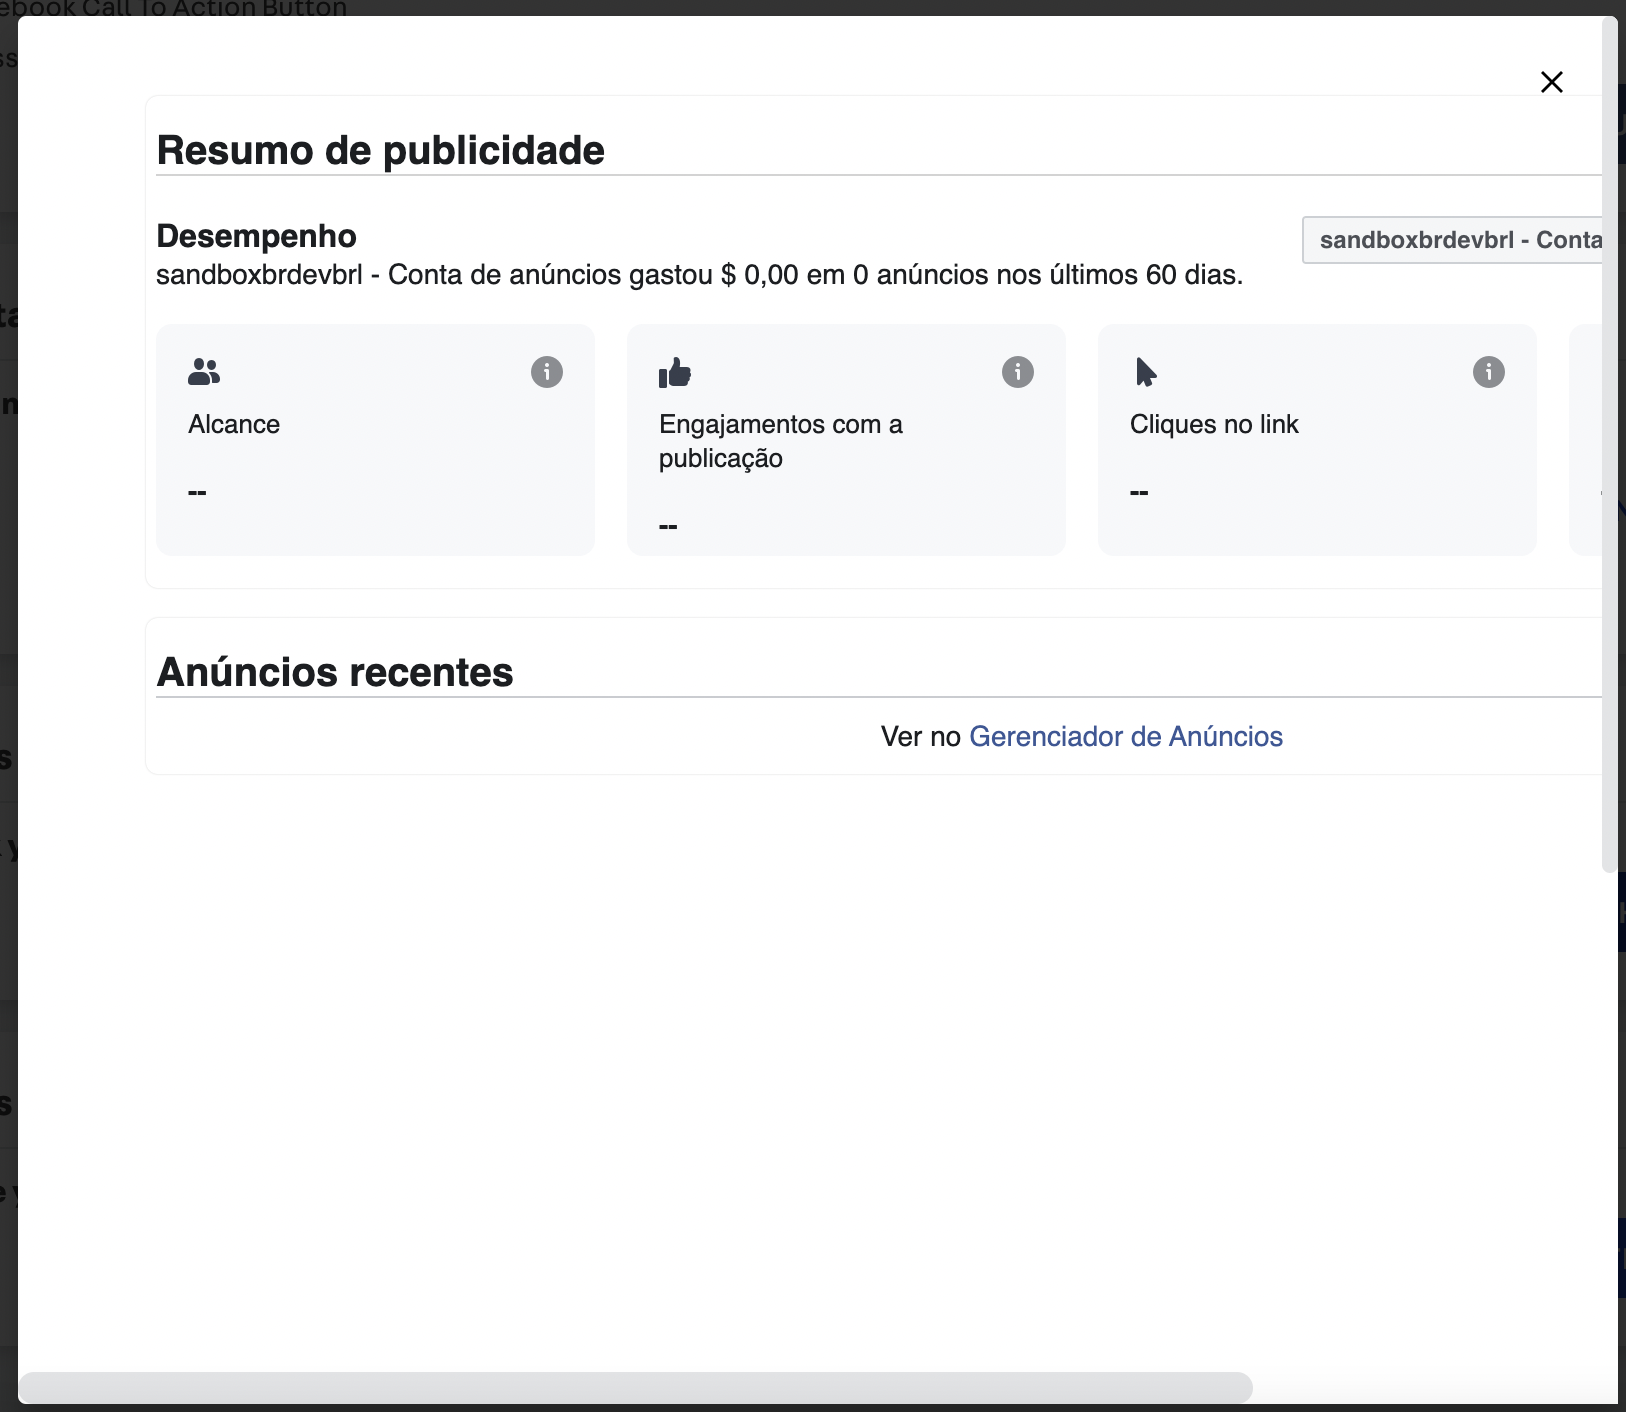
Upon clicking on the "Open Ads Insights" button, a popup will open with your ads metrics and performance.
By clicking on the "Open Ads Creation" button, another popup will open with a lightweight interface for ads creation.
Conversions API Integration
Conversions API comes with the FBE App by default. It allows firing certain events directly from VTEX servers, ensuring the relevant data reaches facebook independently from front-end implementations and/or network failures.
These are the supported events in the current version of this App:
| Event | Facebook Pixel (Native) | Conversions API |
|---|---|---|
| Page View | ✅ | ✅ |
| Content View | ✅ | ✅ |
| Search | ✅ | ✅ |
| Add To Cart | ✅ | ✅ |
| Initiate Checkout | ✅ | ✅ |
| Purchase | ✅ | ✅ |
This integration is configured automatically upon connecting your Facebook account. The CAPI integration works on any store (Legacy/IO), be sure to follow the next steps to ensure an optimal setup for your store.
Optimizing your Conversions API setup
First off, you may need to do some extra steps depending on your current Facebook Pixel Configuration.
Facebook Pixel is a piece of code for your ecommerce website that lets you measure, optimize and build audiences for your ad campaigns. When someone visits your website and takes an action (for example, buying something), the Facebook pixel is triggered and reports this action.
The table below shows if any actions are required:
| Store | Pixel Setup | Actions Required? |
|---|---|---|
| Legacy CMS Portal | None | Yes ⚠️ |
| Legacy CMS Portal | Google Tag Manager | Yes ⚠️ |
| VTEX IO | None | No ✅ |
| VTEX IO | Facebook Pixel App | No ✅ |
| VTEX IO | Google Tag Manager | Yes ⚠️ |
If no actions are required, you may skip the following subtopic.
Required actions for stores using VTEX IO
1 - Browser events need to be fired with the correct parameters in order to promote a correct deduplication between browser and server events. In this case, we need to do this for the Purchase event.
What is Event Deduplication? Facebook tries to deduplicate identical events sent through the Facebook pixel and the Conversions API when we work with a redundant setup.
A redundant setup is when you send the same events through from both a browser pixel and Conversions API. This is the default setup used by this App.
What events will I be able to configure in this step? For now, the only supported event for this step is the Purchase event. The other 5 (PageView, ViewContent, Search, AddToCart and InitiateCheckout) are just supported by VTEX IO stores. These scripts for Legacy stores are on our implementation roadmap.
This is done through specific parameters that may be used to guarantee the events are the same. The two parameters we'll be configuring in this section are the Event ID and the Event Name.
- Event ID: This ID uniquely identifies an event. In our purchase event, we're going to use orderId as the Event ID.
- Event Name: This is the type of the event being triggered. In our purchase event, we're going to go with 'Purchase'.
2 - Browser events must be initialized with the external_id parameter in order to correctly match the actor of the event (the end consumer). We'll use the userProfileId as the external_id
The userProfileId is a unique id which represents a end consumer of a store in the VTEX platform.
In order to do all that, the following steps need to be done in Google Tag Manager (or your tool of choice):
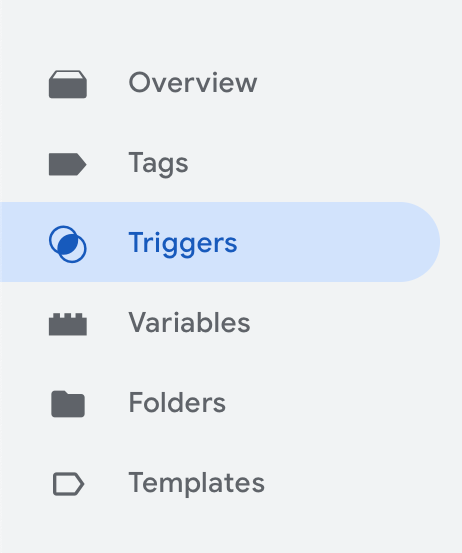
Step 1 - Create the Trigger
You may skip this step if you already fire Purchase events through your browser Pixel.
After accessing your Google Tag Manager workspace, ensure you have a trigger for the orderPlaced event. This event happens in the checkout confirmation page, whenever a purchase is completed.
In order to do so, click on Triggers in the lateral menu:
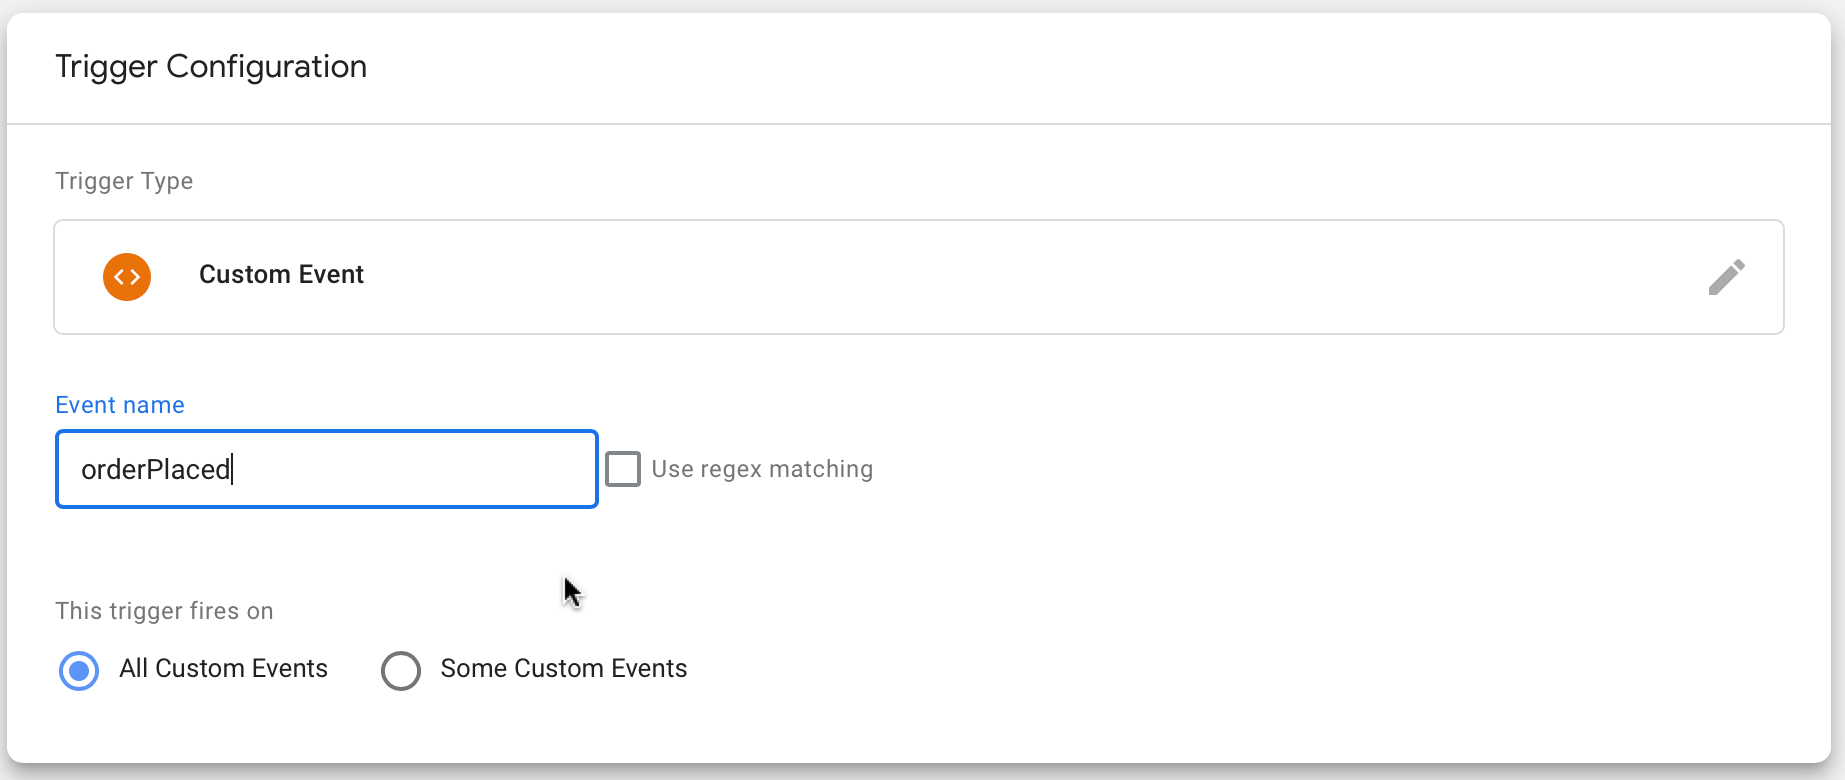
Create a trigger of type Custom Event, and set the event name to orderPlaced:
Save the trigger.
Step 2 - Create the Tag
With your trigger configured, you need to create a tag to run the custom code required to fire the purchase event to Facebook. You can find an example implementation through the pixel snippets in the FBE App. Go to Marketplace -> Facebook on your VTEX Admin, then click on the Purchase button under Pixel Snippets:
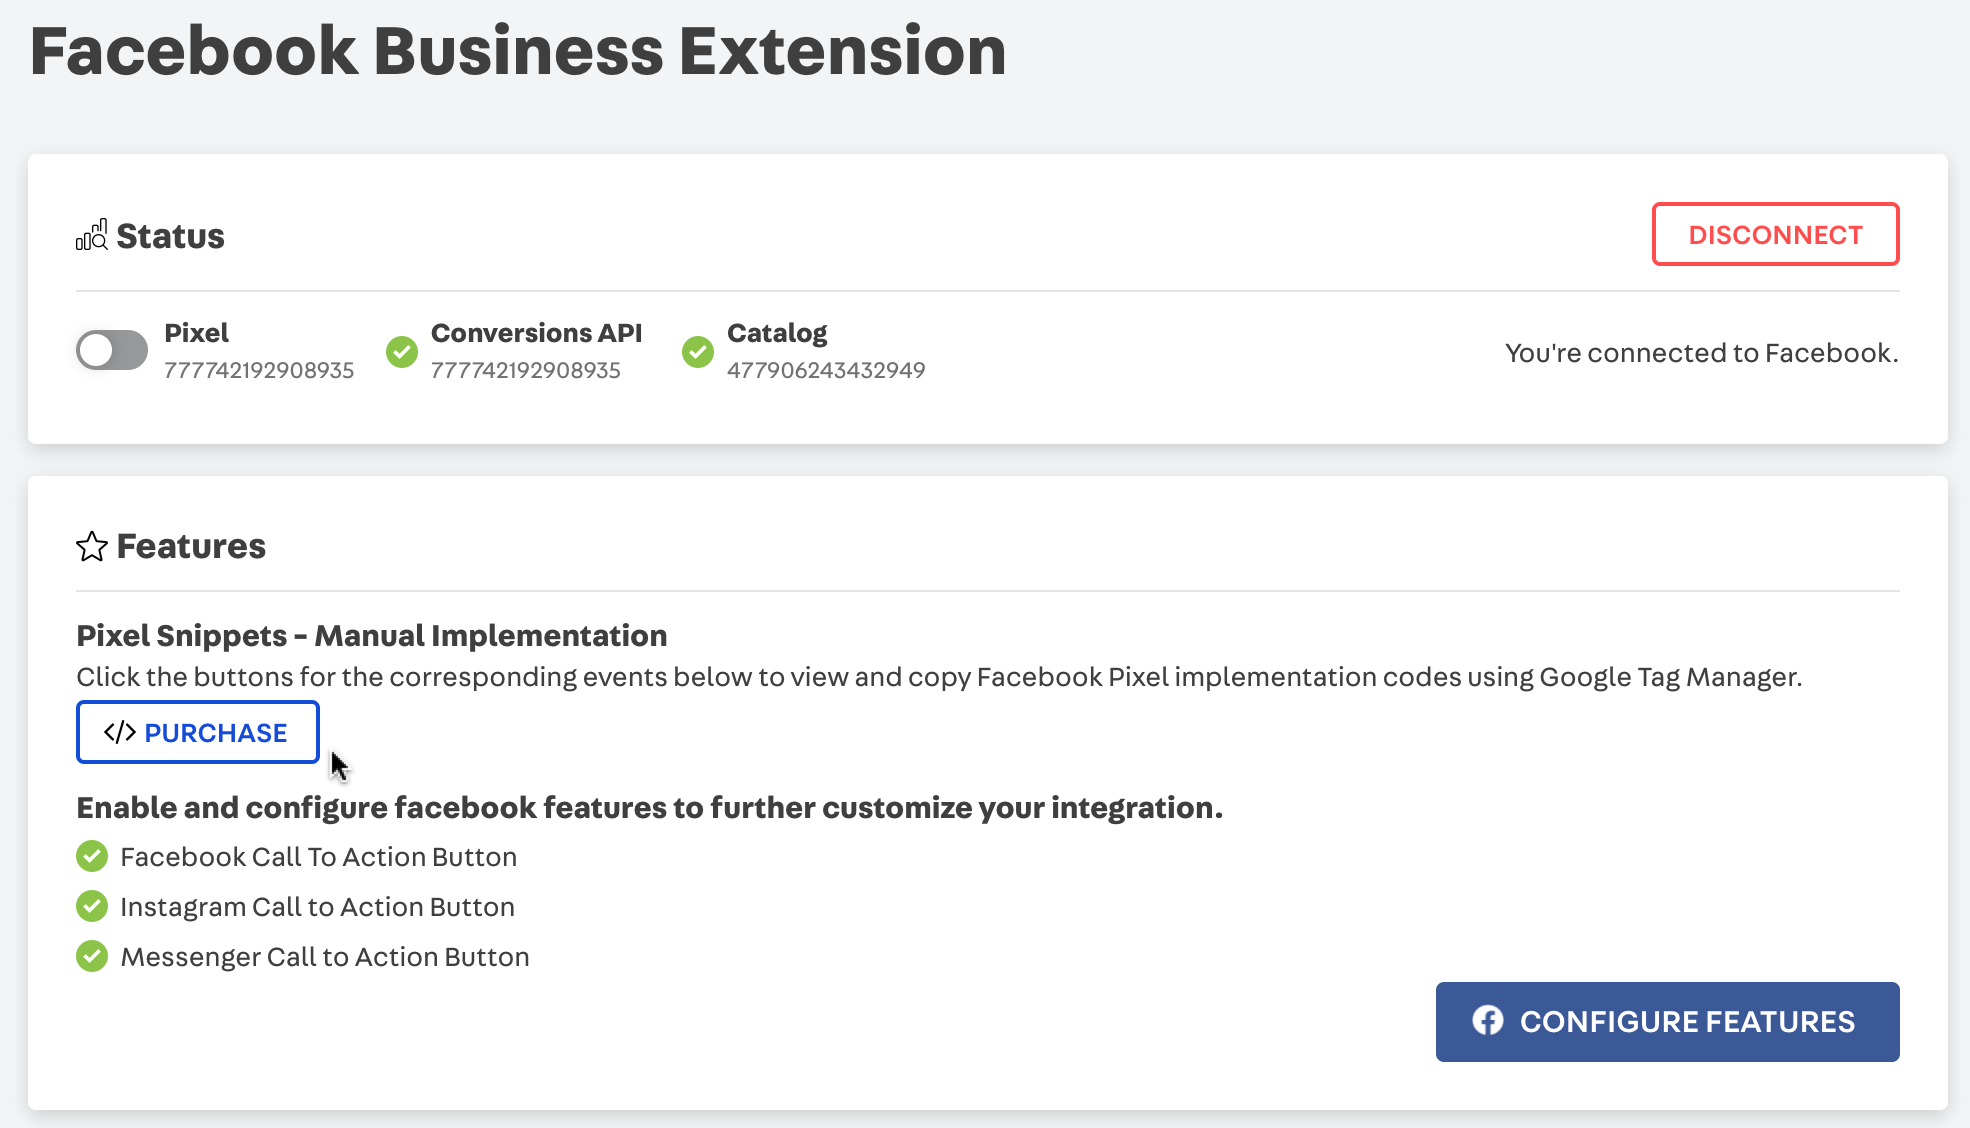
It's important to emphasize that Pixel Snippets are only available if the Pixel Toggle is disabled. VTEX IO stores with the toggle enabled have no need for any extra configuration to have an optimal setup.
Then all you need to do for now is click the copy button:
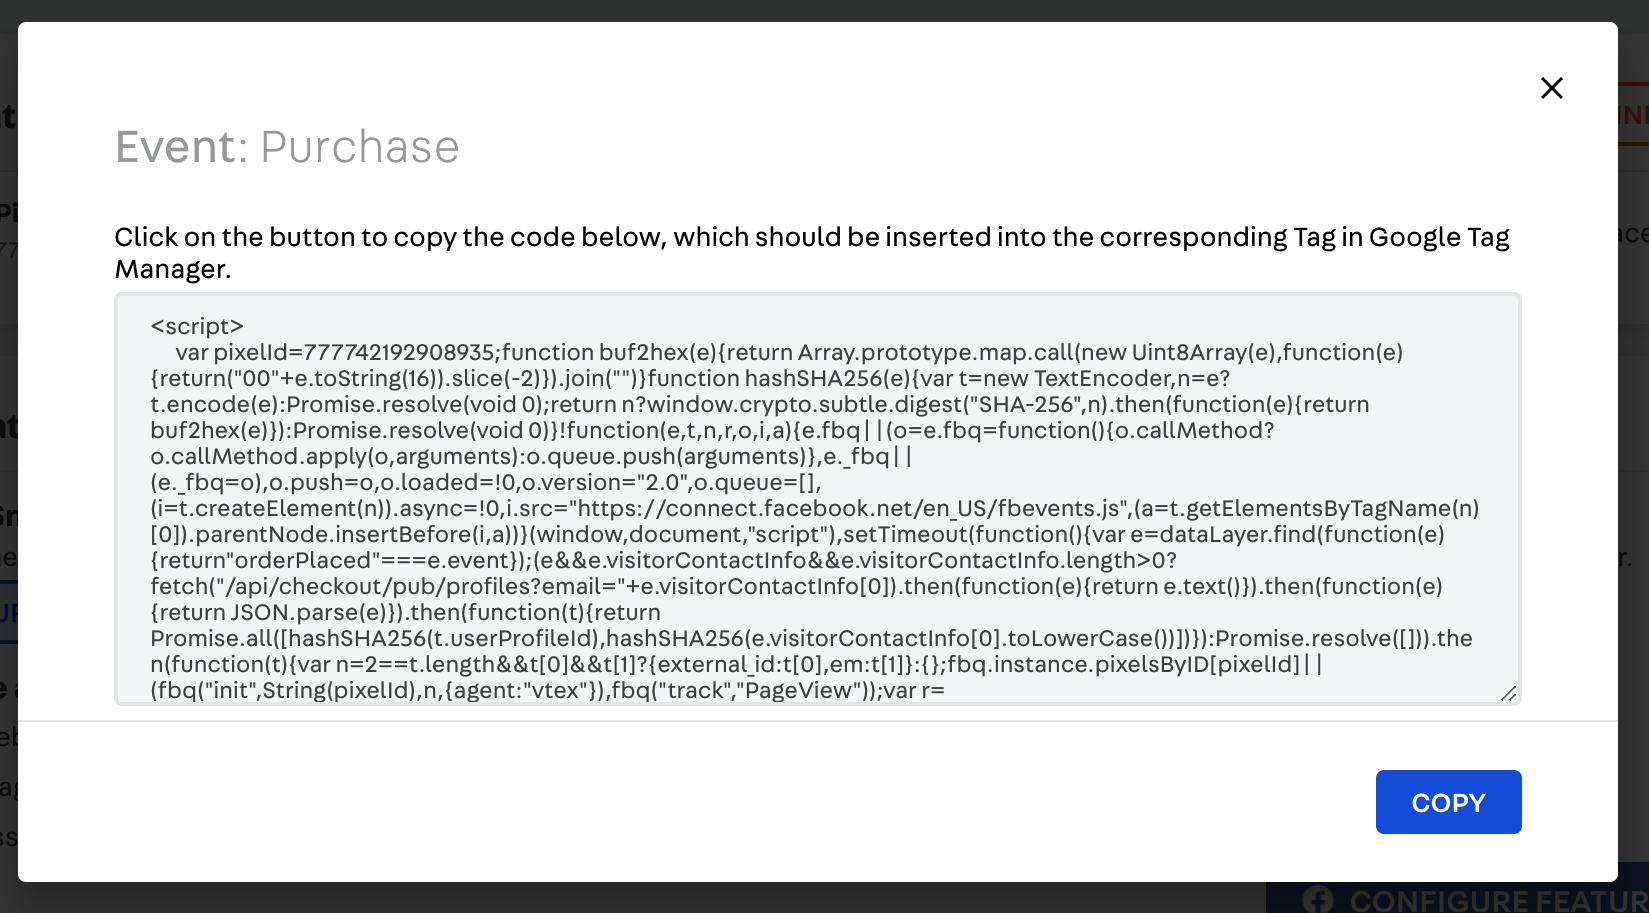
This snippet contains all required parameters to correctly trigger the purchase event. However, if you already have other kinds of customizations in your Purchase Tag, please read the next subtopic for more information about how the snippet was created so you can customize it according to your needs.
Back on Tag Manager, create a new "Custom HTML" tag and paste the currently copied script into the HTML text box.
Click on "Triggering" and set the trigger to your "Order Placed" event:
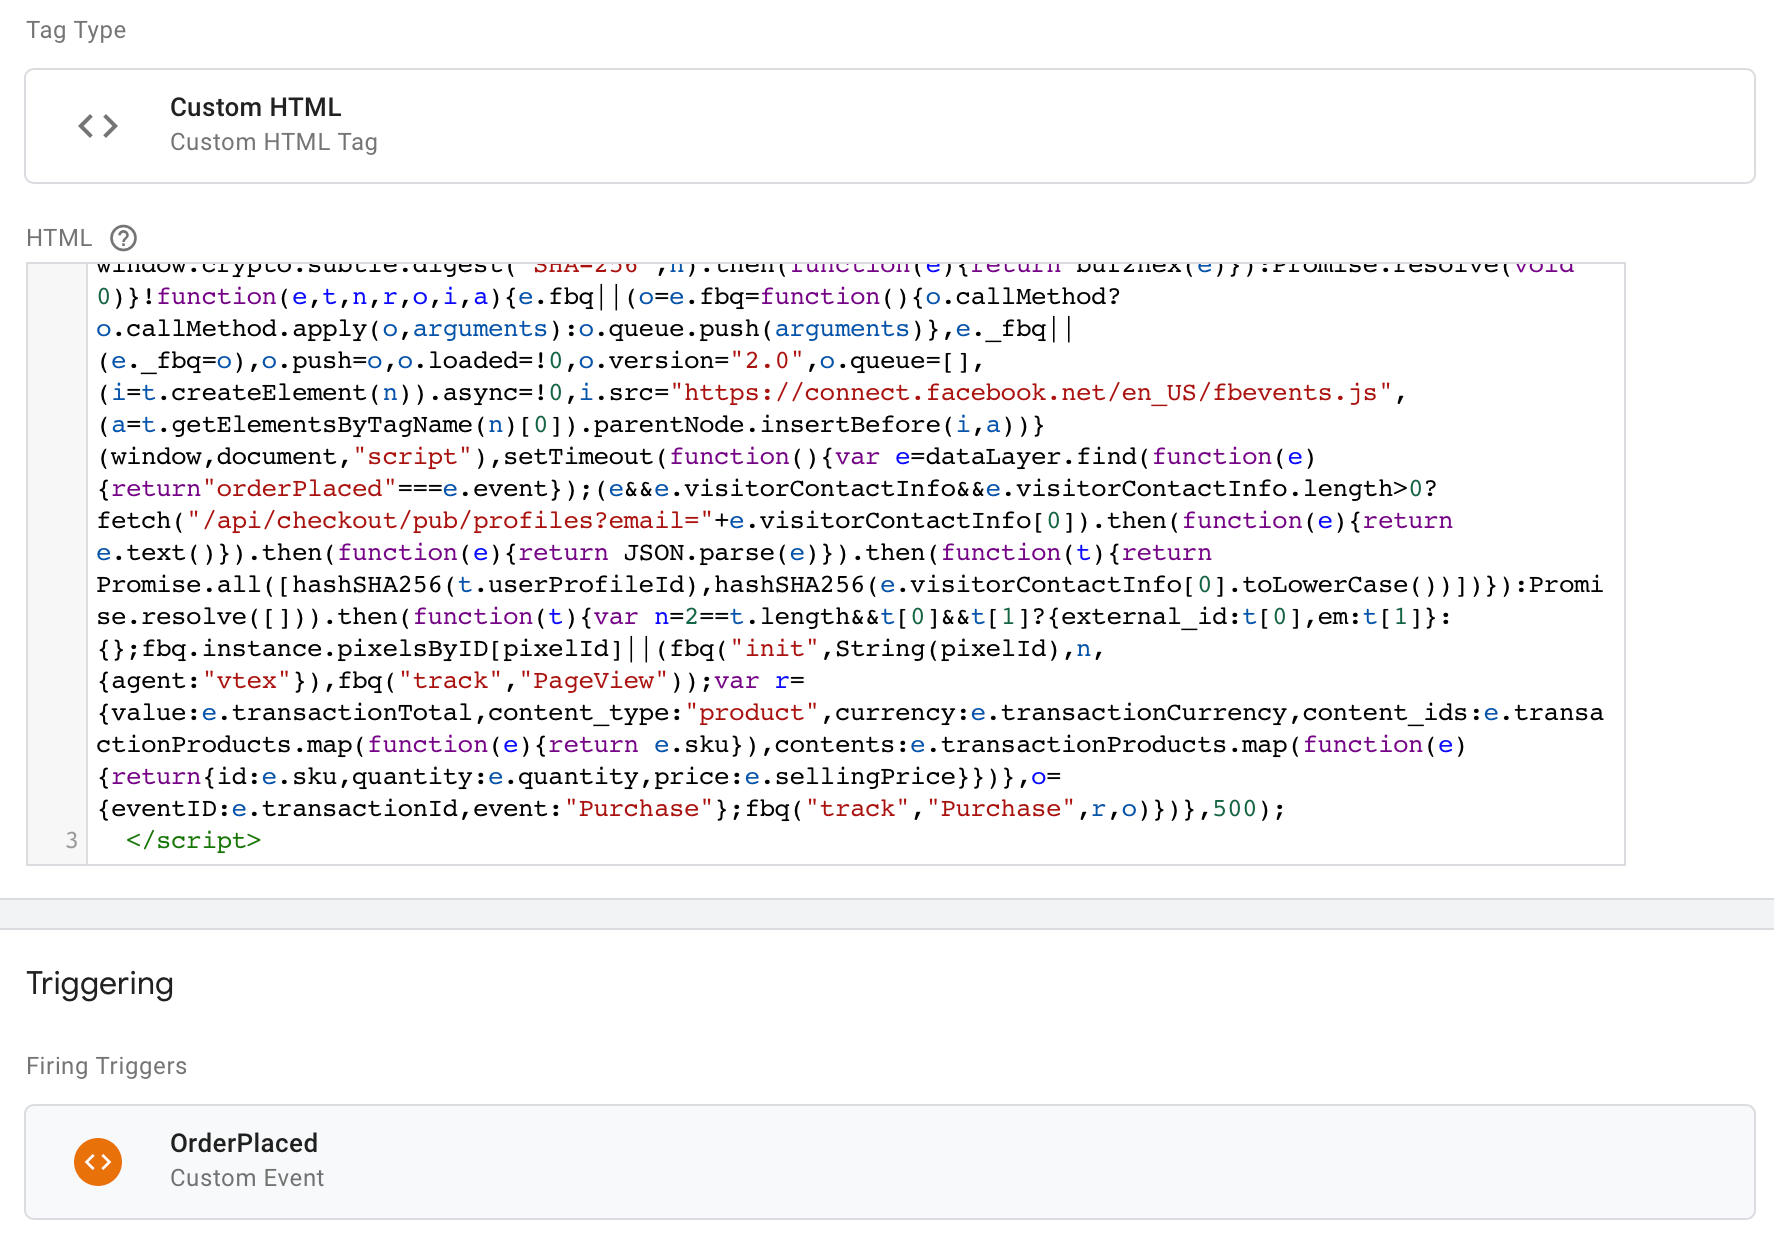
Save your new tag.
Step 2b - What if I already have other customizations in my Purchase Tag?
This section is for setups that already have customizations in their Purchase Tag (such as detecting different payment methods, or having additional parameters on the event payload besides contents, contentId, contentType, currency, and value)
Please be aware that this section is very technical since it explains in details how exactly the Tag gathers all required information to compose and send the purchase event to Facebook.
(Click to Expand) This is the un-minified version of the Purchase Tag Snippet, explained:
_127const pixelId = 111111111111 // this is your PixelId_127_127// Function to convert an array buffer to its hexadecimal representation._127function buf2hex(buffer) {_127 return Array.prototype.map_127 .call(new Uint8Array(buffer), function (x) {_127 return `00$\{x.toString(16)\}`.slice(-2)_127 })_127 .join('')_127}_127_127// Function that hashes values before sending them to FB._127function hashSHA256(value) {_127 const encoder = new TextEncoder()_127 const data = value ? encoder.encode(value) : Promise.resolve(undefined)_127_127 const hashedValue = data_127 ? window.crypto.subtle.digest('SHA-256', data).then(function (f) {_127 return buf2hex(f)_127 })_127 : Promise.resolve(undefined)_127_127 return hashedValue_127}_127_127// This is the main Pixel Code provided by Facebook._127!(function (f, b, e, v, n, t, s) {_127 if (f.fbq) return_127 n = f.fbq = function () {_127 n.callMethod ? n.callMethod.apply(n, arguments) : n.queue.push(arguments)_127 }_127_127 if (!f._fbq) f._fbq = n_127 n.push = n_127 n.loaded = !0_127 n.version = '2.0'_127 n.queue = []_127 t = b.createElement(e)_127 t.async = !0_127 t.src = v_127 s = b.getElementsByTagName(e)[0]_127 s.parentNode.insertBefore(t, s)_127})(window, document, 'script', 'https://connect.facebook.net/en_US/fbevents.js')_127_127// A small timeout of half a second is placed to ensure the fbq function is correctly loaded._127setTimeout(function () {_127_127 // As this tag is self-containing, instead of using variables it peeks into the dataLayer by itself._127 const orderPlaced = dataLayer.find(function (d) {_127 return d.event === 'orderPlaced'_127 })_127_127 // The UserProfile function retrieves the end consumer email from visitorContactInfo and calls the Checkout API to get the saved userProfile, which contains the userProfileId._127 // The userProfileId is used as the external_id which is an advanced matching parameter as described by Facebook._127 // visitorContactInfo is an array with 3 elements, composed by ['email', 'firstName', 'lastName']. We just need the email for now._127 const userProfile =_127 orderPlaced &&_127 orderPlaced.visitorContactInfo &&_127 orderPlaced.visitorContactInfo.length > 0_127 ? fetch(_127 `/api/checkout/pub/profiles?email=$\{orderPlaced.visitorContactInfo[0]\}`_127 )_127 // Retrieve the response text from the API call._127 .then(function (f) {_127 return f.text()_127 })_127 // Parse the response text as an Object._127 .then(function (f) {_127 return JSON.parse(f)_127 })_127 // The e-mail and userProfileId must be hashed before they're sent to Facebook._127 // In no circunstance these parameters can be sent openly before hashing. If that happens, FB automatically discards them._127 .then(function (f) {_127 return Promise.all([_127 hashSHA256(f.userProfileId),_127 hashSHA256(orderPlaced.visitorContactInfo[0].toLowerCase()),_127 ])_127 })_127 : Promise.resolve([])_127_127 // With the userProfile in hands, we're able to compose the advancedMatchingParams_127 userProfile.then(function (profileInfo) {_127 const advancedMatchingParams =_127 profileInfo.length == 2 && profileInfo[0] && profileInfo[1]_127 ? {_127 external_id: profileInfo[0],_127 em: profileInfo[1],_127 }_127 : {}_127_127 // This condition checks if fbq was already loaded/executed in this page._127 if (!fbq.instance.pixelsByID[pixelId]) {_127 // Here we initialize the Pixel with the Advanced Matching Parameters._127 fbq('init', String(pixelId), advancedMatchingParams, { agent: 'vtex' })_127_127 // Then we track the PageView_127 fbq('track', 'PageView')_127 }_127_127 // The Event ID should always be the orderGroupId without -01, -02, etc, to match the Event ID from Conversions API._127 var substr = orderPlaced.transactionId.indexOf('-');_127 var orderId = orderPlaced.transactionId.substring(0, substr > 0 ? substr : orderPlaced.transactionId.length); _127_127 // After that, we create the PurchaseEvent object based on the order placed._127 const eventObject = {_127 value: orderPlaced.transactionTotal,_127 content_type: 'product',_127 currency: orderPlaced.transactionCurrency,_127 content_ids: orderPlaced.transactionProducts.map(function (p) {_127 return p.sku_127 }),_127 contents: orderPlaced.transactionProducts.map(function (p) {_127 return { id: p.sku, quantity: p.quantity, price: p.sellingPrice }_127 }),_127 }_127_127 // In order to ensure deduplication, we send the orderId as the eventID, and the event as 'Purchase'. _127 // This works perfectly for the purchase event since the orderId is unique._127 const eventParams = {_127 eventID: orderId,_127 event: 'Purchase',_127 }_127_127 // We can finally track the Purchase event_127 fbq('track', 'Purchase', eventObject, eventParams)_127 })_127}, 500)
Step 3 - Publish your Changes
After saving your tag, you need to submit and publish your new version.
Step 4 - Test your Changes
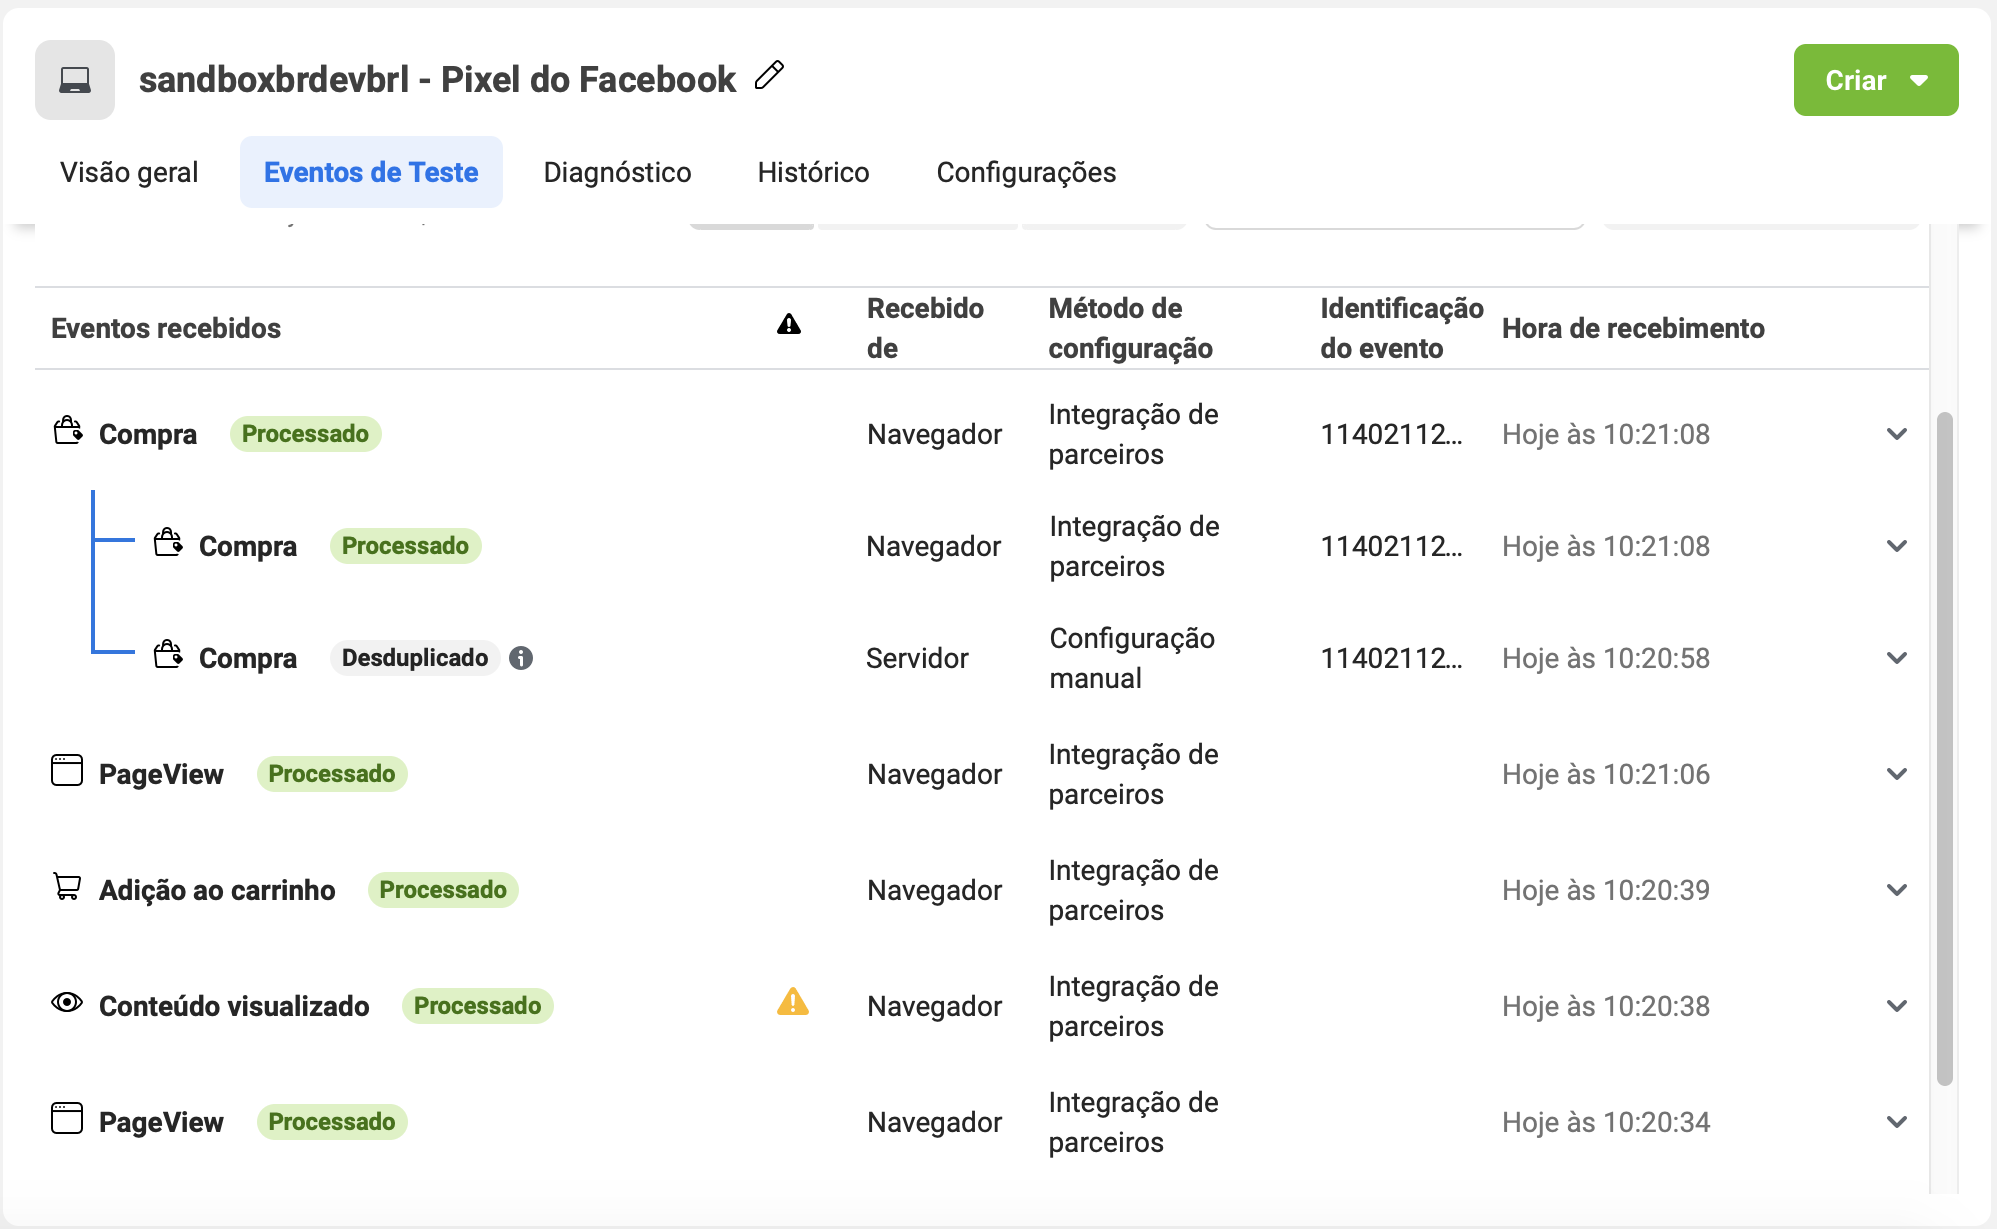
You can then test your events on the Events Manager in the Facebook platform. Open the test events tab and fill in your store URL. Click on the button to open a new browser and finish a purchase in your store. All events should show up in the Test Events Tab:
Though most of the setups use GTM to fire pixel events, it's possible to configure this using other tools. Just make sure the corresponding parameters are being sent correctly in your tool of choice.
Configuring Conversions API for stores using our Legacy CMS Portal (Backend)
The Conversions API is configured automatically on any IO stores, but not in Legacy CMS Portal. Therefore, it is mandatory that Legacy CMS Portal do the configuration.
Required actions for stores using the Legacy CMS Portal
The event captured by the frontend will start the conversions API in the backend. Create a custom script in your store's backend to call the conversions API, following the example below.
_22var myHeaders = new Headers();_22myHeaders.append("Content-Type", "application/json");_22_22var raw = JSON.stringify({_22 "eventName": "PageView",_22 "eventId": "{{eventId}}",_22 "eventSourceURL": "{{host}}",_22 "userAgent": "{{User-agent}}",_22 "fbpCookie": "{{fbpCookie}}"_22});_22_22var requestOptions = {_22 method: 'POST',_22 headers: myHeaders,_22 body: raw,_22 redirect: 'follow'_22};_22_22fetch("/api/io/_v/facebook-capi/event", requestOptions)_22 .then(response => response.text())_22 .then(result => console.log(result))_22 .catch(error => console.log('error', error));
Recommendations:
- Make sure to use
/api/ioin the URL to proxy the app on VTEX IO. - The parameter
eventIDsent on the front-end and back-end must be exactly the same to promote a correct deduplication between browser and server events.
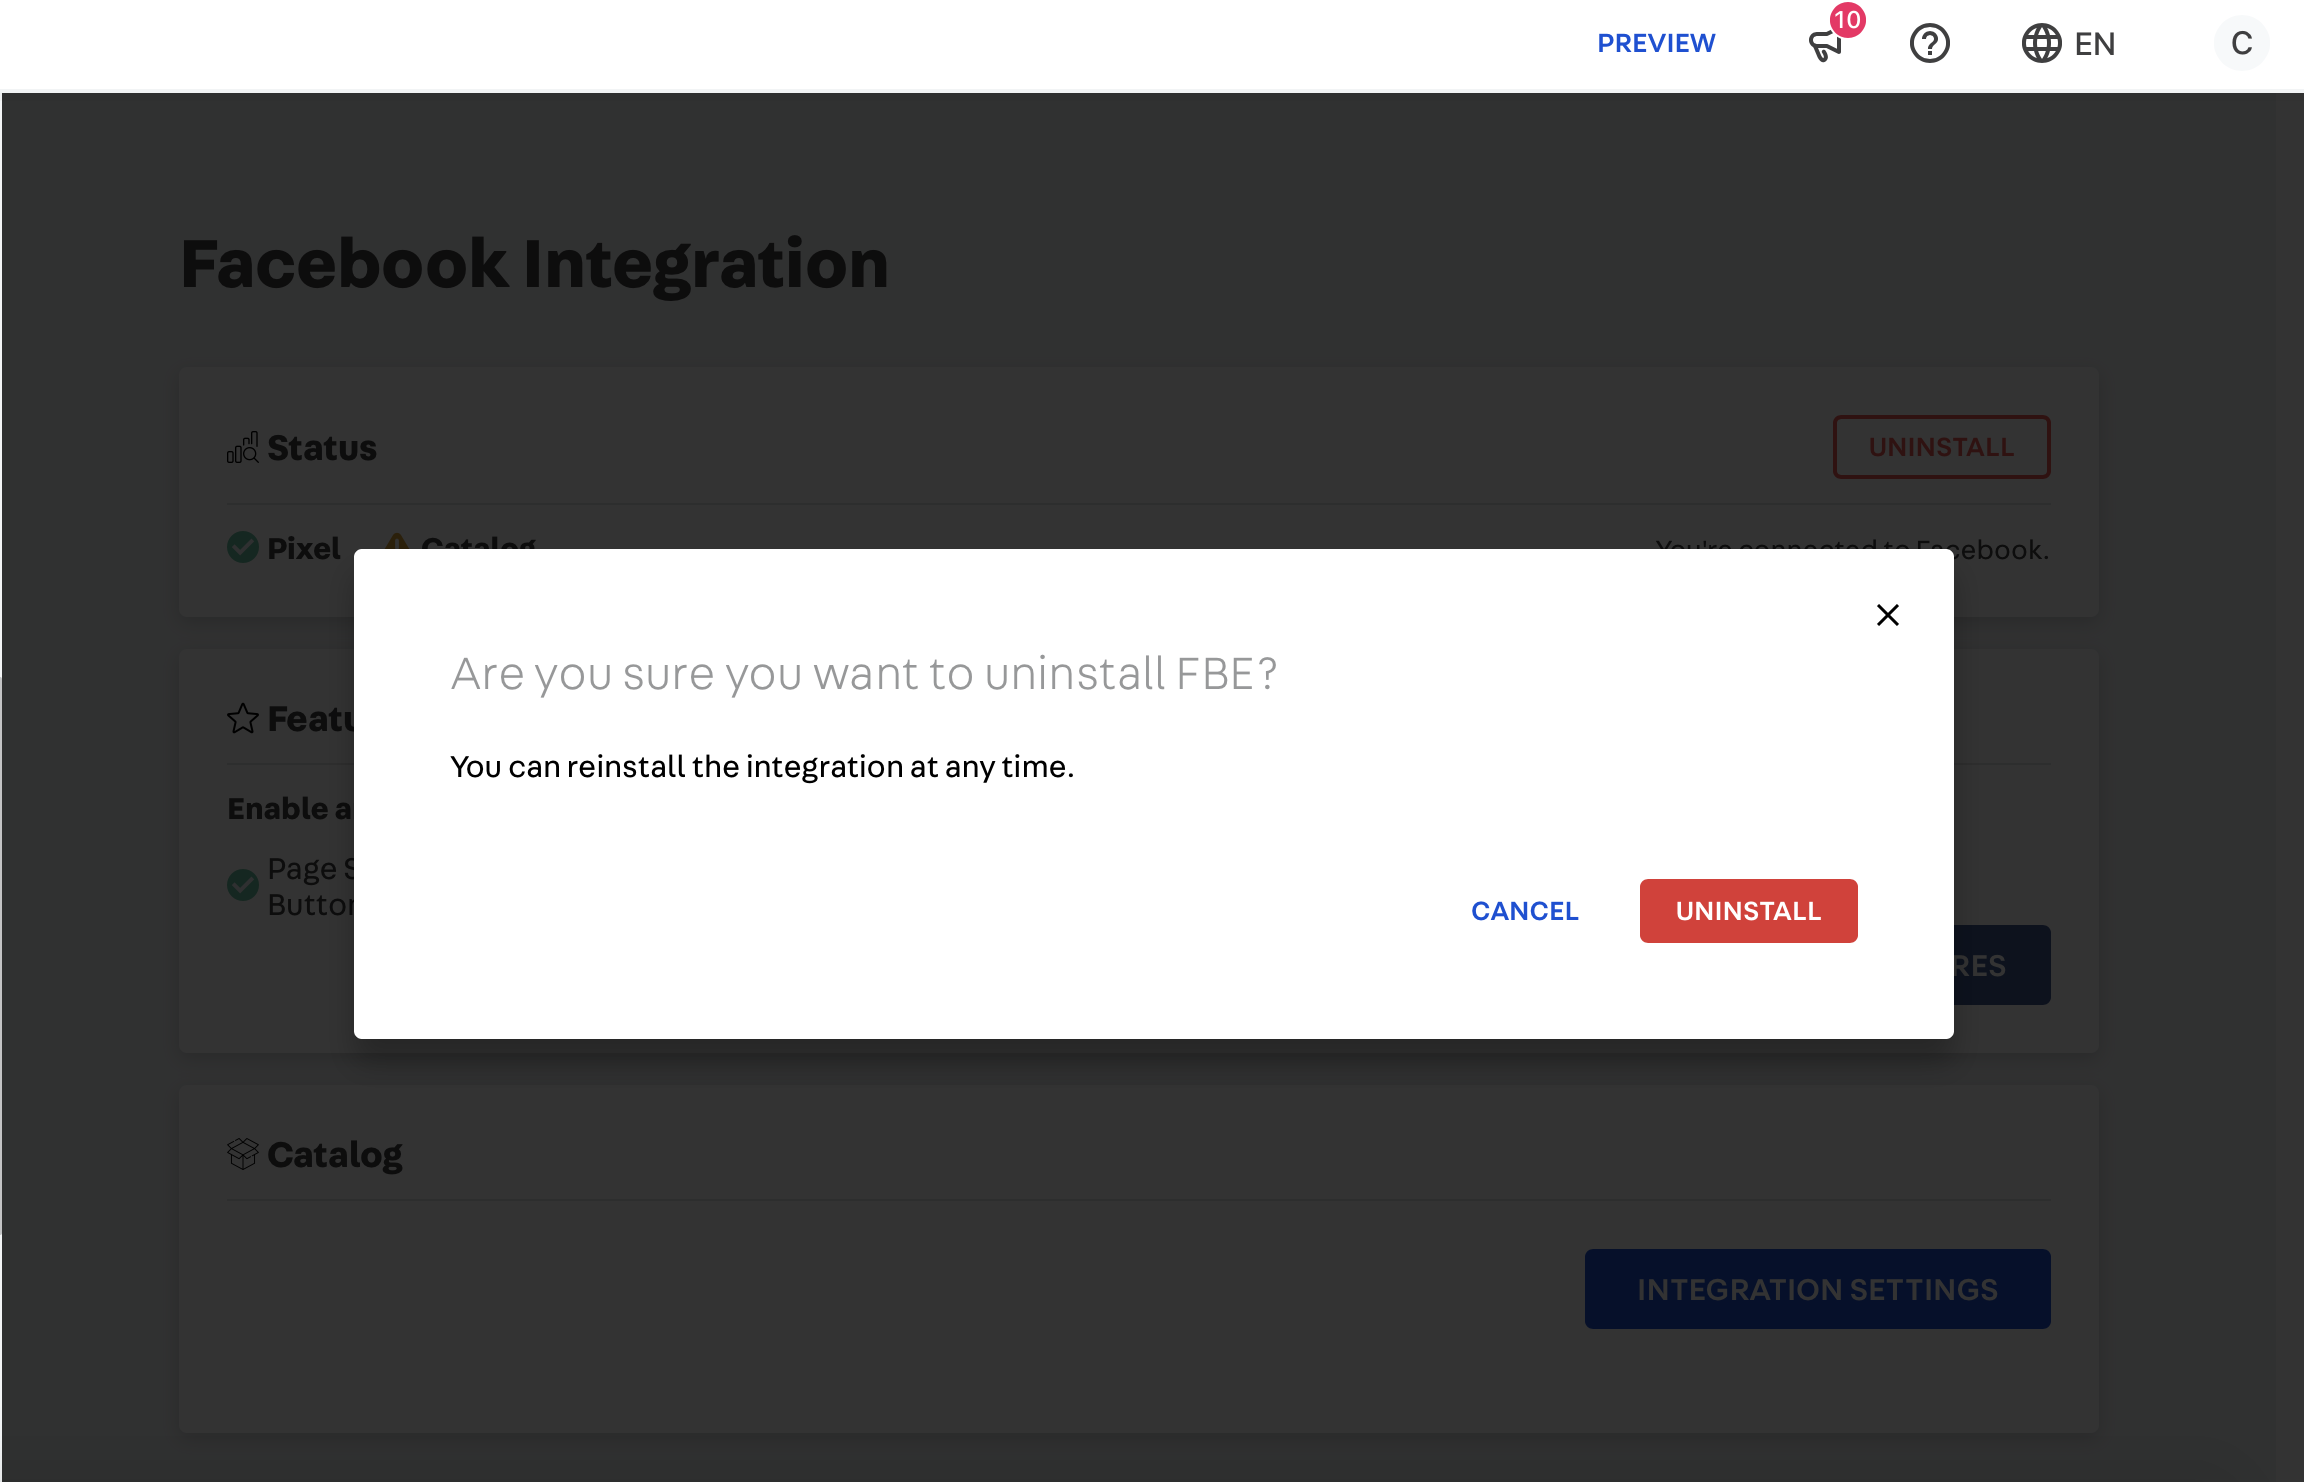
Disconnecting from FBE
At any point in time the user can disconnect from FBE. Please note that while disconnecting revokes access from the system user created for the integration, it does not stop catalog synchronization either. In order to disable it, deactivate catalog sync on bridge (/admin/bridge/#/settings?openConfig=facebook) settings.
Be aware that upon disconnecting, the app will stop sending pixel events (pixel and conversions api). It will resume working as expected if you reconnect to FBE.
Previous Facebook Pixel (vtex.facebook-pixel) installations that might have been uninstalled during FBE configuration will also be reinstalled.