Documentation
Feedback
Guides
Storefront Development

Storefront Development
Store Framework
Building pages
Creating an institutional page with Content types

Content types are templates that structure your documents. They can be pages, publications, articles, events, products, and any other type of content that you want to insert into your project. You can also use them in the CMS to create an institutional page.

To create an institutional page, follow these tutorial.

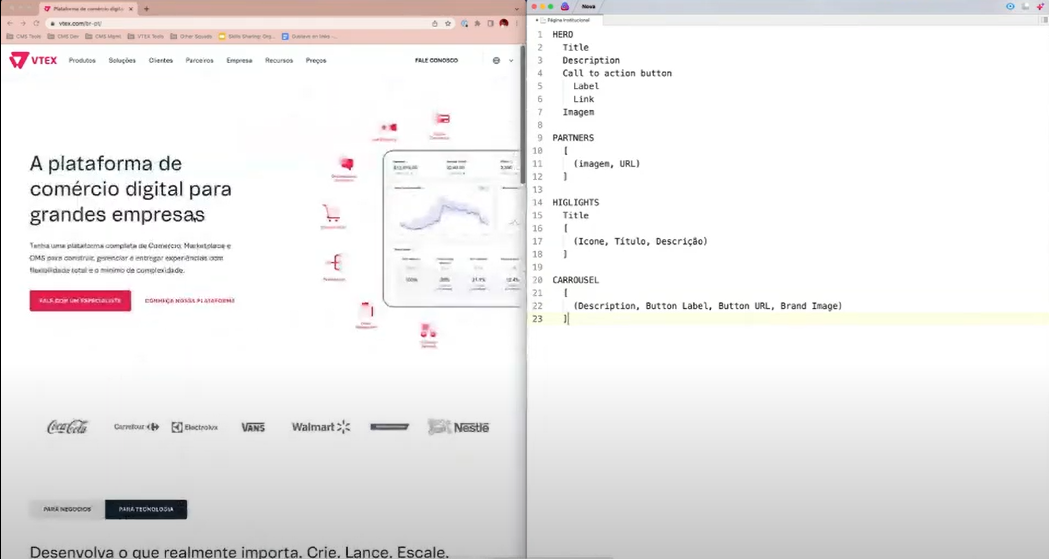
  1. Define the components of your page. In the example below, we use the ww.vtex.com page and its title, partners, highlights, and carousel components.

{"base64":"  ","img":{"width":1049,"height":559,"type":"png","mime":"image/png","wUnits":"px","hUnits":"px","length":241068,"url":"https://cdn.jsdelivr.net/gh/vtexdocs/dev-portal-content@main/images/creating-an-institutional-page-with-content-types-1-0.png"}}

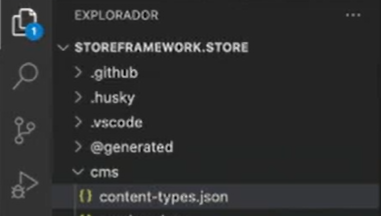
  1. In the cms folder, go to the content-types.json file.

{"base64":"  ","img":{"width":381,"height":216,"type":"png","mime":"image/png","wUnits":"px","hUnits":"px","length":47545,"url":"https://cdn.jsdelivr.net/gh/vtexdocs/dev-portal-content@main/images/creating-an-institutional-page-with-content-types-1-1.png"}}

  1. In the content-type.json file, create a new content type. To do this, define the following information:
  • id: content type ID. It is recommended to have a lowercase pattern with no spaces, like with URLs.
  • name: name that will be displayed on the page.
  • configurationSchemaSets: extra blocks that will configure the page, such as menu settings and slug blocks, for example.

_10
{
_10
"id": "landing",
_10
"name": "Landing Page",
_10
"configurationSchemaSets": []
_10
}

  1. Determine the page sections in the section.json file. To define the sections, duplicate an existing one and edit it using the new names and descriptions that you want in your page.

_35
{
_35
“name” “Hero”,
_35
“schema”: {
_35
“title” “Hero”,
_35
“description”: “Add a quick promotion with an image/action pair”,
_35
“type”: “object”,
_35
“properties”: {
_35
“title”: {
_35
“type”: “string”
_35
},
_35
“subtitle”: {
_35
“type”: “string”
_35
},
_35
“linkText”: {
_35
“type”: “string”,
_35
“title”: “Link text”
_35
},
_35
“link”: {
_35
“type”: “string”,
_35
“title”: “Link path”
_35
},
_35
“ImageSrc”: {
_35
“type”: “string”,
_35
“title”: “Image”,
_35
“widget”: {
_35
“ui:widget”: image-uploader
_35
},
_35
“Imagealt”: {
_35
“Type”: “string”,
_35
“title”: “Alt text”
_35
}
_35
}
_35
}
_35
}
_35
}

️ These fields are the structure of your page. Complete them based on what was defined in step one of this tutorial.

  1. After defining the sections, save them. If you want to view the draft, go to the repository for testing. 6. Go to the store to view the final version of your page.

Learn More

Contributors
2
Photo of the contributor
+ 2 contributors
Was this helpful?
Yes
No
Suggest edits (Github)
Contributors
2
Photo of the contributor
+ 2 contributors
On this page