Registering credentials to set up Apple ID login
This feature is in closed beta, meaning only specific customers can access it now. If you want to implement it in the future, please contact our support.
To allow users to sign in to your store with their Apple ID, you must create valid Apple credentials before setting up this type of authentication through the VTEX Admin. This guide describes all the necessary steps to get these credentials:
After following these steps to register Apple credentials, you must complete the configuration of Apple ID login in the VTEX Admin, as explained in Configuring Sign in with Apple ID.
Read Apple's documentation for more information about the required credentials.
Before you begin
You must have an Apple ID and be a member of the Apple Developer Program to follow the instructions presented in this guide.
Instructions
Step 1: Creating an App ID
Begin by following the instructions below to enable the Sign in with Apple service on an iOS, tvOS, watchOS, or macOS App ID and classifying it as the primary App ID. Read Apple’s documentation on this step for more information.
-
Sign in to the Apple Developer Portal.
-
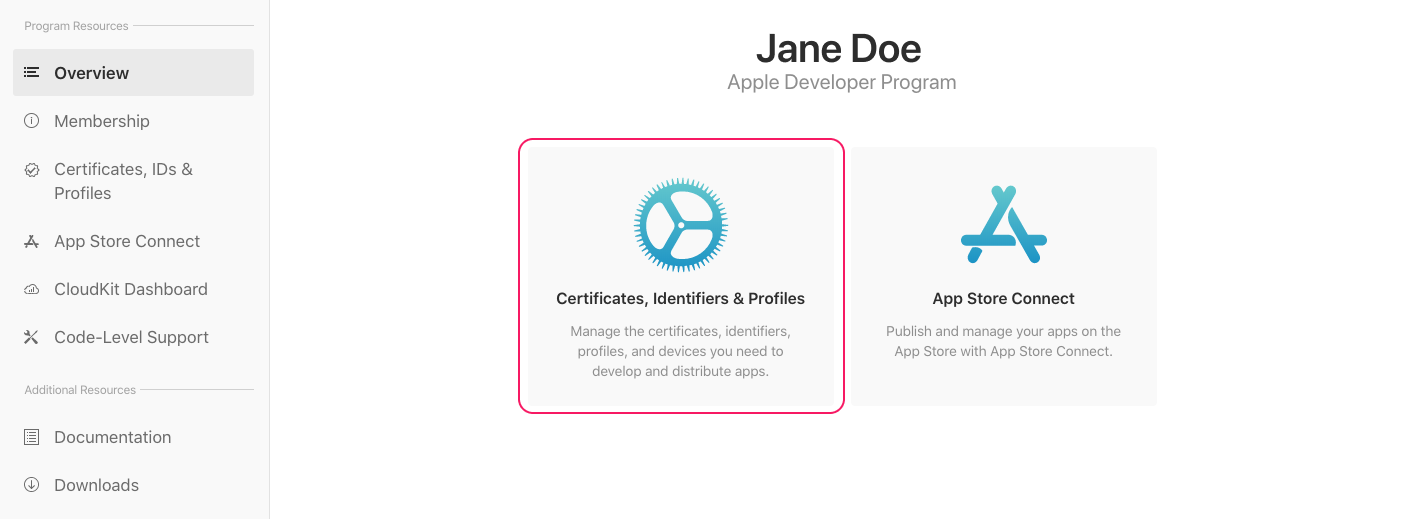
Click Certificates, Identifiers & Profiles, as shown below.
-
From the sidebar, click Identifiers, then click the blue add
+icon.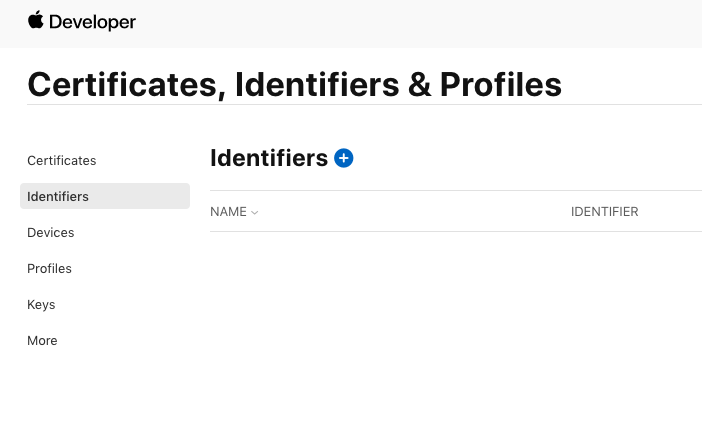
-
Choose App IDs and click
Continue:
-
Complete the fields to register the App ID:
-
Platform: Select the app platform. You can choose between iOS, tvOS, watchOS, or macOS.
-
Description: Write an internal description for the app. Don’t use special characters such as
@,&,*,',". -
App ID Prefix: Non-editable field corresponding to your Apple Developer Team ID, which acts as a prefix to your App ID. Copy this Team ID and save it somewhere, as you will use it to configure the Apple ID login in the VTEX Admin later on. You can also find this Team ID on the Apple Developer Portal top bar anytime you are logged in.
-
Bundle ID: Choose between creating an Explicit App ID, used for a single app, or a Wildcard, used for a set of apps. Check Apple’s documentation about App IDs for more details.
Then, define the Bundle ID, which works as your app’s unique identifier. It needs to be a uniform type identifier (UTI) string containing only alphanumeric characters (
A-Z,a-z,0-9), hyphens (-), and/or periods (.). The string should be in reverse-DNS format, such ascom.domainname.appname. Bundle IDs are case-sensitive.

-
-
Scroll down through the list of capabilities and check the box next to Sign In with Apple.

-
Click
Continue, review the completed information, then clickRegister.
The App ID created is the combination of the App ID Prefix (Team ID) and the Bundle ID. For example, 5PD8XQY9EW.com.mystore.
Step 2: Creating a Services ID
Next, to enable Sign in with Apple for each website, you must register a Services ID, verify your domain, and associate it to an app. The Services ID identifies the particular instance of your app and serves as the OAuth client_id.
-
In the Apple Developer Portal, click Certificates, Identifiers & Profiles, as shown below.

-
From the sidebar, click Identifiers, then click the blue add
+icon.
-
Choose Services IDs, as shown below, and click
Continue.
-
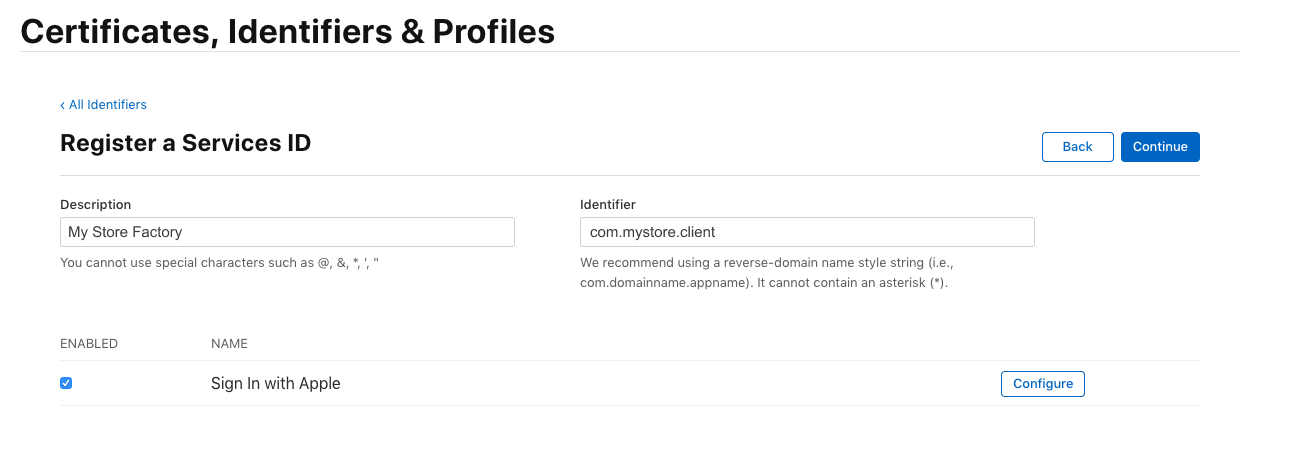
Complete the fields to register the Services ID:
- Description: Write the name of the app the user will see during the login flow. Don’t use special characters such as
@,&,*,',". - Identifier: Write the identifier which will be used as the OAuth
client_id. The string should be in reverse-DNS format, such ascom.domainname.appname.client. Don’t include asterisks (*).
- Description: Write the name of the app the user will see during the login flow. Don’t use special characters such as
-
Check the Sign In with Apple checkbox.
-
Click
Configurenext to Sign In with Apple. -
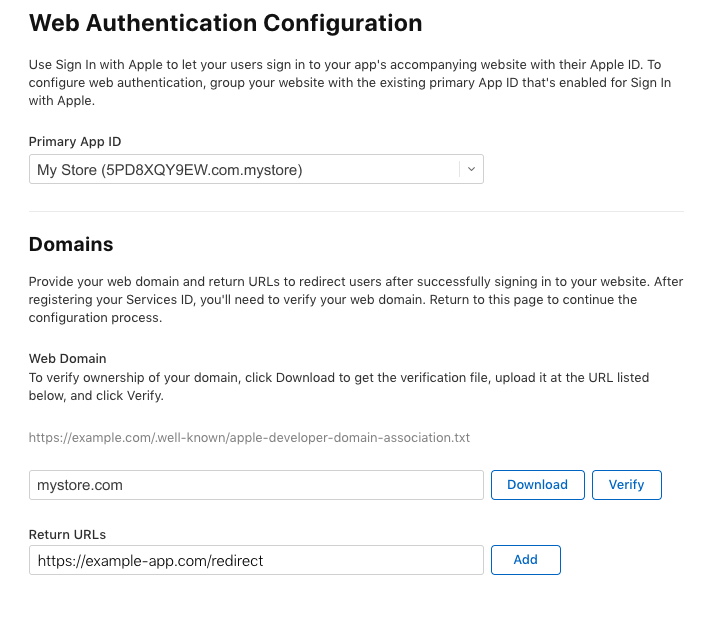
Define the domain your app is running on and the redirect URLs used during the OAuth flow:
-
Primary App ID: Make sure your associated App ID is chosen in this field. If this is the first App ID you’ve created that uses Sign In with Apple, it will probably already be selected.
-
Web Domain: Enter the domain name where your app will run.
-
Return URLs: Enter the redirect URL for your app.
You have to use a real domain here, as Apple doesn't allow localhost URLs in this step. Entering an IP address will result in failure later in the process.
-
-
Click
Save, thenContinueandRegisterto complete this step.
Now, you have an App ID, and you have created a Services ID which serves as your OAuth client_id. The Identifier you entered for your Services ID is your OAuth client_id. In the given example, this Identifier is com.mystore.client.
Step 3: Creating a private Key ID and p8 Certificate
In this step, you must create and download a private key with Sign in with Apple enabled and associate it with a primary App ID. Then, you need to retrieve the Key ID. The Key ID will later be used by VTEX to generate an OAuth client secret during setup in the VTEX Admin. Follow the steps below:
-
On the Apple Developer Portal, click Certificates, Identifiers & Profiles, as shown below.

-
From the sidebar, click Keys, then click the blue add
+icon to register a new key. -
Give your key a name, and check the Sign In with Apple checkbox.
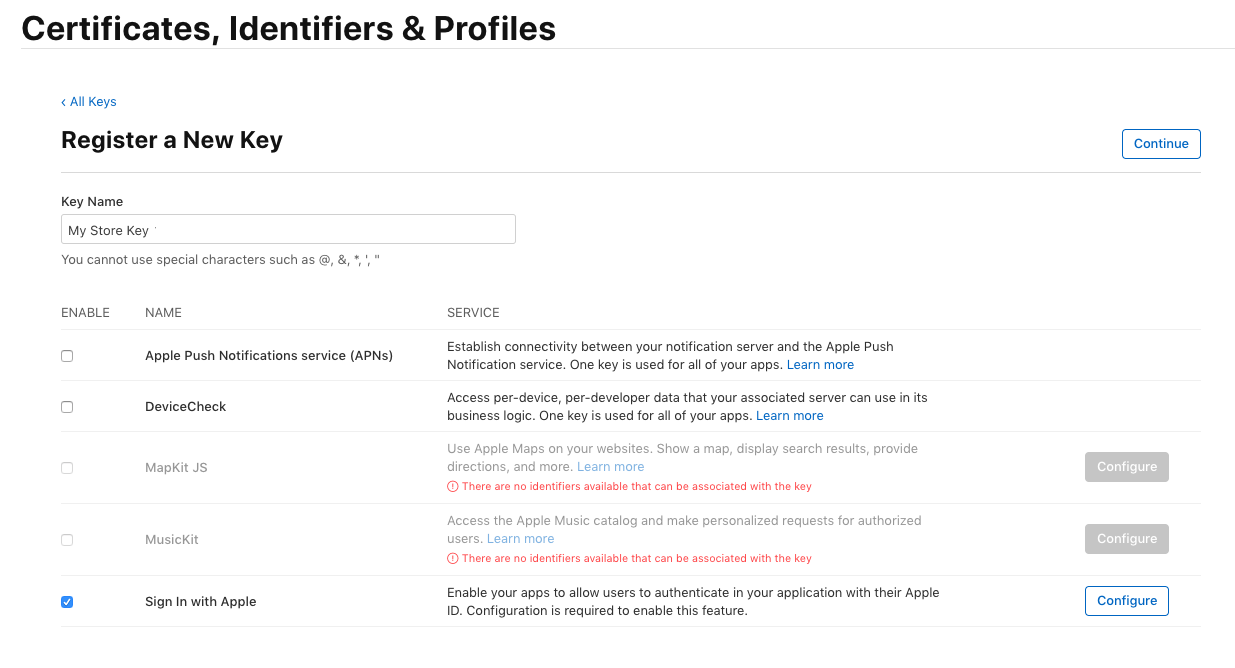
-
Click the
Configurebutton next to Sign In with Apple and select the primary App ID you created earlier, as shown below.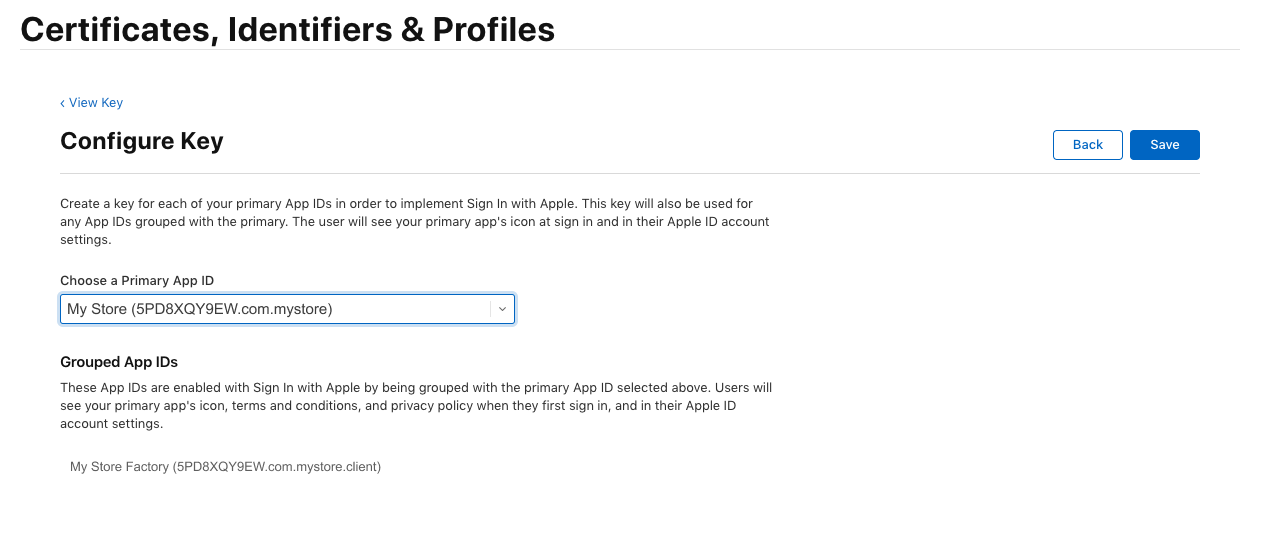
-
Click
Save. Apple will generate a new private key for you and let you download it only once as a p8 certificate, which is a text file ending in.p8.Make sure you save this file. You won’t be able to get it back again later, and you will need to upload this file when configuring login with Apple ID afterwards through the VTEX Admin.

-
Return and view the key information to find your Key ID. In the example below, the Key ID is
FGTOPLJDP.
Step 4: Configuring the Apple ID login in the VTEX Admin
After creating the required credentials, make sure you save them to set up the login with Apple ID through the VTEX Admin. You will need the following information:
| Credential | Description | Where to find it |
|---|---|---|
| Key ID | Private key identifier which will be used by VTEX to generate the OAuth client secret. | Obtained in Creating a private Key ID and p8 Certificate. |
| Team ID | Identifier of your team on the Apple Developer Portal. | Obtained in step 5 of Creating an App ID or on the Apple Developer Portal, in the top bar, once you are logged in. |
| Service ID | Services identifier, to be used as the OAuth client_id. | Obtained in Creating a Services ID. |
| p8 Certificate | Private key saved in a text file ending in .p8, generated only once by Apple. | Obtained in Creating a private Key ID and p8 certificate. |
Once you have saved the credentials, access the VTEX Admin to complete the configuration of the Apple ID login. Follow the steps described in Configuring Sign in with Apple ID to continue.